Application
This document applies to the ePot.V3 firmware used in the V3 Max and Mini series of electronic stepped attenuator & preamp controller and V3 model preamps.
What is firmware?
All of Tortuga Audio’s preamp’s are controlled by a microcontroller which is a type of embedded microprocessor widely used in commercial, industrial and consumer equipment. The software running on the microcontroller is referred to as “firmware”.
Firmware is a class of computer software that controls a specific hardware device and is typically stored in that devices’s read only memory. By its nature firmware is neither easy to erase nor is it easy to replace or update especially as compared to software applications that run on a personal computer. Firmware usually runs directly on a microcontroller’s “bare metal” without any intervening operating system.
Why update your firmware?
The simple reality is that all software have bugs. Most of the time the casual owner of equipment can ignore them. But sometimes the bug is significant and needs to be fixed. And sometimes we simply make improvements and add features you might like to have. In either cause, the only way to get the fix or improvement into your machine is to do a firmware update.
Firmware versions & changelog
Firmware for the ePot.V3 is common to both the Mini and the Max. That means there’s a unified common source code used for both the Mini and the Max. The firmware versions shown in the changelog below reflect this commonality and applies to both the Mini and Max.
However, the Mini uses a 64 pin microcontroller while the Max uses a 100 pin microcontroller and thus the pin assignments are different. Moreover, certain functionality present in the Max is not present in the Mini. As a result, the firmware download files for the Mini and Max are NOT identical and are NOT interchangeable. You must download the Mini firmware file for the Mini and the Max firmware file for the Max.
The firmware changelog listed below reflects mostly minor bug fixes, “under the hood” changes/improvements over time and sometimes a feature addition. Unless you’re having a specific problem with your current firmware, updating to the latest version is not generally warranted. However, significant revision it will be marked ** Important **.
Which firmware version do you have?
You must have an OLED display attached to your V3 in order to tell which firmware version you currently have. The firmware version is shown by selecting the “Version” menu. The firmware version is displayed as a 3 digit number as for example “FW: 108”
Firmware updating overview
Before wading into the detailed firmware updating procedure described below it’s helpful to have an understanding of the overall process and tools required.
The firmware updating process can be summarized as follows:
- Start with your V3 board/preamp powered down (not just turned off but unplugged from power)
- Download the updated firmware file from our website to your computer
- Connect your computer to the V3 with USB cable. If you have a DIY board/preamp make sure the USB-to-Serial adapter/cable is properly connected to the V3.J3 header
- Start the firmware programmer application on your computer, select the USB connection, and select the firmware file you had already downloaded
- Apply power to your V3 board/preamp and then turn it on
- Place your ePot.V3 into bootloader mode but following the menu tree down to “Firmware”, select it, and then press Enter button on your remote 5 times to place the preamp into bootloader mode
- Establish live connection between the programmer application and your V3
- Initiate the firmware download into your V3 by your programmer application
- Disconnect the USB cable and shut down your programmer application.
The USB cable
A USB cable is required to connect your computer, that is running the programmer application, with the V3, that is running the bootloader application.
If you have one of our finished V3 preamps, then you only need a plain USB cable with a Mini B plug on one end and the common type A plug on the other. The Mini B plugs into your preamp and the type A end plugs into any of your computers USB ports.
If you have one of our DIY V3 Mini or Max boards things are a bit more complicated because the V3 does not accommodate a direct USB connection. Instead, the V3 has a serial data (UART) port that has RX (receiver) and TX (transmitter) pin connections. Fortunately, there are many specialized USB-to-Serial cables and also USB-to-Serial adapters available for typically $5-10 that take care of this USB-Serial conversion.
The links below will take you to a couple of examples of these type specialized cables or adapters to be used with plain cables.
- USB to TTL Serial Cable Adapter with built-in FTDI Chipset
- Mini USB to TTL Serial Converter Adapter Module
The bootloader
In order to update the V3 firmware you need to place the V3 into “bootloader” mode. The bootloader is a specialized application that resides on the V3’s microcontroller whose sole purpose is to facilitate firmware updating. We did not create the bootloader application. It was loaded into the V3 microcontroller by the microcontroller manufacturer at the chip factory. You never have to worry about damaging or erasing the bootloader application. It resides in protected memory on the V3 controller chip.
You must start the bootloader application in order update the V3 firmware. There are 2 ways to start the bootloader program.
The first and easier way is to go to the V3 OLED display and scroll down the menu list to the “Firmware” menu item and select it. Follow the instructions on the display to start the bootloader. The display screen may go blank or you may see a message and the V3 will appear non-responsive. This is normal. It is now in bootloader mode waiting for a query from the programmer application running on your computer.
The second and more awkward way is to go to your Mini or Max board and find the S1 (Reset) and S2(Boot) pushbutton switches on the board. First press/hold down the Boot push button and then while still holding down the Boot switch also press/release the Reset button and only then release the Boot button. Nothing obvious will happen when the V3 enters bootloader mode. That’s normal and that’s OK. Read on.
STM32 Cube Programmer application
The STM32 Cube Programmer, a.k.a. the “programmer”, is a powerful multipurpose microcontroller programming application that will run under Microsoft Windows and the Apple MAC OS. The programmer is maintained and made available for free by the manufacturer of the microcontroller used in the ePot.V3. You have to download this application and install it on your computer before proceeding with any firmware update. You only have to do this download/install once.
We use the programmer to communicate with the bootloader through a USB connection. During the firmware update process the programmer erases the existing firmware and then uploads a new version.
You can download the programmer via the link below. The download is a zip file that you’ll have to unzip. Once unzipped you’ll be able to install the programmer by clicking on the installer program.
Starting with the release of version 2.10.0 in March, 2022, the STM32 Cube Programmer comes in different versions depending on whether you have a 32 or 64 bit version of Windows or if you use a MAC.
You only need to download and install the programmer application one time and not each time you update firmware.
The firmware file
The final piece of the puzzle is the updated firmware file itself that you are going to download into the V3. You retrieve this file directly from our website by clicking on the download link below. Store this data file somewhere on you computer since you will need to find it later using the programmer application.
There are 2 distinct download files listed below. If you have a finished Tortuga Audio preamp that ends with a “.V3” designator, or a DIY ePot.V3 Max controller board, only download the “Max” version and not the “Mini”. If you have a DIY ePot.V3 Mini, only download and use the “Mini” file version.
Detailed instructions
Step 1 | install the programmer application
Download the programmer files from the download link above. Install the programmer application on your Windows, MAC or Linux machine. You may also have to download the Oracle Java application which is required to run the programmer.
We do not currently provide detailed instructions on how to install this application. It installs like most any other personal computer application.
Step 2 | start the V3 bootloader
Via OLED menu
Owners of V3 preamps with an OLED display can scroll down the menu list and select “Firmware”. Then press the Enter (center) button on the remote 5 times in a row. On the 5th press, the V3 will enter into bootloader mode. The OLED display may show a message confirming it’s in bootloader mode or it might also be blank.
At this point the V3 will have become non-responsive to any further control inputs. This is normal. Carry on.
No OLED display
Owners of V3 based preamps that have no OLED display need to place their V3 Max or Mini boards into bootloader mode using the S1/S2 (Max) or S2/S3 (Mini) pushbuttons located on the board. Follow the pushbutton sequence below.
- Push/hold-down the Boot pushbutton
- Then push/release the Reset pushbutton
- Finally, release the Boot pushbutton
At this point the V3 will have become non-responsive to any further control inputs. This is normal. Carry on.
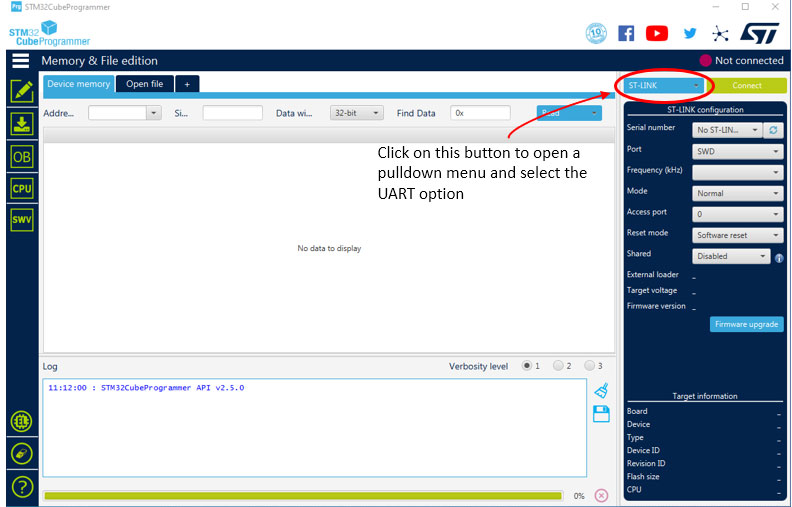
Step 3 | start programmer application & select UART
When you start the programmer application it will probably look like the image below.
The first thing to do is click on the blue pulldown menu labeled ST-LINK, and select the UART option instead.
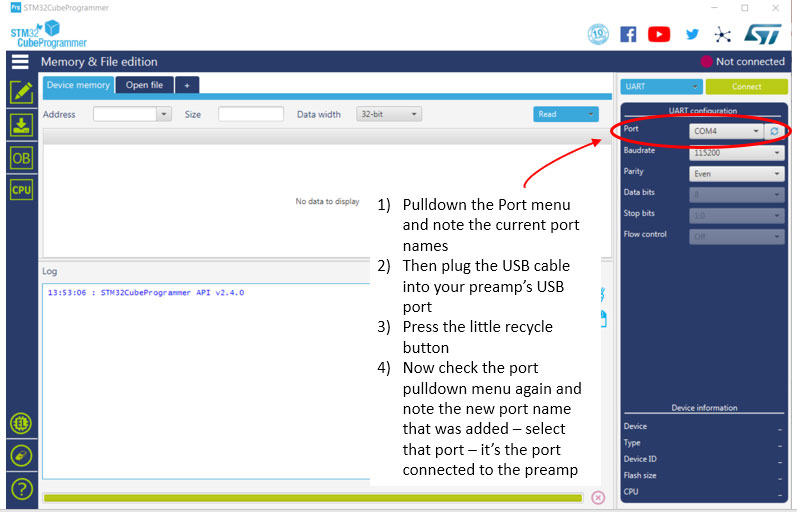
Step 4 | configure the UART port & connect the cable
Follow these substeps:
- Don’t connect the USB cable yet! If you’ve already connected it, disconnect it from the V3 preamp.
- Pull down the Port menu list and note the current available port names. None of these are the correct port because the USB cable is currently disconnected. Abandon the Port pulldown men for now.
- Next, plug the USB cable into your computer and also into your V3 preamp Mini B port.
- Pull down the Port menu list again and this time note the new port name. This new port name is the connection to the V3. Select that port.
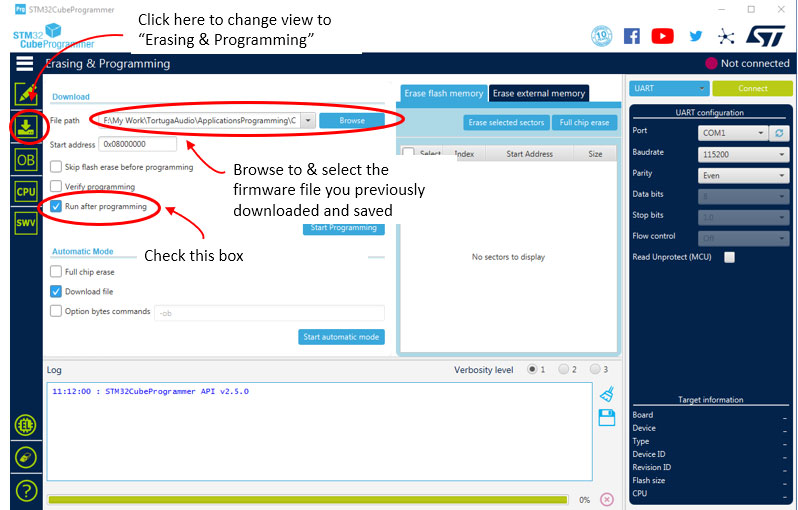
Step 5 | select the firmware file
To get the programmer to look like the image below you first have to click on the downward facing arrow icon on the left side bar to change the view to “Erasing & Programming”.
Then click on the “Browse” button and select the firmware file that you had downloaded and stored earlier.
Please also check the box labeled “Run after programming”
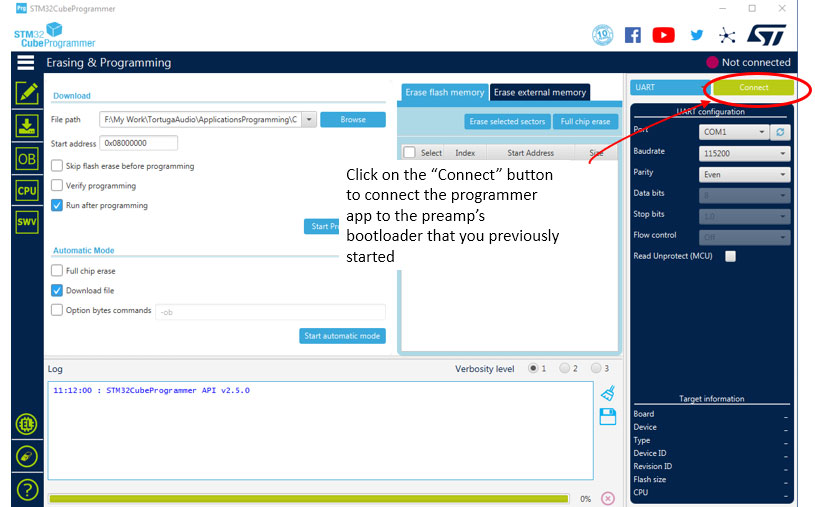
Step 6 | establish communication between programmer & bootloader
To summarize where we are at this point, you have already started the bootloader on your V3 preamp, the programmer applications is running, you’ve connected the USB cable between your computer and preamp, and you’ve selected the correct UART Port.
The next step is to establish communications between the programmer application (on your computer) and the bootloader application (on your V3 preamp). To do this press the green “Connect” button in the upper right hand corner of the programmer application.
This step is where you are most likely to encounter a problem where the programmer is not able to establish a connection with the bootloader. There can be several reasons for this but the most likely reason is that the V3 preamp bootloader has not been started or has quit. Go back and repeat Step 2 and then jump back here to step 7 and try again. You may also want to double check step 6.
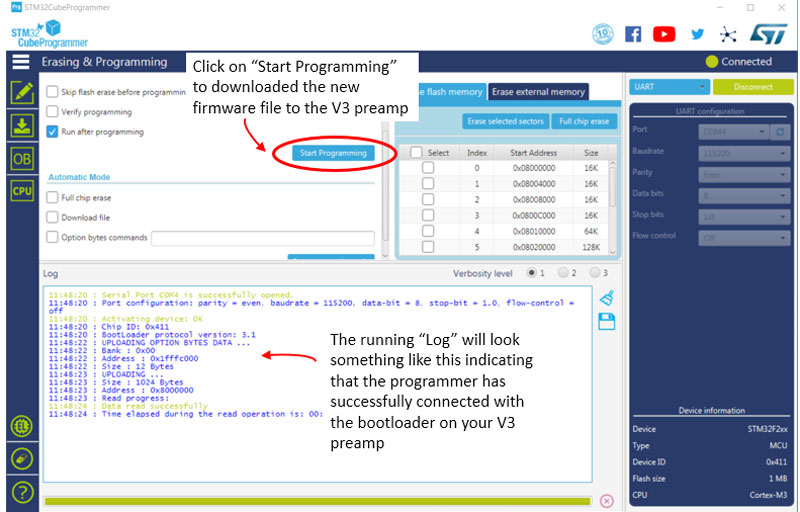
Step 7 | transfer the firmware
If you’ve made it this far you almost done. You are connected as evidenced by the green circle and “Connected” message in the upper right hand and also the running “log” info in the log window.
The last step is to start the transfer of the firmware file into the V3 preamp but clicking on the “Start Programming” button. The horizontal green progress bar at the bottom of the screen will show the firmware file transfer progress. The transfer should take less than a minute to complete.
When the transfer is complete the V3 preamp will reboot and in doing so will disconnect from the programmer application. As a result the programmer will likely report some errors that it has lost communication with the V3 preamp. That’s normal.
At this point your V3’s firmware has been updated. You can proceed to disconnect the USB cable, shut down the programmer application, and operate the V3 preamp as usual.