
The following covers ePot.V3 operation & control as it applies to both the Mini & Max versions of the ePot.V3 preamp controller and stepped attenuator, both with and without the OLED display.

If you own a V3 series Tortuga Audio preamp, you can skip down to the section titled “V3 controls | with OLED display” and focus on information specific to the V3 Max controller.
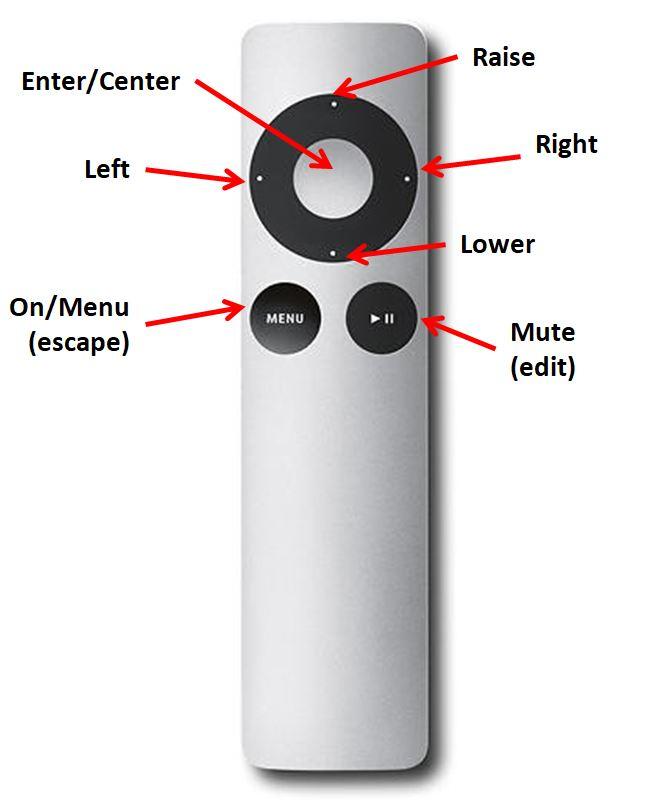
The Apple Remote
The Apple remote has only the 7 controls buttons as shown below. These are adequate for common control actions like turning on, muting, adjusting volume etc. More complex control actions require menu driven interaction between the remote and the visual OLED display.
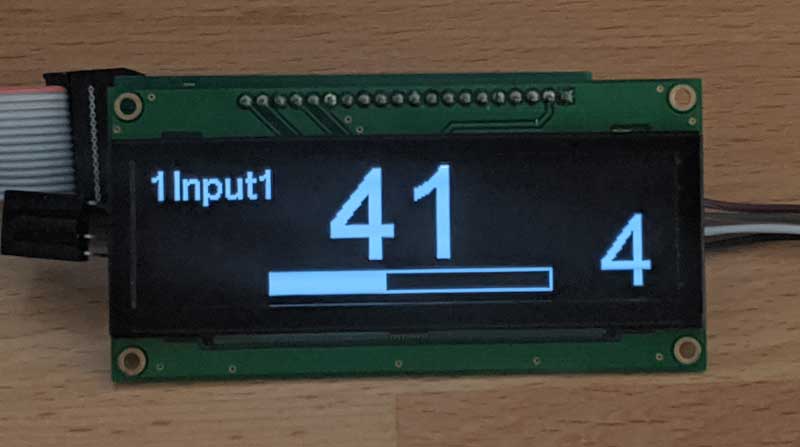
The OLED display
The OLED display is a 256×64 bit high contrast white-on-black graphical display. It works interactively with the Apple remote to allow the user to navigate a menu tree to makek control changes or select or change options. Being a graphic display, the OLED can display a wide range of text, numbers, lines, and images. These capabilities are used to good effect to enable the user to easily configure and control our preamps.
Click on the image above to jump to more detailed documentation on the OLED Display.
ePot.V3 operation & control | Status LED only
The ePot.V3 Mini and Max are designed to work best with the OLED display. However, both V3 models can also be operated without the OLED display albeit with a reduced set of control features and no ability to change controller settings/options. When operating without an OLED display is strongly recommended that a status LED light be attached to provide the most basic visual feedback.
The controls available without an OLED display include:
- turn power on/off
- raise/lower volume
- muting/unmute output
- left/right channel balance adjustment
- input switching (V3 MAX only)
A detailed description of the V3 controls without the OLED display are provided below. Where there are differences between the Mini and Max, these are noted. The control information described below assumes the following:
- No OLED display
- Status LED attached
- Remote control active (IR receiver attached | using Apple remote)
- Encoder is attached (by default in all Mini’s)
The details of each control function is contained within the expandable accordion sections below.
ePot.V3 operation & control | with OLED display
The ePot.V3 Mini and Max both designed to operate optimally with an OLED display. The OLED display provides context and feedback wherein the user is presented with a full set of menu driven controls plus the ability to change controller settings/options to suit. We high recommend using the V3 preamp controller/attenuators together with the OLED display.
The controls described below relate to both the ePot.V3 Mini and Max operating under the following conditions only:
- An OLED display is attached
- The IR receiver & encoder are connected through the OLED display
- An optional status LED is also attached (concurrent use of both OLED and status LED is possible with the Max only)
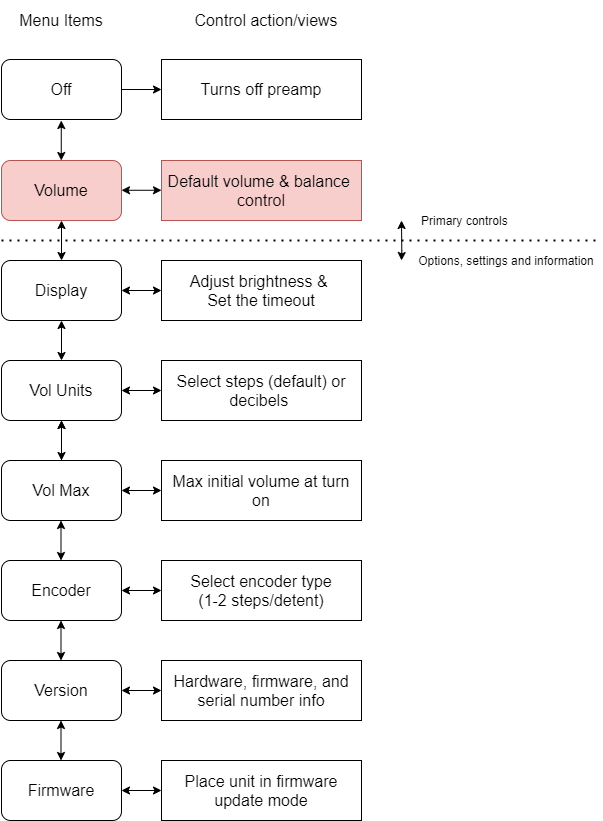
OLED control menu rules
The OLED control menu navigation “rules” are the same for both and are summarized as follows:
Menu Item Labels – The labels listed under the “Menu Items” column below are the actual labels shown in the OLED display
Navigating the List – The user navigates up/down the menu items list using the raise/lower buttons on the remote. You don’t see the whole list, you only see the current menu item label that you’re on.
Selecting a Menu Item – A menu item is selected/activated by pressing the center button on the remote. For example, if the “Off” menu item is currently being displayed, pressing the enter button will turn off the preamp. In this example, “Turns off preamp” is the resulting control action. As another example, if the “Volume” menu item is currently being displayed, pressing the enter button will switch the preamp into the default volume control action/view.
Control Action/Views – When you select/activate a menu item, you leave the menu items list and switch to the selected control action/view. Within each control action/view you use the buttons on the remote control (raise, lower, left, right, menu, mute and center) to manipulate the available controls which are different and specific to each control action. This is difficult to explain in text form and relatively easy and intuitive to understand with a little hands-on experience.
Volume Control | the default Control Action/View – The volume menu item and associated control action/view are highlighted in red. Volume control is the the default control action/view. This is where you’ll spend 99% of your time. No matter what other control action/view you might be in, in most instances you can return to the default volume control action/view by simply pressing the center button on the remote – kind of a universal “escape to home”.
Escape out via Menu button – When in any of the control action/views, pressing the Menu button on the remote will exit that control action/view and revert back to the associated menu item. Pressing the Menu button again will revert you back to the default volume control action view.
Escape back to volume control via Center button – When in any of the control action/views, pressing the center button on the remote will usually exit that control action/view and revert back to volume control action/view.
V3 Mini Control Menu | OLED
The control menus for the Mini is essentially a subset of control menu for the Max. Both control menus are shown below.
V3 Max control menu | OLED
The control menus for the Max has all the same elements as the Mini plus additional elements that are mostly related to input switching and the ability of the Max to adjust its input impedance and to calibrate the LDR module.
The control menu structure is outlined below. Each V3 control feature/function is explained in detail. Some of the control topics listed do not correspond to a specific OLED menu item. The controls that do correspond to a specific OLED control menu item are marked (menu). Controls that apply to only to the Max or Mini are marked accordingly.

Description of each control
- When power is applied the V3 will goes through a brief boot-up process
- A turtle (tortuga) will appear on the display and then fade to black
- The V3 is now turned off and in standby mode ready to be turned on and operated normally.
The V3 can be turned on either via the remote or the encoder as follow:
Turning on the preamp
Remote:
- When the V3 is off, press the Menu button on the Apple remote to turn the V3 on
Encoder:
- When the V3 is off, briefly press/release the encoder control knob/push-button on the front panel to turn the V3 on
After Turn On:
- The large text “Tortuga Audio” will appear on the display and then fade to black
- The display will then switch to the default volume control action/view on the display
- The volume will then unmute and ramp up on the display to the same setpoint it was at prior to being turned off last time
The controller can be turned off with either the remote or the encoder as described below. Off is the topmost menu item in the menu tree.
Turn off the preamp:
Remote:
- Navigate to the topmost Off menu item
- Press Center button on remote to execute the turn off process.
- The volume will then ramp down to zero
- Once volume hits zero the unit will mute and the input will disconnect
- The Tortuga Audio turtle will then appear and fade to black
- At this point the preamp is turned off and remains in standby
Encoder:
- Press/hold in encoder push button for more than 3 (but not longer than 20) seconds and release
The volume control view is the default control view. Wherever you are in the menu tree, pressing the Menu button will eventually return you to the default volume control view where you will spend 99+% of your time when using the V3.
From the volume control action/view it’s possible to:
- Raise/lower the volume level
- Adjust left/right channel balance,
- Switch between inputs
- Mute/unmute the volume
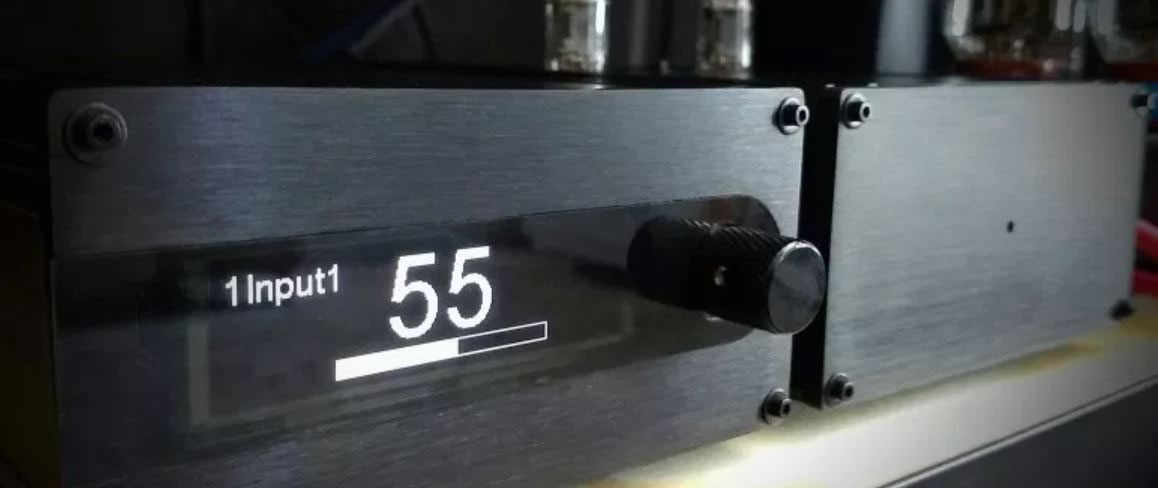
This display will show the volume numerically and also with a horizontal volume bar. Channel balance is shown by a number either to the right or left of the volume which indicates the number of balance adjustment steps right/left of neutral. In the Max only, the upper left corner will indicate the current selected input # plus the input label (“1 Input1” indicates input 1 plus the default unedited label).
Raise/lower volume level:
Volume level can be adjusted up/down using both the Remote and the Encoder.
Remote:
- Press/release the raise/lower buttons briefly on remote to increase/decrease volume by 1 step per press (buttons are quite responsive so make each press quickly)
- Press/hold the raise/lower buttons down to cause commands to repeat and ramp the volume setting up/down quickly
Encoder:
- Turn encoder right/left to adjust volume 1 step per encoder detent
- The encoder generates 20 steps per full rotation so for a 100 step volume controller the encoder will require 5 full turns to go from 0 to 100% volume
- It’s possible to turn the encoder faster than the program can respond
- There are no “stops” to the encoder. It will turn endlessly in either direction
Volume mute/unmute:
Remote:
- Press/release the mute button (lower right hand corner/play button) on the remote to toggle the volume mute state.
- Muting will cause the volume to ramp down smoothly as shown on the display. Once the level reaches zero the display will indicate it’s in the “Mute” state.
- Unmuting will cause the volume to ramp back up smoothly to its prior setpoint level.
Encoder:
- Press/release the encoder push button to toggle the volume mute state.
Max vs Mini Muting:
Please be aware that whereas the Max uses various switches when muted to minimize volume, the Mini does not have any ability to disconnect the audio signal or shunt the signal to ground while muted and so the “muted” volume level for the Mini, especially with the discrete attenuator module, may simply be the same as as the minimum Step 1 volume.
Input switching:
Input switching is now the default control action when using the left/right button as of firmware version 2.2.0. Previously, the default control action was channel balance. You enable this option by going to the “Vol Control” menu item and selecting “Input”.
Remote:
- Use the left/right buttons on the remote to switch to next input.
- Muting behavior during input switching is determined by the volume ramping options selected in menu item Vol Ramp.
Encoder (Mini):
- Control not available
Encoder (Max):
- Press/hold in the encoder pushbutton and then turn the knob 1 step to switch to next input, then release the pushbutton.
Channel balance:
When channel balanced is enabled, you can use the left/right buttons on the remote to adjust channel balance from the volume control action/view. You enable this option by going to the “Vol Control” menu item and selecting “Balance”.
Remote:
- Channel balance adjustment was the default control action when using the left/right button. The default was changed to input switching starting with Rev 2.2.0 firmware. This control action can be changed to input switching instead of balance adjustment by going to the “Vol Control” control action/view and selecting Input instead of Balance.
- Press/release the left/right buttons briefly on remote to shift channel balance left/right by 1 step per press
- Press/hold the left/right buttons down to cause commands to repeat the balance adjustment steps quickly
Encoder (Mini):
- Press/hold in the encoder push button while turning to adjust the adjust balance 1 step per encoder detent. Release push button when done adjusting.
Encoder (Max):
- Control not available
This menu item is for switching from one input to another. Only the ePot.V3 Max switches inputs. The Mini has no input switching. You can also edit the input label of each input.
There’s quite a bit going on here with input switching so we encourage you to review this info carefully.
- Inputs can be switched by both remote control and with the encoder.
- Switching inputs by remote has a fast and slow mode
- Fast mode – input is switched immediately
- Slow mode – volume ramps volume down & mutes, then the input is switched, then the volume unmutes and ramps back up
- Each time you switch an input the volume changes to match the volume last associated with that input when it was selected before
- In no event will the initial volume during input switching ever start higher than the Vol Max setting.
- If you select the “Input” option under the submenu “Vol Control”, then you can switch inputs simply by using the Left/Right buttons on the remote while in the default volume control action/view. With that option enabled you don’t have to visit the “Input” menu item discussed here.
Remote control – fast switching mode:
- Navigate to the Input menu item
- Press Center button to enter Input control action/view
- Use Right/Left buttons to immediately switch to next higher/lower input number
Remote control – slow switching mode:
- Navigate to the Input menu item
- Press Center button to enter Input control action/view
- Use the Raise/Lower buttons to tentatively select next higher/lower input – the input will not have switched yet
- Press Center button to execute switch to new input selection
- Volume will ramp down to zero
- At zero volume point the input gets switched
- Then the volume ramps up again
Encoder – fast switching only:
- Press/hold in encoder push-button while simultaneously turning the control knob right or left to switch immediately to the next higher/lower input number.
- Release encoder push-button when desired input has been selected
Edit input label:
- While within the Input control, pressing the Mute button on the remote will switch the control to label edit mode for the current input.
- The default input labeling will be “Input1” and “Input2” etc.
- While the label edit mode is active….
- The currently selected label character will be highlighted while the rest of the label characters will be dimmed
- Use the left/right remote buttons to navigate between the label characters.
- If you are already at the rightmost character, pressing the right button again on the remote will add a character to the label
- Press the Mute button to erase the currently selected character
- Use the raise/lower remote buttons to change the currently highlighted character
- All edits made are made effective and saved immediately
- Press the Enter or Menu button on the remote to escape out of label edit mode at any time
Selecting the Balance menu item takes you to the balance adjustment control action/view which allow you to adjust the left/right channel balance.
By default, adjusting channel balance is possible through the default volume control view without having to jump out and navigate to this menu item. In which case the Balance menu item is redundant and can be ignored.
The Balance menu item is for users who have elected to change the default volume control/view behavior to input switching instead of channel balance adjusting. In which case this where you have to go to adjust channel balance.
- Balance control is available with the Remote for both the Mini and Max
- Balance control is also possible with the Encoder but only for the Mini
- You can adjust the balance up to 20 steps in either direction.
- Each step represents approximately 0.5-0.6 dB of volume adjustment
The internal balance adjustment logic attempts to maintain a constant volume while balance is adjusted. The way this works is every other balance adjustment step increase actually decreases a step in the opposite channel. For example, a +1 to the right increases the right channel volume +1 step. A +2 to the right increases the right channel +1 step and decreases the left channel -1 step. This mechanism is hidden. All you see is the 2 on the right side of the display (if one is present).
Remote:
- Navigate to the Balance menu item
- Press the Center button to select the Balance control action/view
- Use the Left/Right buttons to adjust channel balance left or right
- The number of balance adjustment steps will be shown either to the right or left of the volume level on the display.
- When the channel balance is neutral, no channel balance values will be shown (i.e. zero “0” values are not shown).
Encoder (Mini only):
- At any time, press/hold-in the encoder pushbutton while simultaneously turning the encoder left or right
- The OLED display will show the changes on the display
- The status LED will blink quickly 3 times when the channel balance hits neutral (zero).
Display (menu)
Display
The Display control provides for both display brightness adjustment and display timeout adjustment from a single control action/view.
The brightness control allows the user to adjust the display brightness between 1 and 14.
The timeout setting allows the user to set a timeout period in seconds after which the display will turn off. Pressing an key on the remote or turning the encoder will “wake up” the display again. The minimum setting is 5 seconds and the maximum is 120 seconds (2 minutes).
Brightness adjustment:
Remote:
- Navigate to the Display menu item
- Press Center button to enter Display control action/view
- Use Raise/Lower buttons to increase/decrease display brightness
- As you change brightness level the level number itself will actually change brightness while the rest of the info on the display retains the original brightness
- Press Center button to lock in the new brightness level
Encoder:
- Control not available
Timeout adjustment:
Remote:
- By default the display timeout feature is disabled (set to off).
- When enabled, the display will turn itself off when the timeout timer times out.
- You can adjust the timeout period from 5 to 120 seconds.
- Navigate to the Display menu item
- Press Center button to enter Display control action/view
- Use the Right/Left buttons to increase/decrease the display timeout period
- When you decrease the period to less than 5 seconds the timeout feature turns off
- The display shows the timeout period as you adjust it.
- When the timeout feature is disabled the display shows “Off”
Encoder:
- Control not available
The Imped/Cal (impedance/calibration) control allows for adjusting input impedance and initiating calibration of the LDRs; two very interrelated aspects of the V3 design and LDR attenuation.
The topics of adjustable impedance and LDR calibration are outside the scope of this section but you are strongly encouraged to read up on these topics as they are unique to Tortuga Audio and are an essential part of how the V3 functions with LDR attenuation.
Impedance adjustment:
Remote:
- Navigate to the Imp/Cal menu item
- Press Center button to enter Imp/Cal control action/view
- Impedance setting #1 is fixed by default and cannot by changed
- If the current impedance setting is labeled “Locked” that means it requires calibration
- Used the Raise/Lower buttons to navigate through the impedance settings. If 2 or more settings have already been established, moving between them will literally switch the impedance of the preamp to the setting/level number shown on the display.
- An unused impedance setting is labeled “Off”.
- Use the Right/Left buttons to increase/decrease the impedance level of the current impedance setting
- Press the Play button on the remote to initiate calibration of the currently selected impedance setting/level.
Encoder:
- Control not available
About “Locked” Impedance:
- When an impedance setting/level is marked “LOCKED” it means that setting/level combination has not been through calibration or even if it had been previously it now requires calibration be performed.
- When the current setting/level is marked “LOCKED” you will not be able to switch to another setting including even the default setting #1. A “LOCKED” setting demands resolution before moving on.
- There only 2 ways to resolve a “LOCKED” setting.
- #1 Run calibration
- #2 Reduce the impedance level to zero which effectively disables that specific impedance setting and allows you to switch to another setting.
Running calibration after a Reset:
- The reset process destroys all attenuation tables for all impedance settings including the attenuation table for the default #1 impedance setting.
- After the reset process is completed, the user MUST put the preamp through 2 cycles of calibration at the default setting #1/20k.
- Some versions of the firmware may do this automatically but the user should ALWAYS check if the impedance/cal status says ** LOCKED ** which indicates it needs to be run through calibration.
Initiating calibration:
Remote:
- Navigate to the Imp/Cal menu item
- Press Center button to enter Imp/Cal control action/view
- Press the Play button on the remote to initiate calibration of the currently selected impedance setting/level.
- When calibration is initiated the display will change to the calibration status display.
- When calibration is complete the preamp will return to the volume control action/view.
- Press the Enter button to interrupt and quit calibration at any time if you don’t wish to wait for the cycle to complete.
Encoder:
- Control not available
Cal Auto is a feature that allows LDR calibration to be run automatically based on a timer set up by the user.
Automatic calibration will only run when the unit is turned off and never when the unit is turned on and operating. If calibration is running and the user wishes to turn on the preamp, the calibration process will immediately terminate and allow the preamp to be turned on.
The user can adjust the timer based on either the number of hours, days or months between between each calibration run.
Cal Auto is enabled by default and set to auto calibrate once a month.
The #Inputs (number of inputs) feature allows the user to adjust the total number of inputs that the preamp can switch between. Every V3 Max has input switching installed for 6 inputs even if fewer than 6 are actually connected to the board. Inputs are numbered sequentially 1-6 so if say 3 inputs are allowed via this control then the preamp will only be able to switch between inputs 1, 2 and 3 regardless of how many inputs may actually be connected to the board.
# input adjustment:
Remote:
- Navigate to the #Inputs menu item
- Press Center button to enter #Inputs control action/view
- Use the Raise/Lower buttons to adjust the number of inputs available or desired.
- If “1 input” is selected then all the input related menus and controls will become disabled and in the case of a menu item will no longer appear in the menu list.
Encoder:
- Control is not available
The Vol Ramp feature allows the user to choose between 4 different volume change behaviors when muting the preamp and/or switching inputs. These 4 options are explained below:
Option #1 – No ramp down | Ramps back up (default):
- Volume will mute immediately. When unmuting, the volume will gently ramp back up to its previous setpoint.
Option #2 – Ramps down | No ramping back up:
- Volume ramps down smoothly when muting or changing input. Then volume goes immediately back up to previous setpoint.
Option #3 – Ramps both down and up:
- Volume ramps smoothly both down and up when muting, unmuting or changing input
Option #4 – Ramping disabled:
- Volume ramping is disabled. Volume goes immediately to zero and back up to previous setpoint when muting, unmuting or changing input.
Remote:
- Navigate to the Vol Ramp menu item
- Press the Center button to enter the Vol Ramp control action/view
- Use the Raise/Lower buttons to select the desired option
- Press the Center button to lock in the selection and revert back to the default volume control action/view
Encoder:
- Control not available
The Vol Control feature allows the user to choose between balance adjustment, input switching or a combination input/phase reversal as a secondary control within the default volume control action/view. These 3 options are explained below:
Option #1 – Balance (default):
- Selecting Balance means that the Right/Left buttons within the volume control action/view will be used to adjust channel balance
Option #2 – Input:
- Selecting Input means that the Right/Left buttons within the volume control action/view will be used to switch inputs
Option #3 – Input & Phase Reversal:
- Selecting Input & Phase Reversal means that the Right button within the volume control action/view will be used to switch to the next input
- The Left button within the volume control action/view will be used to toggle Phase Reversal on the balanced inputs of certain preamps that are especially equipped with the Phase Reversal feature. Unless you know for certain that your preamp has balanced inputs with phase reversal, selecting this option will have no effect.
Changing the Vol Control option:
Remote:
- Navigate to the Vol Control menu item
- Press the Center button to enter the Vol Control control action/view
- Use the Raise/Lower buttons to select the desired option
- Press the Center button to lock in the selection and revert back to the default volume control action/view
Encoder:
- Control not available
The Vol Units control allows the user to view the volume level shown in the default volume control action/view as either a step number (default) or in units of dB (decibels) of attenuation.
Changing the volume units:
Remote:
- Navigate to the Vol Units control menu item
- Press Center button to enter Vol Units control action/view
- Use the Raise/Lower buttons to toggle between Steps and dB
- Press Center to lock in volume display units and return to the default volume control action/view.
Encoder:
- Control not available
The Vol Max control is an equipment protection feature that allows the user to adjust the maximum allowable initial volume associated with any of the following events:
- When the preamp gets turned on
- When another input is selected
For example, let’s say the preamp had been set on input #2 when last turned on and the volume had been on step 80 when the preamp was turned off. Let’s also assume that the Vol Max setting is set at 60 (default). When the preamp is next turned on, the preamp will first recover the saved volume setting of 80 associated with input #2 but will reset it to 60 before the actual preamp volume level command is transmitted to the attenuation circuit.
Changing the max allowable initial volume:
Remote:
- Navigate to the Vol Max control menu item
- Press Center button to enter Vol Max control action/view
- Use the Raise/Lower buttons to adjust the value between 1 and the maximum step available in your preamp.
- Setting Vol Max to the maximum volume of your preamp effectively defeats any protection provided by this feature.
Encoder:
- Control not available
The Vol Mute control in available only in the Max and is only relevant when the Max is also connected to a buffer that has its own muting relay. When enabled, the Max will transmit a mute command to a connected buffer. Muting relays typically connect the output signal to ground effectively killing the output. Some amplifiers do not tolerate this and may hum during grounded muting. This control allows the user to disable the mute command coming from the Max. This is a fairly rare scenario and most users can simply ignore this control.
Remote:
- Navigate to the Vol Mute control menu item
- Press Center button to enter Vol Mute control action/view
- Use the Raise/Lower buttons to select between Enable and Disable
- Press Enter/Center button to lock in the change
Encoder:
- Control not available
Version provides information only. There is no control action per se associated with this menu item, only information to view.
To view version info:
Remote:
- Navigate to the Version info menu item
- Press Center button to access the version info view showing the following information:
- Model: The model number of the V3 based product
- Hardware: The hardware version of the V3 controller board
- Firmware: The version number of the current firmware
- Imp: For Mini boards this is the fixed impedance of the LDR module currently installed
- Atten: Indicates whether the installed attenuation module is an “LDR” or a “DIS1” (discrete) type module.
- SN: Serial number of the board
Encoder:
- Control not available
Reset allows the user to erase all impedance and calibration data of the currently installed LDR attenuation module in an ePot.V3 Max. Cal Reset is a convenience feature in the event the user wishes to clear out and start over with setting up calibration for an LDR module. Cal Reset is not a panacea or “go to” remedy for resolving problems with your preamp.
After running Cal Reset, you MUST run calibration (twice) to rebuild the attenuation tables for the default #1 impedance setting.
To run Cal Reset:
Remote:
- Navigate to the Reset control menu item
- Press Center button to access the reset control action/view
- To initiate Reset press the Right button on the remote 5 times. Note the press count on the display.
- Once reset is initiated it can’t be stopped.
- If the unit is turned off or powered down before reset is completed it will resume or start over when next powered up.
- When reset is completed the controller will revert to the default volume control action/view
Encoder:
- Control not available
Remote pairing is a procedure to pair your V3 preamp with a a specific Apple remote. Each Apple remote has an internal ID number between 0 and 255 (256 possible IDs) that it transmits with every command it sends. The ePot.V3 will only respond to commands from the one remote/ID number it is paired with. The pairing process teaches your preamp the ID number of your remote. It will then ignore all other Apple remotes with any of the 255 other ID numbers.
The Apple remote ID numbering scheme allows you to own multiple Apple products each responding to a different Apple remote in order to avoid conflicts. For this to work each product must be deliberately paired with a remote with a unique ID number.
Remote pairing procedure:
- First, turn on the preamp
- Press/hold in the encoder knob/push-button for 20+ seconds
- When the display changes and indicates the unit is in pairing mode, release the encoder. For units without an OLED display, the status LED will begin to blink quickly.
- Then press the Center button on the remote. This should complete the pairing process and the preamp should revert to the default volume control action/view. For units with only a status LED, the status LED will stop blinking and remain on.
- Repeat the above procedure if the controller still does not respond to the remote
