The following covers ePot.V3 operation & control as it applies to both the Mini & Max versions of the ePot.V3 preamp controller and stepped attenuator, both with and without the OLED display.

If you own a V3 series Tortuga Audio preamp, you can skip down to the section titled “V3 controls | with OLED display” and focus on information specific to the V3 Max controller.
The Apple Remote
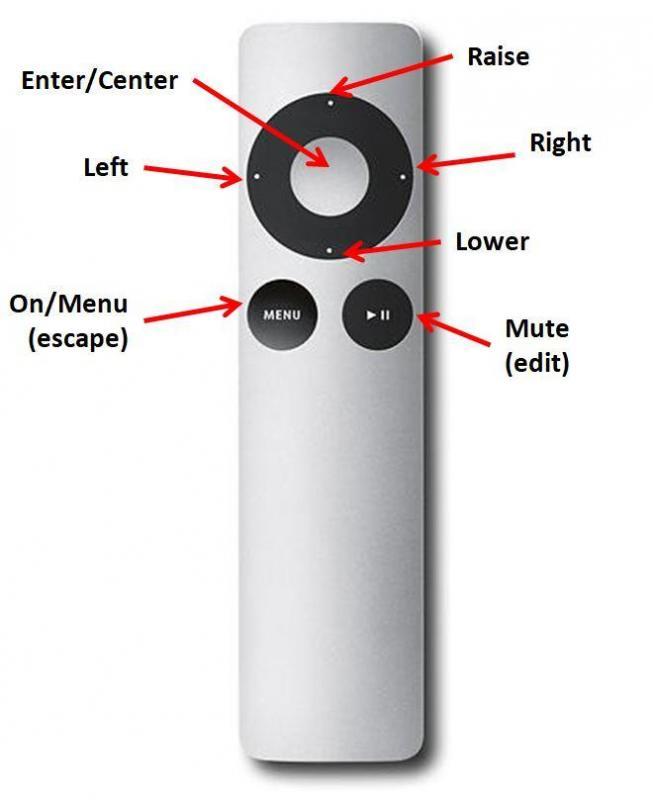
The Apple remote has only the 7 controls buttons as shown below. These are adequate for common control actions like turning on, muting, adjusting volume etc. More complex control actions require menu driven interaction between the remote and the visual OLED display.
The OLED display
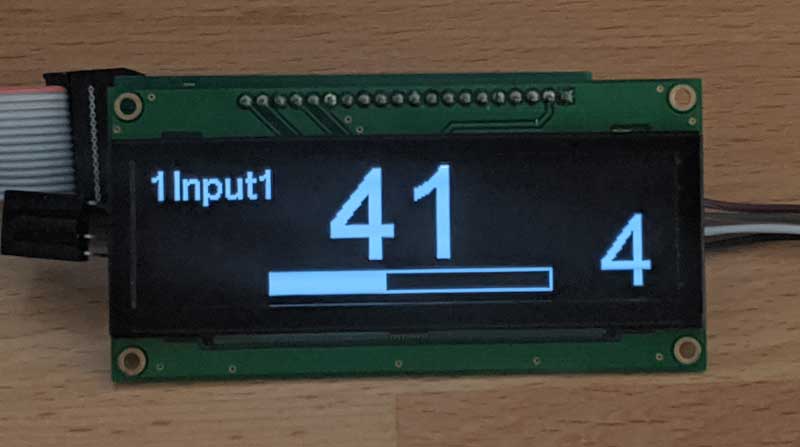
The OLED display is a 256×64 bit high contrast white-on-black graphical display. It works interactively with the Apple remote to allow the user to navigate a menu tree to makek control changes or select or change options. Being a graphic display, the OLED can display a wide range of text, numbers, lines, and images. These capabilities are used to good effect to enable the user to easily configure and control our preamps.
Click on the image above to jump to more detailed documentation on the OLED Display.
ePot.V3 operation & control | Status LED only
The ePot.V3 Mini and Max are designed to work best with the OLED display. However, both V3 models can also be operated without the OLED display albeit with a reduced set of control features and no ability to change controller settings/options. When operating without an OLED display is strongly recommended that a status LED light be attached to provide the most basic visual feedback.
The controls available without an OLED display include:
- turn power on/off
- raise/lower volume
- muting/unmute output
- left/right channel balance adjustment
- input switching (V3 MAX only)
A detailed description of the V3 controls without the OLED display are provided below. Where there are differences between the Mini and Max, these are noted. The control information described below assumes the following:
- No OLED display
- Status LED attached
- Remote control active (IR receiver attached | using Apple remote)
- Encoder is attached (by default in all Mini’s)
The details of each control function is contained within the expandable accordion sections below.
ePot.V3 operation & control | with OLED display
The ePot.V3 Mini and Max both designed to operate optimally with an OLED display. The OLED display provides context and feedback wherein the user is presented with a full set of menu driven controls plus the ability to change controller settings/options to suit. We high recommend using the V3 preamp controller/attenuators together with the OLED display.
The controls described below relate to both the ePot.V3 Mini and Max operating under the following conditions only:
- An OLED display is attached
- The IR receiver & encoder are connected through the OLED display
- An optional status LED is also attached (concurrent use of both OLED and status LED is possible with the Max only)
OLED control menu rules
The OLED control menu navigation “rules” are the same for both and are summarized as follows:
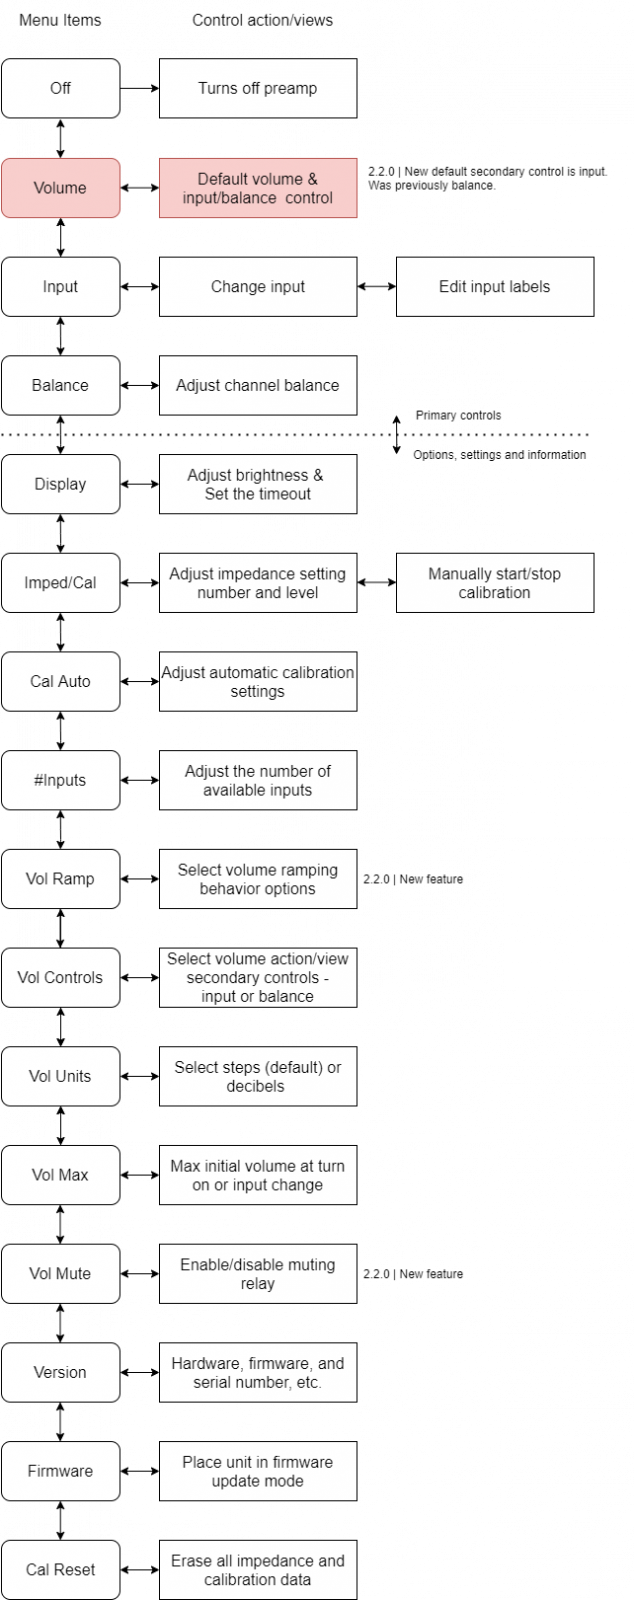
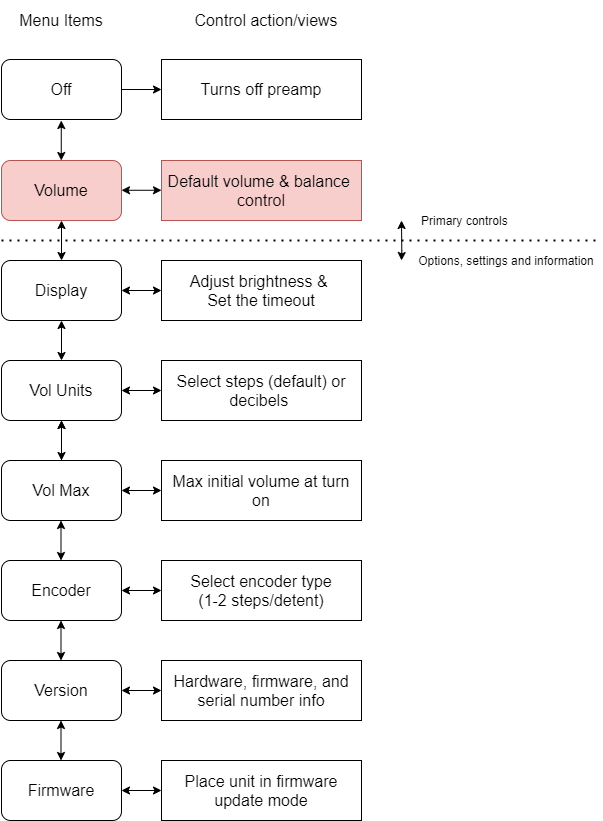
Menu Item Labels – The labels listed under the “Menu Items” column below are the actual labels shown in the OLED display
Navigating the List – The user navigates up/down the menu items list using the raise/lower buttons on the remote. You don’t see the whole list, you only see the current menu item label that you’re on.
Selecting a Menu Item – A menu item is selected/activated by pressing the center button on the remote. For example, if the “Off” menu item is currently being displayed, pressing the enter button will turn off the preamp. In this example, “Turns off preamp” is the resulting control action. As another example, if the “Volume” menu item is currently being displayed, pressing the enter button will switch the preamp into the default volume control action/view.
Control Action/Views – When you select/activate a menu item, you leave the menu items list and switch to the selected control action/view. Within each control action/view you use the buttons on the remote control (raise, lower, left, right, menu, mute and center) to manipulate the available controls which are different and specific to each control action. This is difficult to explain in text form and relatively easy and intuitive to understand with a little hands-on experience.
Volume Control | the default Control Action/View – The volume menu item and associated control action/view are highlighted in red. Volume control is the the default control action/view. This is where you’ll spend 99% of your time. No matter what other control action/view you might be in, in most instances you can return to the default volume control action/view by simply pressing the center button on the remote – kind of a universal “escape to home”.
Escape out via Menu button – When in any of the control action/views, pressing the Menu button on the remote will exit that control action/view and revert back to the associated menu item. Pressing the Menu button again will revert you back to the default volume control action view.
Escape back to volume control via Center button – When in any of the control action/views, pressing the center button on the remote will usually exit that control action/view and revert back to volume control action/view.
V3 Mini Control Menu | OLED
The control menus for the Mini is essentially a subset of control menu for the Max. Both control menus are shown below.
V3 Max control menu | OLED
The control menus for the Max has all the same elements as the Mini plus additional elements that are mostly related to input switching and the ability of the Max to adjust its input impedance and to calibrate the LDR module.
The control menu structure is outlined below. Each V3 control feature/function is explained in detail. Some of the control topics listed do not correspond to a specific OLED menu item. The controls that do correspond to a specific OLED control menu item are marked (menu). Controls that apply to only to the Max or Mini are marked accordingly.
