LDR1B.V25K Balanced Passive Preamp Kit
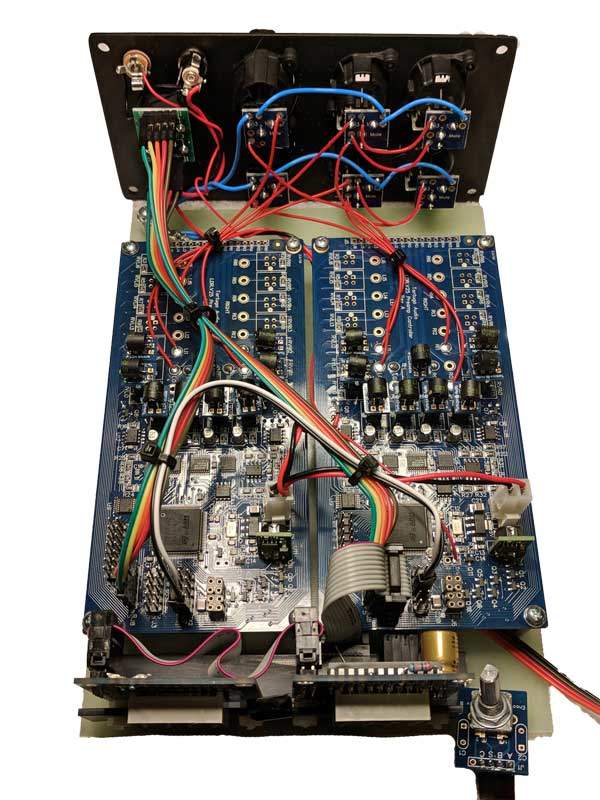
Price: $1,095
This is a legacy product and is no longer produced or sold by Tortuga Audio.
The LDR1B.V25K is a complete balanced passive preamp kit built around a pair of Tortuga Audio V25 preamp controller boards, orderable with either a single XLR input & dual outputs, or dual inputs & a single output. All circuit boards are provided fully built and tested — no soldering of components to circuit boards required. The kit includes everything needed to assemble a complete audiophile grade balanced passive preamp: enclosure, front/rear panels, graphic OLED display, XLR jacks, power supply, manual encoder/knob, remote, and wire.
| The kit is sonically identical to the LDR1B.V25 Balanced Passive Preamp that Tortuga Audio sold as a finished product, built around the same V25 preamp controller board — that page is the technical reference for the electronics themselves. |
Kit vs. finished unit
The differences between the base kit and the non-kit LDR1B.V25 are:
-
Front panel — the kit’s is acrylic, where the finished unit uses brushed anodized aluminum with an acrylic inlay
-
Hookup wiring — the kit uses MilSpec silver-coated stranded copper wire (Neotech UP-OCC available as a paid upgrade), where the finished unit uses Neotech UP-OCC solid copper hookup wire standard
What’s included
| Qty | Item |
|---|---|
2 |
LDR.V25 preamp controller board |
1 |
2.95" x 6" x 8" black powder coated extruded aluminum enclosure box |
1 |
0.25" x 2.95" x 6" see-through dark acrylic front panel, cut for the encoder and knob |
1 |
0.08-0.10" x 2.95" x 6" black anodized rear panel, cut for jacks |
1 |
Knurled black enameled Fender Telecaster-style encoder control knob |
4 |
Peel-and-stick urethane rubber feet |
3 pair |
XLR jacks (1 input & 2 outputs, or 2 inputs & 1 output) |
1 |
DC power jack |
1 |
12 VDC trigger-out phono jack |
8 |
Sets of socket head black oxide sheet metal screws with washers (front/rear panel) |
1 |
External "wall-wart"/"brick" 12 VDC power supply, 120 or 240 VAC |
1 |
4-conductor cable, encoder to display module |
1 |
Ribbon cable, display module to V25 board |
1 |
Rotary encoder module with nut and washer |
1 |
Blue master display board with IR receiver module soldered in place |
1 |
Blue slave display board |
1 |
Ribbon cable, master to slave display module |
1 |
Display module mounting bar (plastic angle) |
4 |
Sets of nylon threaded rods with nuts & washers for the master display mounting bar |
1 |
USB cable, V25 USB port to rear panel |
10 ft |
White #24-26 gauge silver-coated copper wire (audio hookup) |
1 ft |
Red #20 gauge silver-coated copper wire (power hookup) |
1 ft |
Red #26 gauge silver-coated copper wire (trigger hookup) |
1 ft |
Black #20 gauge silver-coated copper wire (power hookup) |
1 ft |
Black #26 gauge silver-coated copper wire (trigger hookup) |
3 ft |
Green #20 gauge silver-coated copper wire (audio ground hookup) |
1 |
0.060" x 5.7" x 8" FRP mounting board |
10 |
#4 threaded hex stand-offs (mounting the V25 board and ground bar) |
20 |
#4 screws for the mounting stand-offs |
2 |
#4 screws for mounting the display bar to the board |
2 |
#4 nuts for mounting the display bar to the board |
1 |
Apple remote |
4 |
Power connector wire crimps |
2 |
2-pin power connector shells |
Optional: 5 ft of Neotech 26AWG UP-OCC solid copper wire, in place of the standard hookup wire.
Not a difficult kit to build, but balanced wiring takes care
On a scale of 1-10 (10 being expert level), this kit was rated around a 4-5 difficulty level — higher than the single-ended LDR3.V25K, because getting the point-to-point XLR wiring right requires care. It’s straightforward, but the complexity of balanced wiring can trip up a novice (and an expert whose mind wanders).
In addition to the kit itself, building it requires:
-
Solder
-
Soldering iron
-
Allen (hex) wrench for the socket head screws that attach panels
-
Wire strippers
-
Wire cutters
-
Small screwdrivers (regular and Phillips) for stand-off screws, encoder knob, etc.
-
Wrenches and/or sockets for tightening the jack nuts
| Assembly instructions specific to this balanced kit were never published — only instructions for the very similar single-ended LDR3.V25K kit, most of which apply here too. |