V2 / V2.1 firmware updating
Application
The files below are for use solely with various Tortuga Audio preamp products that use the V2 or V2.1 preamp controller boards.
Use the appropriate firmware version for your model. If you select the wrong version for your preamp no harm will come to your unit. However, it may not work properly and will you will need to upload the correct version and try again.
What is firmware?
All of Tortuga Audio’s preamp’s are controlled by a software driven embedded microcontroller similar to those used in so many commercial, industrial and consumer products today. Software running on the microcontrollers is often referred to as "firmware.
Firmware is a class of computer software that controls a specific hardware device and is typically stored in that devices’s read only memory. By its nature firmware is neither easy to erase nor is it easy to replace or update especially as compared to software applications that run on a personal computer. Firmware usually runs directly on a microcontroller’s "bare metal" without any intervening operating system.
Why update your firmware?
The simple reality with software is there are always bugs that need fixing and new features and capabilities that keep getting added. Most of the time the casual owner of equipment can ignore all that. But sometimes the bug is significant and once the fix is in the only way to get that fix into your machine is to do a firmware update.
Which firmware version do I currently have?
How do you know what firmware version you have? The 3 digit firmware version will display briefly in the right display ~5 seconds after power is applied to your V2 preamp.
About USB cables - important!
Firmware updating requires a USB cable connection between your PC and your V2/V2.1 preamp device. *The #1 problem that people encounter when trying to update their firmware is the inability to make a connection. In most cases this is caused by their USB cable.*
Most of us have several USB cables laying around because we have cell/smartphones and other devices that use USB cables for charging. Unfortunately, many of those USB cables are for charging only and lack the ability to transmit data. *"Charging only" USB cables will not work with the bootloader and firmware update system! You need to use a proper USB "data" cable that has the conductors for the D+ and D- USB data signals.*
Finished preamps: type A male USB both ends
All finished Tortuga preamps require a USB cable with type A male connectors on both ends. The cable is supplied with all finished Tortuga Audio preamps. Connecting the cable does nothing by itself. Your PC should not react.
DIY boards: with micro-B USB socket
If you have an older V2 LDR3x DIY board with a micro-B socket board soldered to the J8 header on the board you’ll need a cable with a male A end and male micro-B USB end. An LED light on the micro USB connector breakout board on the V2 will light up once it’s connected to your PC.
DIY boards: with 5 pin USB J8 header
If you are using a Tortuga USB connector cable with the female end connected to the J8 header make sure you have the female end connected such that the red wire is next to microcontroller end of J8 header and not the end with the white dot.
Firmware update procedure overview
Updating your preamp’s firmware requires the use of a bootloader program running on a PC together with the latest firmware “hex” file. You can download both the bootloader application and the firmware file from our website.
To execute the actual upload process you:
-
Disconnect power from your preamp
-
Download & start the bootloader program (PC only)
-
Download the new firmware file for your preamp product
-
Establish USB link from your PC to your V2 preamp.
-
Choose your updated firmware file
-
Upload the updated firmware into your preamp.
The rest of this document elaborates on the firmware updating process described above.
Step 1: Disconnect power from your preamp
Turn off your preamp and disconnect it from your power source.
It’s not enough that your preamp is turned off. IT MUST BE DISCONNCECTED FROM POWER! This is key and often confuses people so read carefully. *The Bootloader is only able to connect to your preamp during the 5 second period immediately after power is applied. If the connection hasn’t been made during that 5 second start-up period you have to remove power and try again.*
Step 2: Download & start the bootloader program (PC only)
The (mikro)Bootloader is a small PC based software application that you use to establish USB communications with, and upload new firmware into, the V2 preamp.
Unfortunately the Bootloader is a PC/Windows only application. There’s no MAC version currently available. We are not anti-MAC, but the supplier of our programming tools stubbornly refuses to provide a MAC version of the Bootloader program while providing no reasons for not doing so.
The Bootloader program is a simple executable file (mikroBootloaderUSBHID.exe). Unlike conventional software, it does not have to be installed/registered into your PC. The program file simply has to reside somewhere on your PC. We suggest you download it to your PC desktop. The first time your run this program (by double clicking on it) it will create a small text file named "settings.ini" in the same directory. No special drivers are needed. It doesn’t install or change anything in your PC. If your PC has a USB port, you should be good to go. We know the Bootloader works with Windows 7 through 11. It may also work with older versions of Windows but we haven’t tested that. To remove the Bootloader program from your PC simply erase both the mikroBootloaderUSBHID.exe and settings.ini files from whatever directory you put them in.
You only need to download the bootloader application one time since it rarely if ever changes. Please find the download link below.
|
Download
MikroBootloader USB HID PC Program (.exe file) |
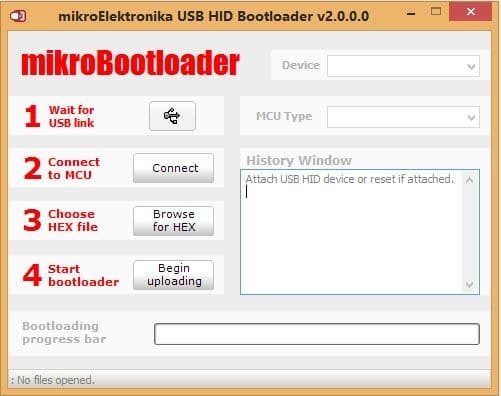
When you’ve started the bootloader program on your PC, the program will appear something like image below and nothing else will happen yet.
Step 3: Download the firmware file
The firmware file is a "something.hex" file. It’s a plain text file wherein the code is formatted using a specific hexadecimal protocol. It’s perfectly safe to download it. You can view it with any text editor or word processor if you’re curious what it looks like "under the hood".
When you try to download the firmware file it may show up as lines of text in your browser. In that case right-click on that browser page and do a "save as" to download the actual file to your computer.
There are 4 versions of the V2/V2.1 firmware file as listed below. Each version is specific to a product class. Please be sure you download the right file for your specific V2 product.
-
DIY V2 board (not associated with any specific finished Tortuga Audio V2/V2.1 product)
-
The 3-input LDR.V2 and any LDRx model with 3 inputs
-
The 4-input LDRxB and any LDRx model with 4 inputs
-
The 1-input LDR1.V2 and LDR1B.V2 preamps
A separate download link is provided below for each of these 4 V2 variants.
DIY V2 board
Download the following version for use in the DIY version of the V2/V2.1 board.
|
Download
V2 firmware - DIY boards only |
LDR3.V2 & 3-input LDRx preamps
Download the following version for use in the LDR3.V2 model and the 3-input LDRx model preamps.
|
Download
V2 firmware - 3-input LDR3.V2 & LDRx preamps only |
LDRxB and 4-input LDRx preamps
Download the following version for use in the LDRxB model and the 4-input LDRx model preamps.
|
Download
V2 firmware - 4-input LDRxB & LDRx preamps only |
LDR1.V2 and LDR1B.V2 preamps
Download the following version for use in the single input LDR1.V2 and LDR1B.V2 preamps.
|
Download
V2 firmware - 1-input LDR1.V2 & LDR1B.V2 preamps only |
Step 4: Establish the USB link to the preamp
At this point your *V2 board should be powered down (not just turned off, but actually disconnected from any power source*), and the *V2 board should be connected to your PC via a USB cable*. Keep in mind that *connecting the USB cable while the V2 is powered down will result in no change to the Bootloader program already running on your PC. *
Very important concept (read carefully): The only time the Bootloader program (already running on your PC) can connect with your V2 board is during the 5 second period after power is applied to the V2 board. If a connection is not achieved within this 5 second window, you have to remove power from the V2 board and try again.
Here is the specific sequence of events for establishing a USB link between your PC and the Bootloader program already running on your PC.
-
Apply power to your preamp (but don’t attempt to turn it on in any way)
-
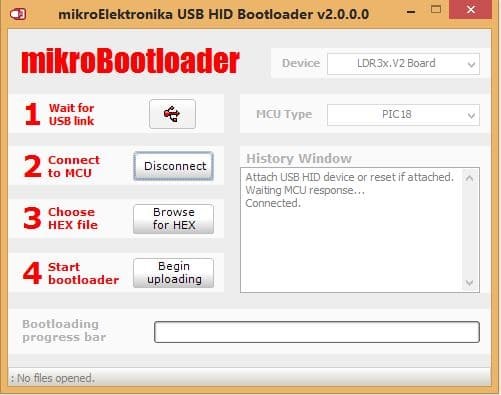
The little USB symbol to the right of "1 Wait for USB link" should turn red
-
At this point you have 5 seconds to establish the USB link by pressing the "2 Connect" button on the Bootloader program running on your PC
-
The Device window should then display "LR3x.V2 Board" or "LDR.V25" or similar and the MCU Type window should display "PIC18" or "STM32F" or similar
-
The History Window should now say "Waiting MCU response…Connected"
If you run out of time, don’t panic, just remove power again, wait a few seconds and then reapply power to the preamp which restarts the 5 second Bootloader timer.
Step 5: Choose the firmware (.hex) file
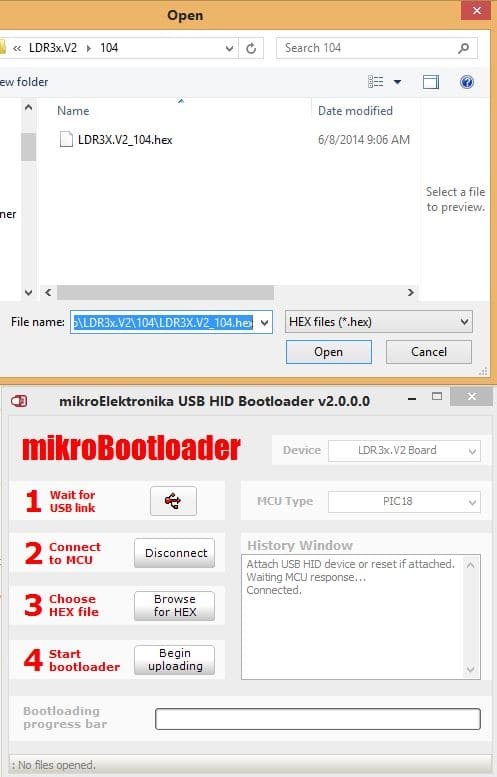
Select your firmware file by pressing the "Browse for Hex" button next to "3 Choose HEX file". This will open a file dialog box. Find your downloaded .hex file stored on your PC and click the "Open" button. At this point the firmware is ready to be uploaded into the preamp board.
Step 6: Upload the firmware to your preamp
Press the "Begin uploading" button next to "4 Start bootloader" to upload the firmware into the preamp. The previous firmware build will first be erased and then the updated software build will be written to the preamp’s microcontroller chip. This erase/write operation is very fast and should take less than 5 seconds to complete.
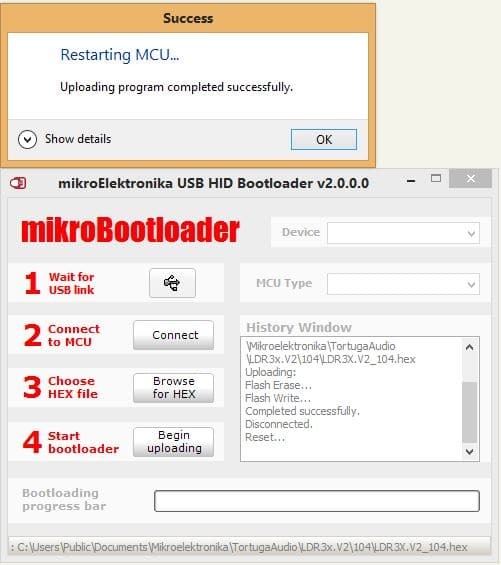
You should get a "Success" message. Click the "OK" button to close the message box. Note the new messages in the History Window. Upon a successful write, the Bootloader program will automatically disconnect from preamp and the preamp will reboot which takes 5 seconds.
You are now done and can close the Bootloader program, disconnect the USB cable, and enjoy your updated preamp.
Firmware change log
The following table lists all changes to the V2/V2.1 firmware since initial release.
Click to expand or collapse the change log
| Rev/Date | Description |
|---|---|
2.2.8 - 8.23.16 |
Not a critical update. Update is relevant only if you wish to be able to use the Encoder while the display timeout feature is enabled. The workaround is just use the remote.
|
2.2.7 - 8.16.16 |
This update optimizes the operation of the manual encoder which hasn’t received much attention for quite some time now. Volume control via the encoder is now smoother and more granular with each volume step more clearly corresponding to the encoder’s position detents (stopping points). It also adds back the missing encoder balance adjust feature which somehow got left out when we released version 2.2.0 firmware. You might have noticed we skipped version 2.2.6. We implemented phase reversal in version 2.2.6 but this applies only to our LDRxB balanced preamp model and requires some special hardware modifications to the LDRxB for phase reversal to work. Please contact us if you’re interested in the LDRxB and balanced preamp phase reversal. Importance? For most users this is not a critical update. If you notice anything amiss while using your encoder for either volume control or input changing, this update should resolve the problem.
|
2.2.5 - 6.16.16 |
This update corrects one minor bug (balanced preamps only) and adds 2 new features. It’s not a critical update.
|
2.2.4 - 6.10.16 |
This version was shipped in only 1 preamp and included the "Fix" referenced in version 2.2.5 above. |
2.2.3 - 5.30.16 |
This update added back some features that didn’t make the jump from 2.1 to 2.2. Most importantly it brought back muting as a stand alone feature.
|
2.2.2 - 5.24.16 |
This was an an internal revision and only relevant to initial commissioning of new boards/preamps
|
2.2.1 - 5.22.15 |
Note: The one-time initialization process will require you to pair your remote with your preamp |
2.2.0 - 5.16.15 |
Initial upgrade from 2.1 series to 2.2.
|
The following firmware changes apply only to the V2.1 version of the LDR3x board and related products released and shipped on or after Jan 1, 2015 up until May 15, 2016. Please refer to Version 2.2 firmware for all Tortuga Audio preamps shipped starting 5.15.16. |
|
2.1.8 - 7.17.15 |
|
2.1.7 - 2.25.15 |
This revision applies only to balanced (dual Master/Slave board) preamp configurations and can be ignored if you have an RCA/single-end preamp
|
2.1.6 - 2.21.15 |
|
2.1.5 - 2.9.15 |
|
2.1.4 - 2.7.15 |
|
2.1.3 - (no date) |
This version included with first wave of V2.1 boards and LDR3.V2 & V2k preamps |
2.1.1 and 2.1.2 |
Interim internal versions - never released or shipped |
2.1.0 - 1.26.15 |
First firmware release with the new V2.1 board
|
The following firmware updates relate solely to the V2 version of the preamp controller board and related preamp products shipped prior to January 1, 2015. |
|
1.2.0 - 9.15.14 |
Please Note: All LDRx & LDRxB Passive Preamp models (released 9.1.14) were shipped with version 1.2.0 or later firmware. Change: Adapted for new IO Board used with the LDRx & LDRxB including 4th input Change: Going forward there will be different versions of firmware for LDR3x.V2 vs. the LDRx/LDRxB. Tweaks: Miscl changes to improve stability |
1.1.9 - 9.1.14 |
|
1.1.8 - 8.18.14 |
|
1.1.7 - 8.15.14 |
|
1.1.6 - 8.12.14 |
|
1.1.5 - 8.5.14 |
This update only relevant to those using V2’s in balanced audio configuration.
|
1.1.4 - 7.29.14 |
|
1.1.3 - 7.19.14 |
|
1.1.2 - 7.15.14 |
This update is primarily relevant to those who only use an Encoder and not the Apple Remote to control the V2
|
1.1.1 - 7.7.14 |
|
1.1.0 - 7.6.14 |
|
1.0.9 - 6.30.14 |
|
1.0.8 - 6.26.14 |
|
1.0.7 - 6.20.14 |
Notice: All units shipped on or after 6.20.14 now include rev 1.0.7 or higher and also include Rev 2 or higher of the bootloader. Rev 2 of the bootloader keeps audio disconnected during the 5 second bootload period after power is applied to the board. This avoids possible relay buzz and possible random audio output when power is applied to the V2. Any amp connected to the V2 should be powered down (or muted) prior to the V2 being connected to power.
Change: The minimum volume setting upon turning on the unit changed from 20 to 1 so that volume will now resume wherever it was previously for a given input prior to input change or unit being turned off but only between the limits of step 1 and a max of step 35. Fix: Corrected timer used for enabling display brightness adjustment. Deliberately pressing Enter twice in a row should put the unit into "brightness adjust mode". If the unit doesn’t change modes, suggest you slow down the speed of pressing Enter twice. Tweak: Added 1 second delay after turning off the 12V TriggerOut before proceeding with turning off the V2. Give triggered amp more time to shut off. Tweak: Several other miscl. edits intended to ensure audio output is minimized when unit is turned off. |
1.0.6 - 6.9.14 |
|
1.0.5 - 6.9.14 |
|
1.0.4 - 6.8.14 |
|
1.0.3 - 6.2.14 |
Tweak: consolidated all flag initialization into single procedure Tweak: numerous other post development/release clean-up & housekeeping mods |
1.0.2 - 5.29.14 |
Tweak: turned off debug info being sent to UART |
1.0.1 - 5.17.14 |
|
1.0.0 - 5.15.14 |
|