
Application
The following information is for Tortuga Audio preamps based on the V25 preamp controller with the OLED display. If you have an earlier model that uses the original 7-segment display, please consult the menu for a separate section on V25 control with 7-segment display.
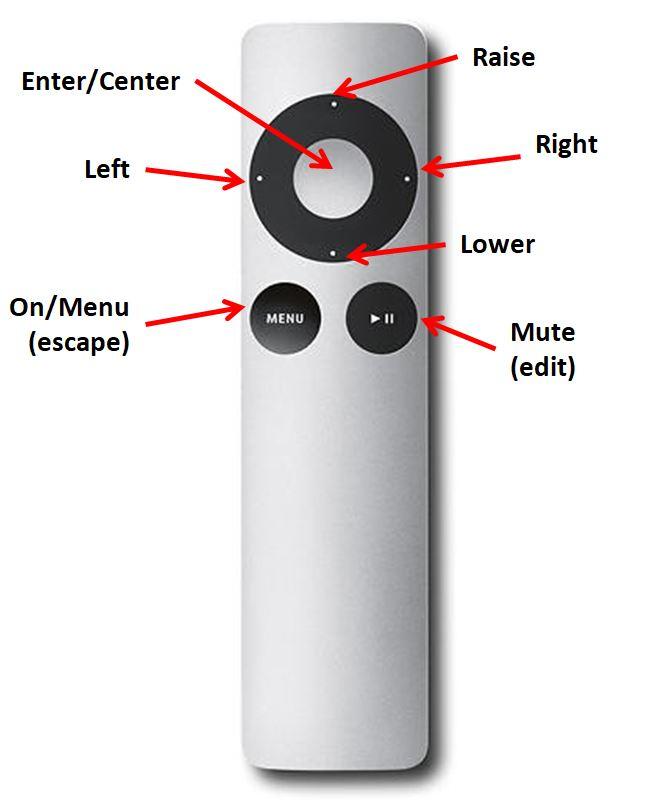
The Apple remote
The following information is for Tortuga Audio preamps based on the V25 preamp controller with the OLED display. If you have an earlier model that uses the original 7-segment display, please consult the menu for a separate section on V25 control with 7-segment display.
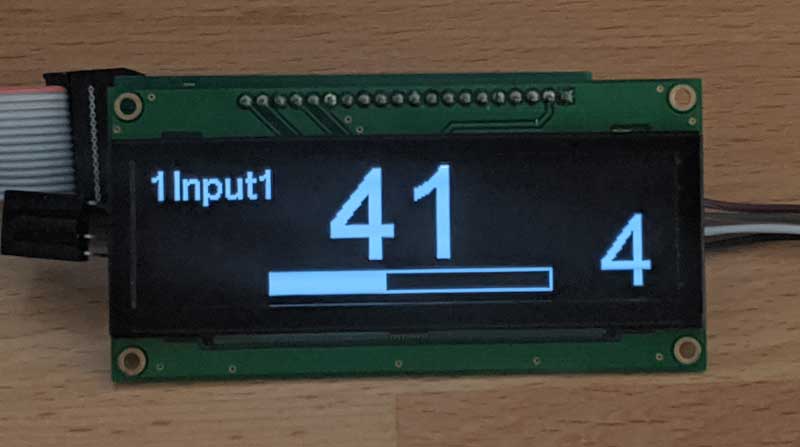
The OLED display
The OLED display is a 256×64 bit high contrast white-on-black graphical display. It works interactively with the Apple remote to allow more complex controls than are possible with the Apple remote alone. Being a graphic display, the OLED can display a wide range of text, numbers, lines, and images. These capabilities are used to good effect to enable the user to easily configure and control the V25 preamp controller and V25 based preamps.
The V25 menu & controls
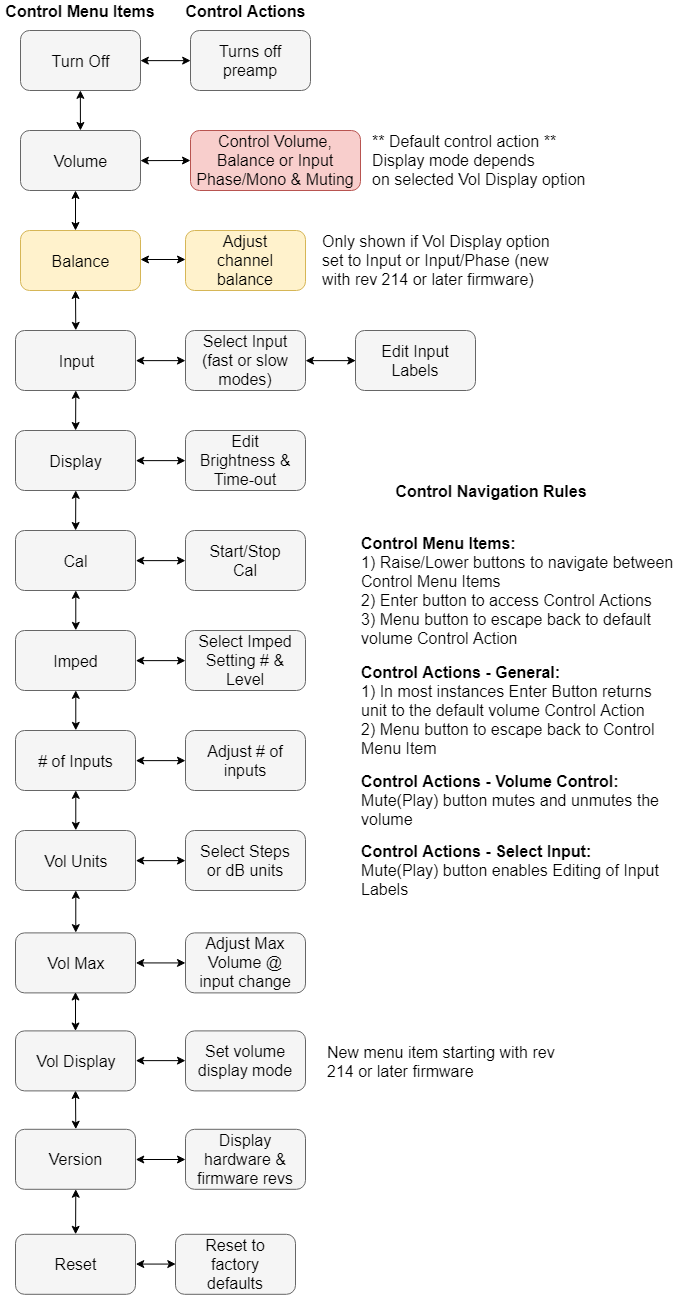
The V25 uses a menu driven interactive control scheme that uses the simple Apple remote together the flexible OLED display. The control scheme is shown in the diagram below. The left hand column lists the control menu items (i.e. the menu “tree”). These menu items are displayed on the OLED screen as the user scrolls up and down the menu list.
The following summarizes how the V25 control scheme works.
- You’ll spend 99%+ of your time in volume control mode (the pink box)
- When the preamp is off, pressing the Menu button will turn the preamp on
- When the preamp is on, pressing the Menu button will display the current menu list item
- If you press the Menu button when already viewing the menu list, the controls revert to the default volume control mode (the pink box) – (kind of like the “escape key” on a computer)
- Only a single menu list item is visible at any time.
- You scroll up and down the control menu list using the raise/lower buttons on the remote
- Pressing the Center button on the remote while viewing a menu list item will activate that item’s respective control action
- The most common example: to turn off the preamp
- Press Menu – exits volume control action (pink box) and displays Volume menu item
- Press Raise – scrolls up to the Off menu item
- Press Center – activates the control action to turn off the preamp
The control menu shown below is the current control menu as of firmware version 220 released on February 27, 2018. Preamps with earlier firmware will differ slightly from this menu.
Prior to the version 220 firmware release, there were separate Calibration (Cal) and Impedance (Imped) menu items
Description of each control
Each menu item and control action/view in the control scheme diagram shown above are described in the accordion list below. Click on any control topic to expand and read.
Control items below with (menu) in their title relate to the navigable menu tree diagram above and are shown on the OLED display. There are controls items below that are not directly associated with a menu item (Turning On being the first example of this).
LDR3000T | warm up delay
The LDR3000T Tube Preamp has a visible 10 second warm up timer which will count down from 10 seconds when you turn it on. During this warm up period the tube heaters will turn on and stabilize. When the timer hits 0, the tube plate voltage is switched on, the preamp’s output is unmuted, and the volume then ramps up to its previous setpoint. We recommend the user avoid making any additional control inputs while the warm up timer is running.
LDR300 | buffer output delay
The LDR300.V25 Buffered Preamp has a built-in 10 second delay (not visible on display) which disconnects (mutes) the preamp output for 10 seconds each time power is connected to the preamp. The same 10 second delay happens again each time the preamp is turned on. Therefore you may notice that even though the OLED display indicates the preamp is no longer muted after turning it on, the 10 second buffer output delay timer may still be running keeping the output muted. This is normal. The buffer output delay is there to protect against bumps and pops during power/turn on/off transitions.
