The following information is for Tortuga Audio preamps based on the V25 preamp controller (released April 2017) with 7-segment LED display. If you have a preamp with the newer OLED graphic display please consult the main page for a separate section on V25 controls with OLED display.
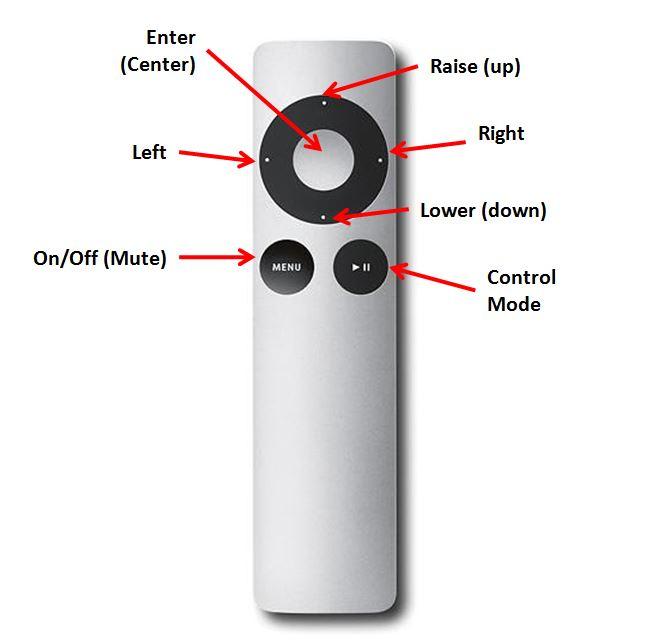
The Apple remote
The Apple Remote shown below is Apple’s standard “silver” remote. It’s a simple 7 button IR remote. The control functions of each button will vary depending on the control mode the preamp is in as explained below.
The 7-segment LED display
7-segment LED displays are able to show numbers only by turning on and off a combinations of 7 individual LED segments. They are inherently easy to read high-contrast displays and are relatively easy to control.
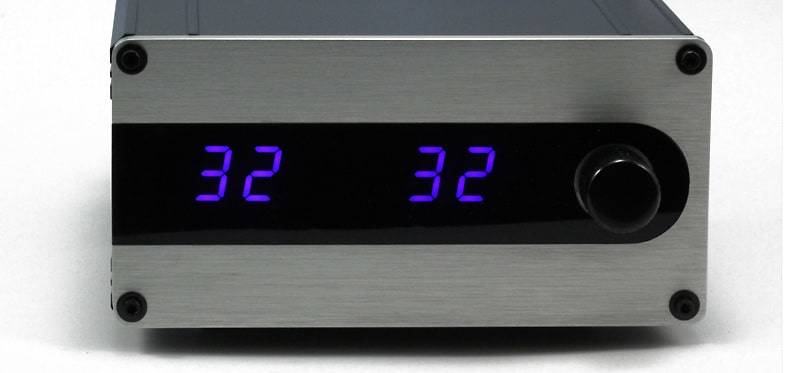
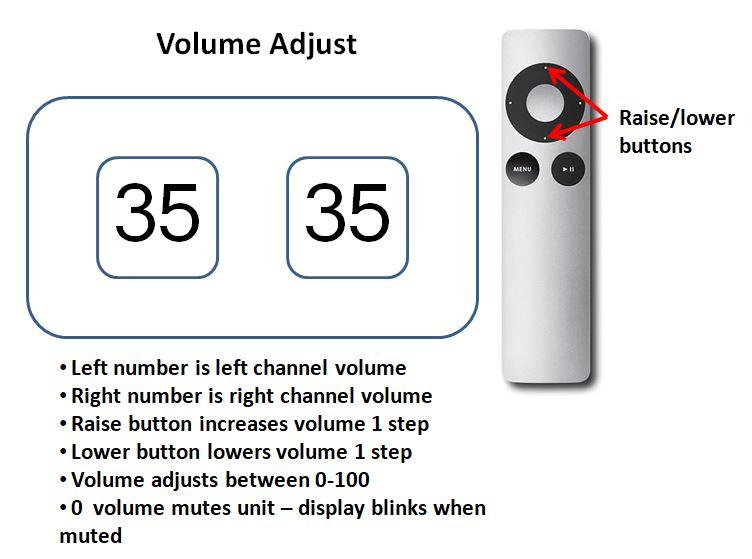
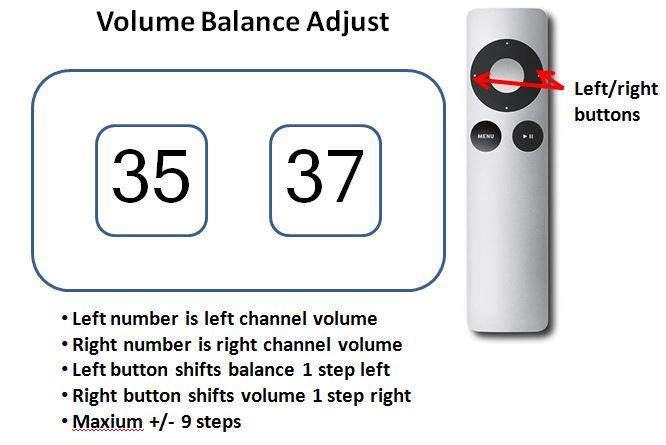
Tortuga Audio preamps use a pair of double digit 7-segment display modules as shown below. Each module can show a number from 0 to 99. In default volume control mode, the left module represents the left channel’s volume and the right module represents the right channel’s volume. If there are differences in the two numbers this indicates either a left or right adjustment in channel balance. Volume is controlled in discrete steps with each step up or down shown on the 7-segment display modules.
V25 control scheme overview
The control scheme for the V25 with 7-segment display is organized into a collection of control modes. The numerical information displayed will mean something different depending on which mode the controller is in. Unfortunately, it’s not intuitively obvious what control mode the controller is in so it’s up to the user to maintain situational awareness. The good news is that pressing the Center button on the remote will always cause the controls to revert back to the default volume control mode.
Control scheme changes with OLED firmware
V25 preamps with 7-segment displays that are updated to the 2xx series OLED firmware have the following changes to their control behavior that differs from what is described herein. Please note that these changes are NOT reflected in the detailed control instructions presented below which reflect the original 7-segment only version of the V25 firmware. Again, the differences are only in assignment of the Mode and Mute buttons on the Apple remote. These changes were made so that the controls would be consistent between the 7-segment and OLED displays going forward. Apologies for any inconvenience.
Mode Button – The “Menu” button on the lower left of the remote is now the Mode button. As before, the Menu button also turns the preamp on when it’s off.
Mute Button – The lower right button of the remote (with the >= play/pause symbol) is now the Mute button.
Control modes
There are six (6) control modes with Volume Adjust mode always being the default. The six control modes are listed below followed by a table that further explains each one. Further below each of these modes are discussed again using a more graphic approach.
- Volume adjust mode
- Input adjust mode
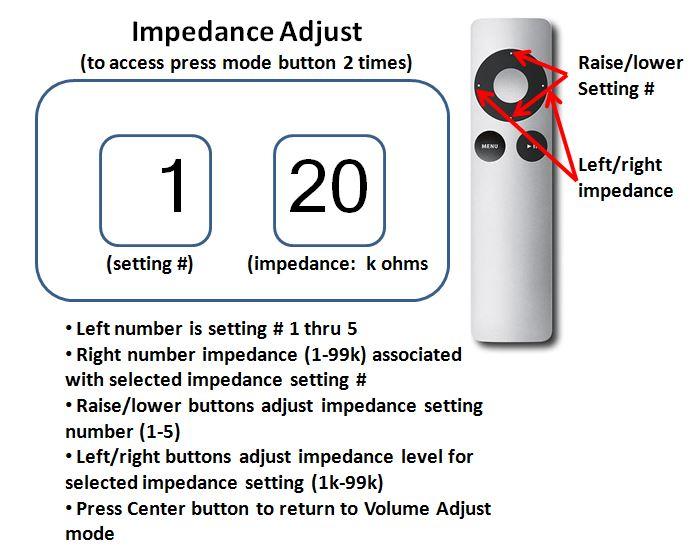
- Impedance adjust mode
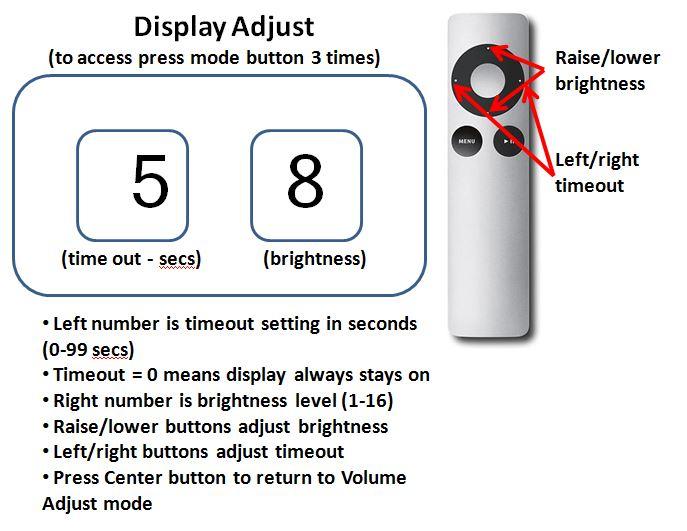
- Display adjust mode
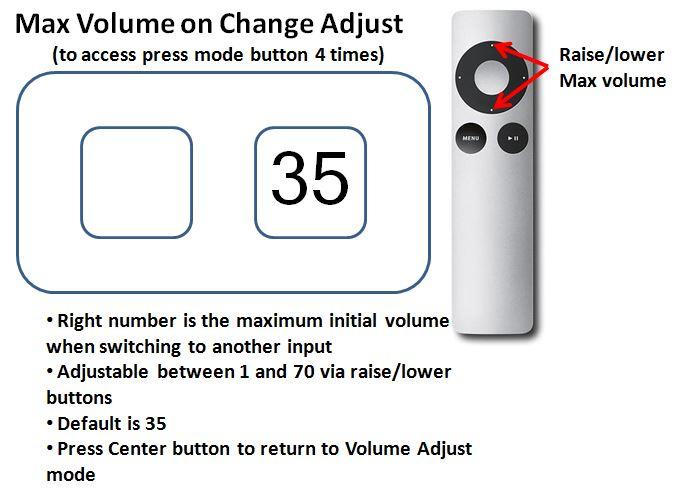
- Max volume on change adjust mode
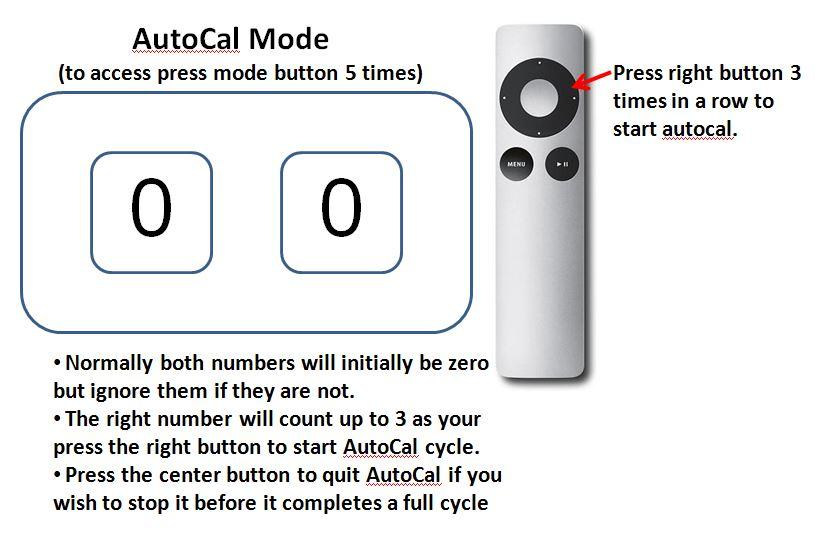
- Calibration start/stop mode
| Control Mode | Description |
|---|---|
| Volume/balance adjust (default) | The default control mode for common use with the primary function being to raise/lower volume using the raise/lower buttons on the remote. The secondary function is to adjust channel balance left/right using the left/right buttons on the remote. |
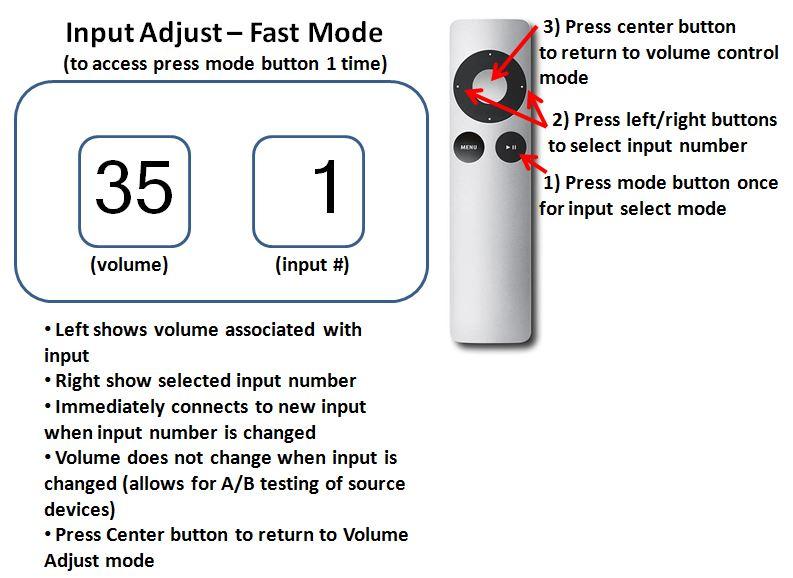
| Input adjust | This mode allows for switching between inputs using either the raise/lower (slow method) or left/right buttons (fast method). The fast method causes the inputs to switch immediately. The slow method does not change the inputs until the user locks in the new selection by pressing the center button on the remote. The preamp will then ramp down, mute, execute the input switch, unmute, and then ramp back up again. |
| Impedance adjust | This mode allows the input impedance settings to be configured. There are multiple settings with each setting adjustable between 1 and 99k input impedance. Once configured, the user can switch between impedance settings "live" while listening to music in order to optimize the impedance setting for their system. Note: Earlier versions of V25 firmware require Calibration to be started while in Impedance Adjust mode by pressing the Control Mode button on the remote. |
| Display adjust | The display adjust mode enables the adjustment to both the display brightness and the display timeout feature. Brightness can be adjusted from between 1 (dim) to 15 (brightest) using the raise/lower buttons on the remote. The timeout feature allows the user to adjust a timer (between 5 and 99 seconds) using the left/right buttons on the remote. When the timer times out the display will turn itself off (go dark). When the display is off, any press on the remote will wake up the display and reset the timer but that control input will be otherwise ignored. The timeout feature is optional and can be disabled such that the display will not turn itself off. The timeout feature is disabled by default. |
| Max volume on change adjust | This control mode allows the user to adjust the maximum initial volume when turning the preamp on or when switching from one input to another. This is a protective feature that helps prevent accidentally putting the preamp in a high or maximum volume state. It's adjusted using the raise/lower buttons on the remote. |
| Calibration start/stop | This control mode allows the user to start or stop a calibration cycle of the LDRs. Calibration is an off-line process that allows the controller to calibrate and build attenuation tables for each of the 4 attenuation LDRs at the current input impedance setting/level. Note: Earlier versions of V25 firmware did not have a Calibration Control Mode. Instead, Calibration is started while in Impedance Adjust mode by pressing the Control Mode button on the remote. |
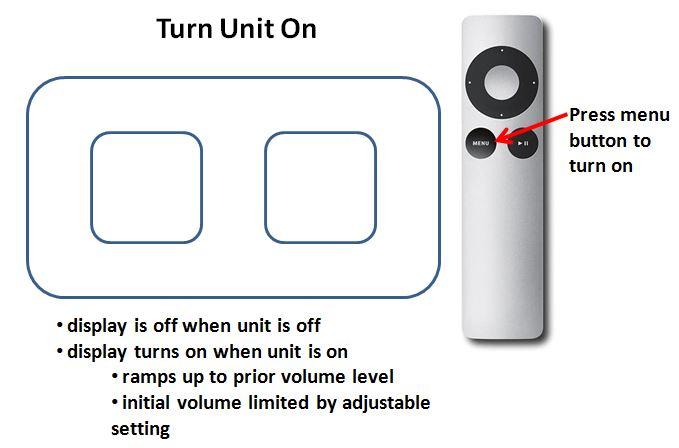
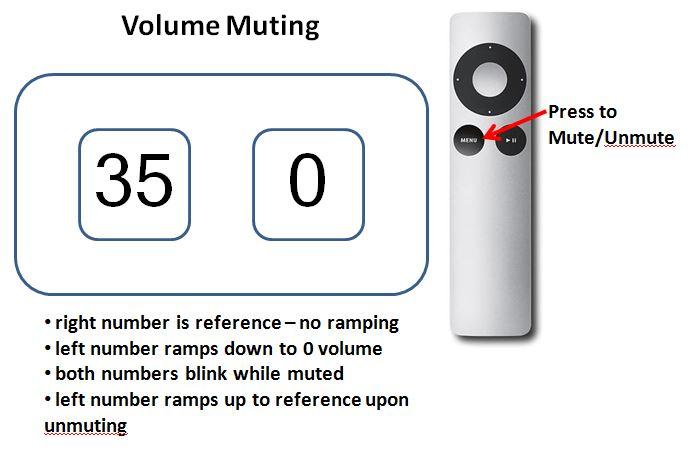
| Muting | While not a control mode per se, when muted the controller will ramp down the volume to zero. When unmuted the volume will ramp back up to the prior level last associated with the currently selected input. Muting is toggled using the Menu button on the remote. |
Navigation rules
Navigation between the control modes is done with the Apple remote in accordance with the following simple rules:
- Each press of the Mode button switches the preamp sequentially to the next mode.
- The 6th press returns the preamp back to its default volume adjust mode.
- Pressing the Center button at any time returns the preamp to its default volume adjust mode.
- When the preamp is in volume adjust mode, pressing the Center button will cause the display to briefly flash acknowledging the command.
Remote control functions
Each of the remote control functions and control modes are shown below in a mock-up of the dual displays.
The original method for turning off the preamp was a 2 step process of first muting the preamp. Once the preamp had ramped down to zero volume, a subsequent press of the Lower button on the remote would shut off the preamp.
Preamps with version 1019 or higher firmware, no longer have to wait until the volume ramps down to zero before pressing the Lower button.
Please note that preamps with only a single input will only have 4 control modes because Input Adjust mode will not be present.

When in input adjust mode, the input can be changed using either the slow mode or the fast mode.
Slow Mode – First ramps volume down to zero, then switches the input, and finally ramps volume back up to setpoint.

Fast Mode – Input is switched immediately. There is no ramping down of the volume first.
Please note that in early versions of the firmware, Calibration was started by pressing the Mode button while in Impedance Adjust mode.
Please note that older versions of the V25/7-segment display firmware may not have a separate Calibration control mode. In that case, Calibration is started while in the Impedance Control Mode by pressing the Mode button on remote.