Who should read this section?
If you’re new to Tortuga Audio preamps and/or you are considering updating the firmware of your V25 based preamp for the first time, then we recommend you read this section first.
If you’re a tech savvy audiophile who everyone comes to for help with their computers then you can probably skip this overview and go directly to the next section in this series which discusses how to obtain a firmware update and how to install it on your V25 preamp controller.
What is firmware?
All of Tortuga Audio’s preamp’s are controlled by a software driven microcontroller which is a type of embedded microprocessor widely used in commercial, industrial and consumer equipment. The software running on the microcontroller is referred to as “firmware.
Firmware is a class of computer software that controls a specific hardware device and is typically stored in that devices’s read only memory. By its nature firmware is neither easy to erase nor is it easy to replace or update especially as compared to software applications that run on a personal computer. Firmware usually runs directly on a microcontroller’s “bare metal” without any intervening operating system.
Why update your firmware?
The simple reality with software is there are always bugs that need fixing and new features and capabilities that keep getting added. Most of the time the casual owner of equipment can ignore all that. But sometimes the bug is significant and once the fix is in the only way to get that fix into your machine is to do a firmware update.
Firmware Versions
Firmware for the V25 can be divided into 2 periods – before OLED and After OLED. OLED refers to the graphic OLED (organic light emitting diode) display introduced in May, 2018.
7 Segment Display Only Firmware – Before introducing the OLED display our displays used 7-segment display technology with a 2 digit left channel and a 2 digit right channel numerical display. The firmware version was nominally a 4 digit number that started with the numbers “10” on the left followed by the actual version on the right. This series started at 1001 and went up through 1029 before this firmware series ended when the OLED display came out.
New Firmware Series For Both Display Types – When the OLED display was introduced, a new firmware series was started that applies to both types of displays. The same firmware operates either display. The new firmware versioning uses a 3 digit number plus an additional leading “0” which you can ignore. The new versioning started with version 201 and has since had over 30 subsequent updates most of which were minor fixes or improvements.
Which firmware version do you have?
Your preamp is able to display the version number of your firmware. It’s done differently depending on whether you have the original 7-segment display or the newer OLED display.
7 Segment Display – The firmware version will flash briefly on the display roughly 5 seconds after power is applied to your V25 preamp. To be clear, the firmware version does NOT display when you turn on the preamp but only when you apply power to the preamp. The firmware version will be a 3-4 digit number like 1025 or 0232.
OLED Display – On preamps with an OLED display you can scroll down the menu tree until you see the “Version” menu item. Press Enter on the remote and it will display the preamp model number, hardware version, and firmware version.
Special consideration when upgrading beyond version 1011
If your preamp currently has earlier series firmware version between 1001 and 1011, please read the following information carefully before proceeding with a firmware update.
If your preamp currently has firmware versions 1011 (or earlier), updating your firmware will cause your preamp to go through a mandatory automatic re-initialization process. This is a one-time process but must be allowed to run to completion in order for the update to become effective. If interrupted, the automatic re-initialization process will repeat itself the next time your preamp is powered up until the process is allowed to run to completion.
Duing this re-initilziation process your existing impedance settings and associated attenuation/calibration tables will all be deleted. Various numbers may be displayed during this process. When the first phase of the re-initilization process is complete your preamp will then automatically enter the second phase where it automatically runs through a calibration cycle associated with impedance setting #1 which will now become fixed at 20k ohms by default. When the calibration process is completed your preamp will reboot and then turn itself on after which it will be available to be used normally.
If for whatever reason your preamp does not operate properly after such an update, please run the calibration process 1-2 more times.
Users with balanced preamp will need to repeat this process with both V25 boards. When updating the left board there will be no information displayed. Please allow at least 15 minutes after uploading the firmware to allow the automatic re-initialization process to complete even if no information is displayed.
With this upgrade, setting/level #1/20k will no longer be available to be edited by the user as before. Only settings 2-9 will be available to the user to setup and adjust input impednace between 1-99k ohms.
Procedure overview
Updating your preamp’s firmware requires the use of a bootloader program running on a PC together with the latest firmware “hex” file. You can download both the bootloader application and the firmware file from our website.
To execute the actual upload process you:
- Unplug your preamp from its power source
- Start the bootloader application program on your PC
- Then plug in the USB cable from your PC into the preamp
- Depending on the version of your V25 hardware you might also have to plug power into your preamp.
- At this point you have a 5 second window to connect the bootloader app to the preamp (details on this below)
- Once connected, you select the firmware hex file you previously downloaded and stored on your PC, and upload it into your preamp. The actual upload proper takes less then 5 seconds.
The rest of this document elaborates on the firmware updating process described above.
The bootloader
The (mikro)Bootloader is a small PC based software application that you use to establish USB communications with, and upload new firmware into, the V2/V25 preamp.
Unfortunately the Bootloader is a PC/Windows only application. There’s no MAC version currently available. We are not anti-MAC, but the supplier of our programming tools stubbornly refuses to provide a MAC version of the Bootloader program while providing no reasons for not doing so.
The Bootloader program is a simple executable file (mikroBootloaderUSBHID.exe). Unlike conventional software, it does not have to be installed/registered into your PC. The program file simply has to reside somewhere on your PC. We suggest you download it to your PC desktop. The first time your run this program (by double clicking on it) it will create a small text file named “settings.ini” in the same directory. No special drivers are needed. It doesn’t install or change anything in your PC. If your PC has a USB port, you should be good to go. We know the Bootloader works with Windows 7, 8 and 10. It may also work with older versions of Windows but we haven’t tested that. To remove the Bootloader program from your PC simply erase both the mikroBootloaderUSBHID.exe and settings.ini files from whatever directory you put them in.
You only need to download the bootloader application one time since it rarely if ever changes. Please find the download link below.
Download the firmware file
Click on the link below to download the firmware file. Store the file in a convenient place on your PC and remember where you put it. You will need to find it later on.
The file itself is a text based “hex” file. It’s perfectly safe to download it. You can view it with any text editor or word processor if you’re curious what it looks like.
When you try to download the firmware file it may show up as lines of text in your browser. In that case right-click on that browser page and do a “save as” to download the actual file to your computer.
About USB cables – important!
The #1 problem that people encounter when trying to update their firmware is the inability to make a connection. In most cases this is caused by their USB cable.
Most of us have several USB cables laying around because we have cell/smartphones and other devices that use USB cables for charging. Unfortunately, many of those USB cables are for charging only and lack the ability to transmit data.
“Charging only” USB cables will not work with the bootloader and firmware update system! You need to use a proper USB “data” cable that has the conductors for the D+ and D- USB data signals.
Finished Preamps
All finished Tortuga preamps require a USB cable with type A male connectors on both ends. The cable is supplied with all finished Tortuga Audio preamps. Connecting the cable does nothing by itself. Your PC should not react.
DIY Boards – Micro-B Socket
If you have an older V2 LDR3x DIY board with a micro-B socket board soldered to the J8 header on the board you’ll need a cable with a male A end and male micro-B USB end. An LED light on the micro USB connector breakout board on the V2 will light up once it’s connected to your PC.
DIY Board – Tortuga USB Connector
If you are using a Tortuga USB connector cable with the female end connected to the J8 header make sure you have the female end connected such that the red wire is next to microcontroller end of J8 header and not the end with the white dot.
Step 1 – Preparation
Download the bootloader application
The Bootloader application is a small Windows executable (.exe) application file. You only need to download it once and keep it handy somewhere on your PC. See the link above to download the application.
Download the firmware file
Please refer to other sections within the V25 firmware topic for downloading the firmware file itself. Store the file on your PC somewhere where you can easily find it.
The firmware file is referred to as a “hex” file because it’s a text file wherein the code is formatted using a specific hexadecimal protocol and file uses a .hex file type suffix.
Remove power from your preamp
This is key and often confuses people so read carefully. The Bootloader is only able to connect to your preamp during the 5 seconds after power is applied. If the connection hasn’t been made during that 5 second start-up period you have to remove power and try again.
Connect your USB cable to your PC but NOT to the preamp
Please not this carefully. DO NOT CONNECT YOUR USB CABLE TO YOUR PREAMP YET!! But please do connect one end to your PC.
Step 2 – Start the bootloader program
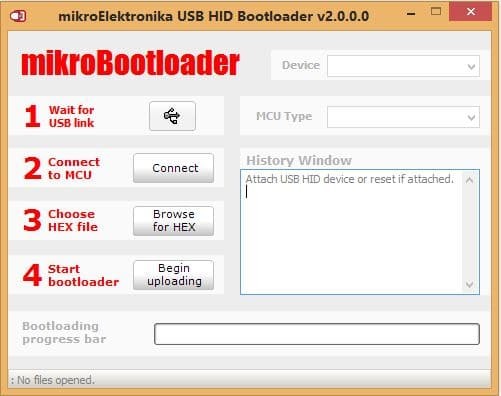
When the Bootloader program starts it will look more or less like the pic below. At this point it won’t be doing anything except waiting.
Step 3 – Establish the USB link to the preamp
This is perhaps the trickiest and most confusing part of the process. All V2 boards and earlier Rev A versions of V25 boards require that power be plugged into the preamp to initiate the 5 second bootloader connection window. Later version B & C of the V25 board can be powered directly from their USB connection. Hence the following procedure differs slightly depending on the hardware model/version you have.
- Apply power to your preamp
- V2 & V25-RevA preamps
- Connect USB cable to the V25
- Connect power to the V25
- V25-RevB/C preamps
- Only connect USB cable to the V25 (not power)
- V2 & V25-RevA preamps
- The little USB symbol to the right of “1 Wait for USB link” should turn red
- The Device window should display “LR3x.V2 Board” or “LDR.V25” or similar
- The MCU Type window should display “PIC18” or “STM32F” or similar
- The History Window should say “Waiting MCU response…”
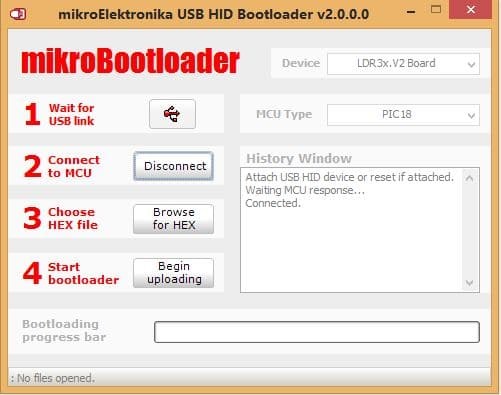
At this point you will have 5 seconds to establish a USB link between your PC and preamp by pressing the “Connect” button next to “2 Connect to MCU”. If all goes well, the “Connect” button text will change to “Disconnect” and the History Window will now say “Connected” as shown in the pic below. If you run out of time, don’t panic, just remove power again, wait a few seconds and then reapply power to the preamp which restarts the 5 second Bootloader timer.

Step 4 – Choose the firmware (.hex) file
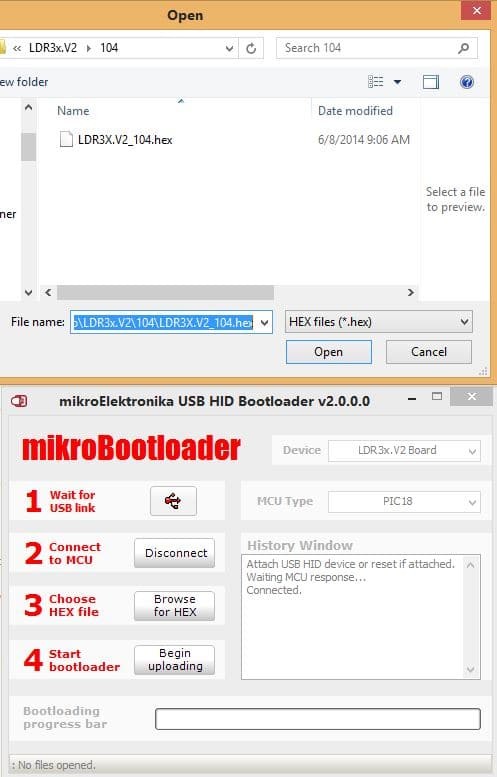
Select your firmware file by pressing the “Browse for Hex” button next to “3 Choose HEX file”. This will open a file dialog box. Find your downloaded .hex file stored on your PC and click the “Open” button. At this point the firmware is ready to be uploaded into the preamp board.

Step 5 – Upload the firmware to your preamp
Press the “Begin uploading” button next to “4 Start bootloader” to upload the firmware into the preamp. The previous firmware build will first be erased and then the updated software build will be written to the preamp’s microcontroller chip. This erase/write operation is very fast and should take less than 5 seconds to complete.
You should get a “Success” message. Click the “OK” button to close the message box. Note the new messages in the History Window. Upon a successful write, the Bootloader program will automatically disconnect from preamp and the preamp will reboot which takes 5 seconds.
You are now done and can close the Bootloader program, disconnect the USB cable, and enjoy your updated preamp.
Firmware changelog
Click on the shaded bar below to expand and view the V25 firmware changelog.


