
The following information is for Tortuga Audio preamps based on the V2 preamp controller with a 7-segment LED display. If you have a V25 preamp please consult the main page for a separate section on V25 controls.
Identifying a V2 preamp
Some V25 preamps also use 7-segment displays. There are 3 ways to tell if your preamp is using the V25 controller instead of a V2.
- Product Name – Your preamp has the V25 suffix in the product name, i.e. LDR1B.V25.
- Firmware Splash – Approximately 5 seconds after you plug power into your preamp the firmware version will display briefly. If you see a 4 digit number then you have a V25 version preamp. If its’ not a 4 digit number you have a V2 board (see below).
- Inspect Controller Board – The most definitive method is to physically inspect the controller board itself upon which the name (V2 or V25) can be found.
The 7-segment LED display
7-segment LED displays are able to show numbers only by turning on and off a combinations of 7 individual LED segments. They are inherently easy to read high-contrast displays and are relatively easy to control.
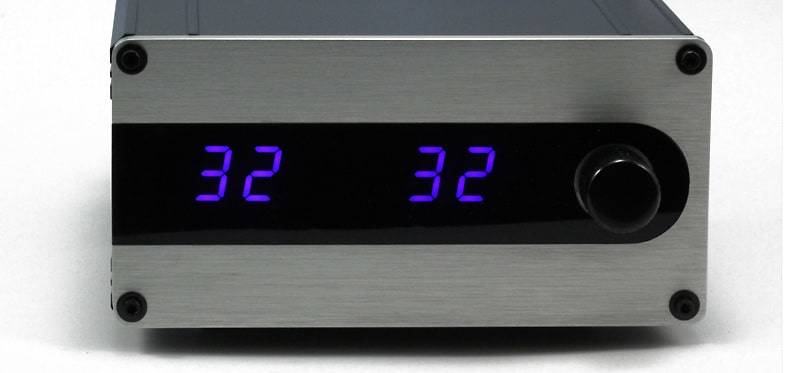
Tortuga Audio V2 (and some earlier V25) preamps use a pair of double digit 7-segment display modules as shown below. Each module can show a number from 0 to 99. In default volume control mode, the left module represents the left channel’s volume and the right module represents the right channel’s volume. If there are differences in the two numbers this indicates either a left or right adjustment in channel balance. Volume is controlled in discrete steps with each step up or down shown on the 7-segment display modules.
Two control scheme versions
Customer feedback and user experience after initial deployment of the V2 preamp controller eventually lead to some significant changes to the V2 controls. The earlier original control scheme is referred to as version “2.1” with a 3 digit firmware version numbering system 2.1.x. The later control scheme is referred to as version “2.2” with a similar 3 digit firmware version numbering system 2.2.x. Version 2.2 was introduced on May 15, 2016. All V2 based preamps produced after this date use the version 2.2 control scheme.
You can determine which firmware version you have by watching the display when you plug in or turn on power to the preamp. As the preamp boots up it will first display 3 numbers. These numbers will be either 2.2.x or 2.1.x where “X” is a subversion. If the first 2 numbers are 22 then you have firmware version 2.2.
Owners with a 2.1 version are encouraged to upgrade their firmware to 2.2 which is arguably a better organized and easier more intuitive control scheme compared to the earlier 2.1 version.
Release of the version 2.2 firmware included the following major changes from the earlier version 2.1.
- Auto-Repeat – With the 2.2 firmware, all buttons on the Apple Remote will auto-repeat if held down.
- Balance Adjustment – Balance adjustment is now the primary function of the left/right buttons along with volume control via raise/lower buttons.
- Control Modes – The Mute(play) button repurposed as a Control Mode button. See below for more info regarding Control Modes
- Power On/Off – The Power On/Off button is now dual purpose where a brief press will mute/unmute the preamp while a press/hold will shut the unit off.
Version 2.2.x control scheme
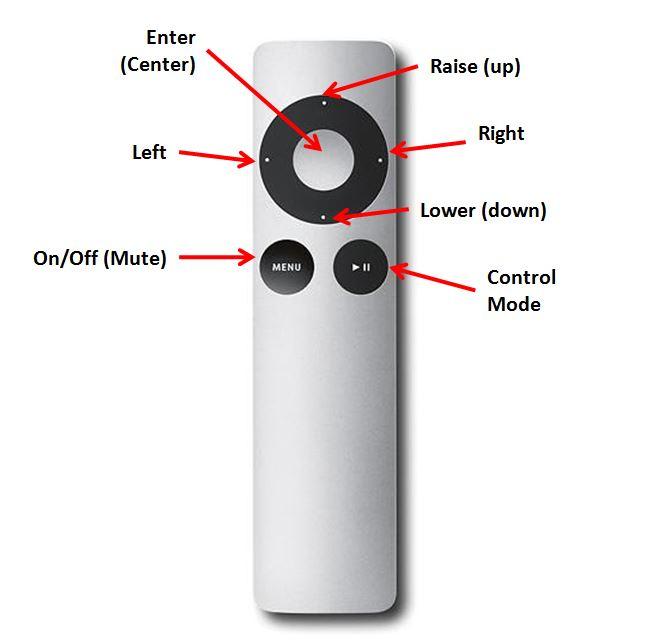
The V2 control scheme is designed around the Apple Remote. The Apple Remote is a simple 7 button infrared remote as shown below. The control functions of each button will vary depending on whether the preamp is turned on or off and depending on the current control mode of the preamp.
The control functions are presented below 3 different ways; visually with text, as a list of the control functions and as a list of control buttons. It is left to user to determine which is most useful.
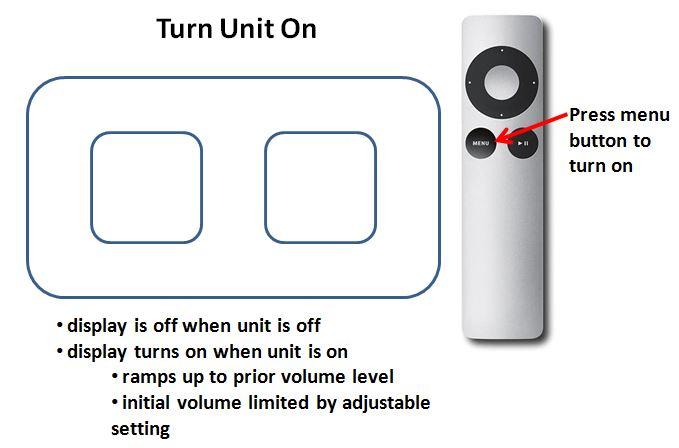
Turning on
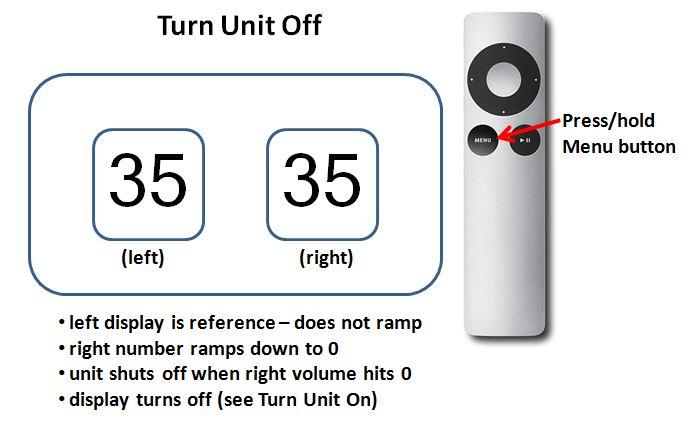
Turning off
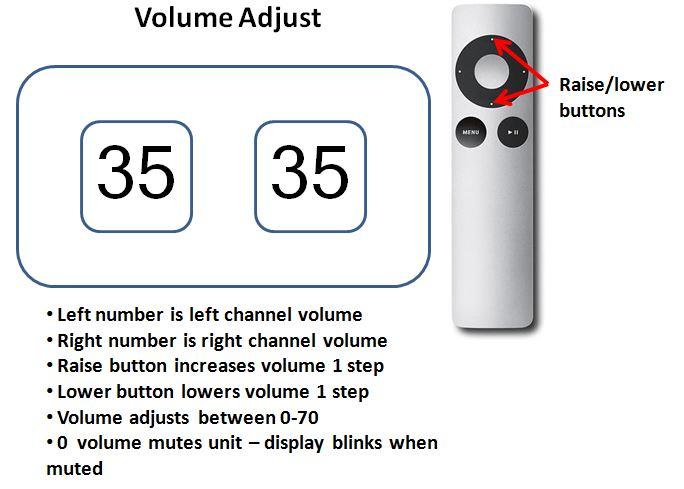
Volume adjust
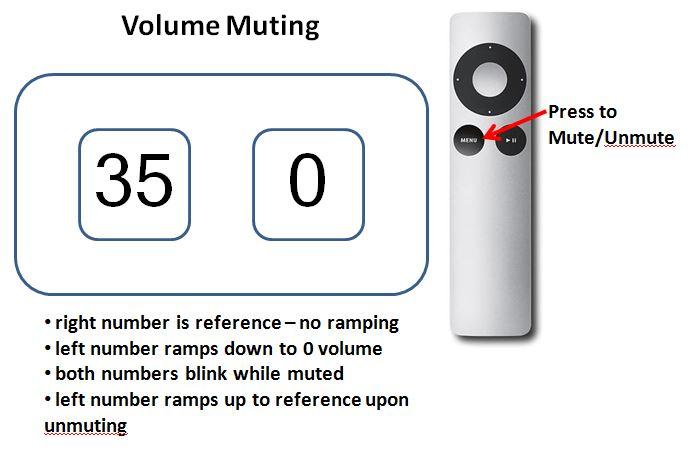
Volume muting
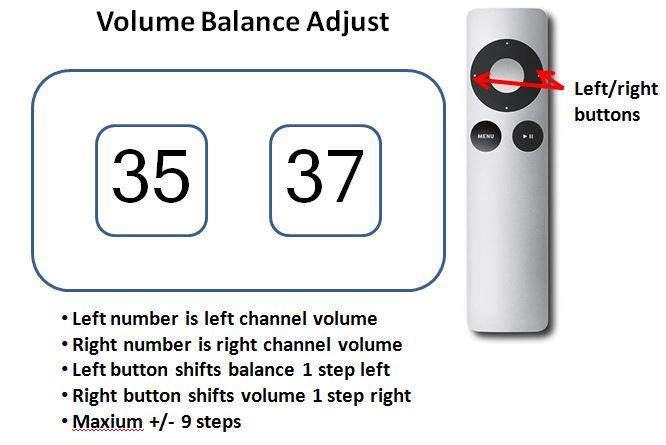
Balance adjust
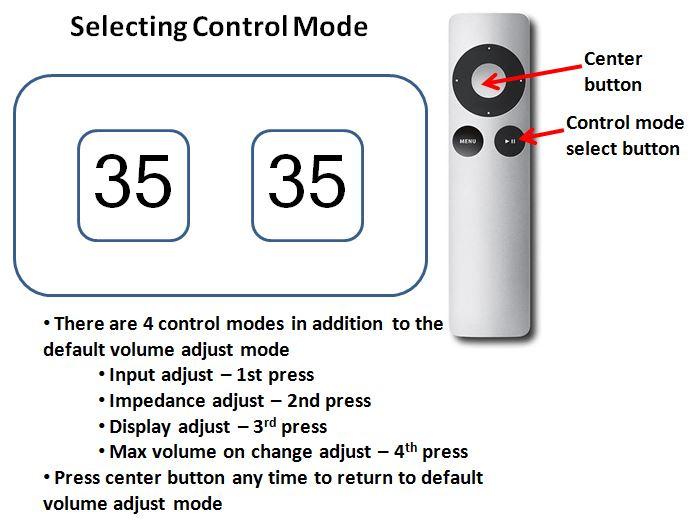
Changing control mode
In addition to the default volume control mode discussed above there are 4 additional control modes that are enabled using the control mode select button. Each these 4 control modes are explained below.
Input adjust | slow mode

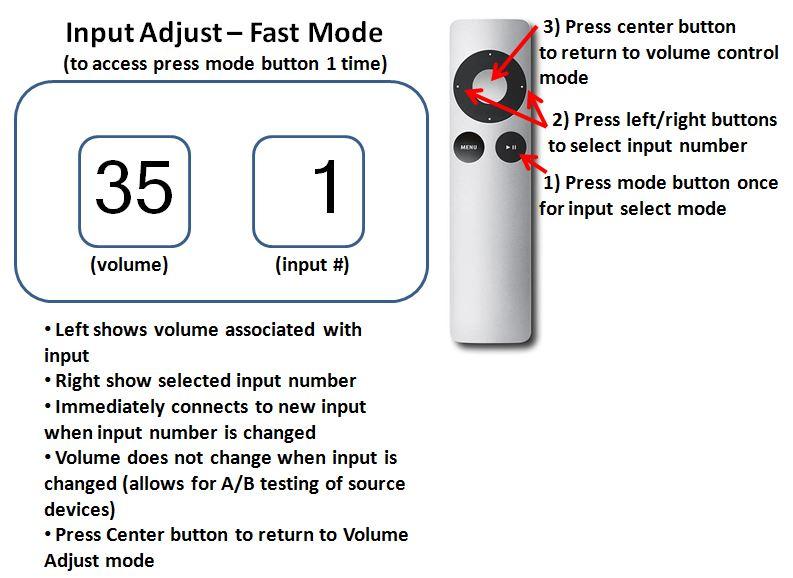
Input adjust | fast mode
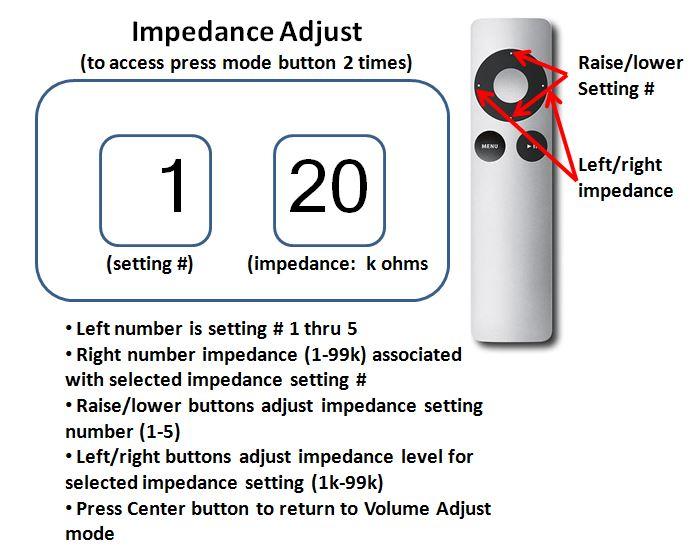
Impedance adjust
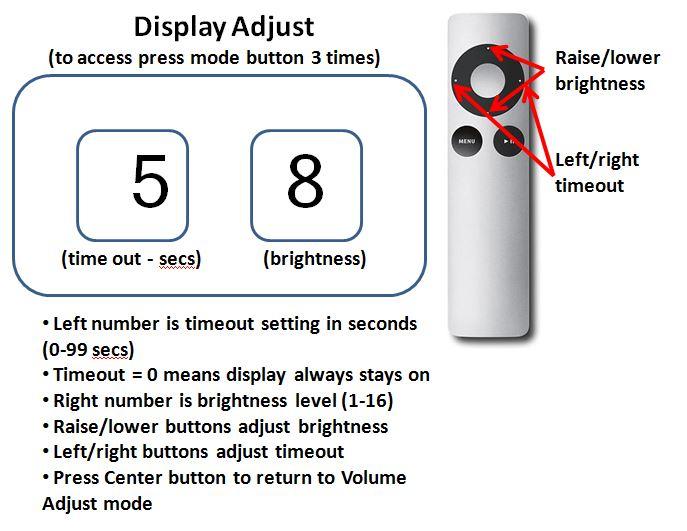
Display adjust
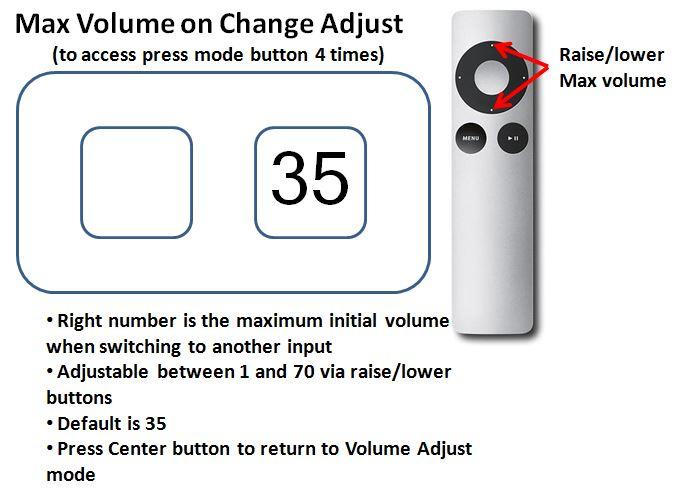
Max volume @ change adjust
Control functions list
| Function/Mode | Power | Button(s) | Description |
|---|---|---|---|
| Power/Mute | Off | Power/Mute | Pressing button turns the unit on. |
| Power/Mute | On | Power/Mute | Brief press will mute or unmute the unit. The volume will ramp down to zero when muted. When unmuted the volume will ramp back up to its prior setting. Press/hold of the button will turn the preamp off. |
| Volume Adjust | On | Up/Down | Raises and lowers the volume by 1 step for each press. Holding down the buttons will cause the commands to repeat. |
| Balance Adjust | On | Left/Right | Shifts the channel balance 1 step to the left or right. Maximum of 9 steps either way. Each step is slightly less than 1 dB. |
| Input Adjust | On | Mode, Raise/Lower & Left/Right | Pressing Control Mode (play) once will switch the unit into Input Adjust mode. The right display will show the currently selected input number. The left display will show the prior volume level associated with that input when it was last selected. Music will continue to play on current input channel while while the preamp is in Input Adjust mode. SLOW MODE Use the raise/lower buttons to adjust the input to desired number/source. Press the Center/Enter button to activate the newly selected input and return to volume control mode. If you select the same same input as your're currently listening to, nothing happens upon pressing the Enter button and returning to volume control mode. If you select a new input, pressing the Enter button will cause the existing input signal volume to ramp down, the new input to then be connected, and the new input volume to ramp back up. FAST MODE Use the left/right buttons to change inputs immediately. Using the fast mode will change inputs immediately without first muting the volume. The volume will change to the level last associated with the newly selected input. There will be a brief 200 millisecond delay in fast switching the inputs which will hardly be perceptible. If you are switching from a low volume to a high volume source you may hear a brief surge in volume of the previous input during the change over. This is normal and due to the fact that we use LDRs as on/off switches and they turn off slowly. Units with regular relays should not experience this volume surge during fast switching. |
| Impedance Adjust | On | Mode, Raise/Lower | Pressing Control Mode (play) twice will switch the unit into Impedance Adjust mode. The left display will show the impedance setting number (1 through 5) and the right display will show the impedance level (in xxK ohms) associated with the currently selected impedance setting number. Use the raise/lower buttons to change the impedance setting number (1-5). Use the left/right buttons to change the impedance level for the currently selected impedance setting. Press the Center/Enter button to exit Impedance Adjust mode and return to volume control. Changing the impedance setting number will instantly change the preamps impedance to the level associated with the setting number provided that this setting and its associated level have already been run through autocal. If the setting has not been initialized through autocal then selecting it will result in the audio being turned off. |
| Display Adjust | On | Mode, Raise/Lower & Left/Right | Pressing Control Mode (play) three (3) times will switch the unit into Display Adjust mode. BRIGHTNESS ADJUST The right display will show the brightness level number between 0-15. Use the raise/lower buttons to change the brightness level. Press the Center/Enter button to exit the Display Adjust mode and return to volume control. TIMEOUT ADJUST Timeout allows you to cause the display to turn off at the selected number of seconds after prior command input via the remote. Timeout only works when in Volume Adjust Mode and is disabled when the preamp is in any other control mode. The left display will show the timeout number between 0 and 99 seconds. If set at 0 the display timeout feature is disabled. Use the left/right buttons to adjust the timeout to desired level. Press the Center/Enter button to exit the Display Adjust mode and return to volume control. |
| Max Volume On Input Change Adjust | On | Mode, Raise/Lower | Pressing Control Mode (play) four (4) times will switch the unit into Max Volume On Input Change mode. The left display will be blank. The right display will show the maximum volume allowable when switching to a new input or when the unit is first turned on. This can be adjust between 1 and 70. The initial default value is 35. This protects your audio gear (speakers!) from accidentally going to full volume when switching to an input they may have been at or near full volume when previously selected as would be the case if the preamp was being used in a home theater bypass scenario. Use the raise/lower buttons to change the max volume on input change level. Press the Center/Enter button to exit the max volume on input change adjust mode and return to volume control. |
| Auto-Cal | Off | Enter, Right | Press Enter button to enable auto-calibration. Unit will cycle through each of 4 LDRs showing LDR number in left display and step number in right display. There are 70 calibration steps for each LDR. Upon completion of 4th LDR, unit will shut disable auto-cal and shut off display. You can skip over an LDR any time during autocal by pressing the right button. If you skip past the 4th LDR, autocal will terminate. |
| Pre-Cal | Off | Left, Right | Caution! Do not attempt the Pre-Cal process unless you have both the proper precision resistors and have carefully studied the pre-cal documentation. Pre-Cal requires the removal of all 4 LDRs and temporarily replacing them with a set of precision resistor modules with both 100 ohm and 100k ohm resistors. Use the 100 ohm resistors first. Also, Pre-Cal requires dual display modules. After the pre-cal resistors are installed, proceed to place the unit into Pre-Cal mode. First place unit in Auto-Cal mode. Then press the Left button 3 times to switch unit to Pre-Cal mode. When the calibration factor on the display stabilizes, press the Right button to switch to the next LDR/resistor. Repeat for next 3 100 ohm LDR/resistors. Then switch all 4 precision resistors over to 100k. Repeat the process of stabilizing the display value and pressing the Right button four more times. At the conclusion of this process you will have pressed the Right button 8 times. The eight time will end the Pre-Cal process and blank the display. The results of the pre-calibration will be save in memory. |
Control buttons list
| Button | Power | Mode | Function |
|---|---|---|---|
| Enter | Off | Auto-Cal | turns auto-cal on/off |
| On | Volume Adjust | does nothing except blinks display | |
| On | Input Adjust | turns on selected input and returns unit to volume control | |
| On | Impedance Adjust | returns unit to volume control | |
| On | Display Adjust | returns unit to volume control | |
| On | Max Volume On Input Change Adjust | returns unit to volume control | |
| Raise | Off | Info Display | move info display up 1 step |
| Off | Auto-Cal | press 3 times to enable Pre-Cal Adjust | |
| On | Volume Adjust | increase volume 1 step (0-70) | |
| On | Input Adjust | select next input (increasing) | rolls over to 1st at max input | |
| On | Impedance Adjust | select next impedance setting (1-5) | rolls over at top | |
| On | Display Adjust | increase brightness level one step (0-15) | |
| On | Max Volume on Input Change Adjust | increase max volume 1 step (1-70) | |
| Lower | Off | Info Display | move info display down 1 step |
| On | Volume Adjust | decrease volume 1 step (0-70) | |
| On | Input Adjust | select next input (decreasing) | rolls over at bottom | |
| On | Impedance Adjust | select next lowest impedance setting (1-5) | rolls over at bottom | |
| On | Display Adjust | decrease brightness level one step (0-15) | |
| On | Max Volume on Input Change Adjust | decrease max volume 1 step (1-70) | |
| Left | Off | Pre-Cal | If unit is in AutoCal, pressing the left button 3 times in a row will put unit into Pre-Cal mode |
| On | Volume Balance Adjust | shifts volume balance 1 step to the left (max 9 steps) | |
| On | Input Adjust | switch to next lowest input (fast switch mode) | |
| On | Impedance Adjust | increases impedance lvel by 1k | |
| Right | Off | Auto-Cal | switches auto-cal to next LDR, shuts off auto-cal if already at 4th LDR |
| Off | Pre-Cal | switches pre-cal to next LDR (required), 1st 4 steps are 100 ohm, 2nd 4 steps are 100k ohm | |
| On | Volume Balance Adjust | shifts volume balance 1 step to the right (max 9 steps) | |
| On | Input Adjust | switch to the next highest input (fast switching mode) | |
| On | Impedance Adjust | increases impedance level by 1k | |
| Power | Off | n/a | turns unit on |
| On | n/a | quick press – mutes volume press/hold - turns unit off |
|
| Mode | On | 1st press | selects Input Adjust mode |
| On | 2nd press | selects Impedance Adjust mode | |
| On | 3rd press | selects Display Adjust mode | |
| On | 4th press | selects Max Volume on Input Change mode | |
| On | Additional press | rolls over to 1st position – Input Adjust mode |
Version 2.1.x control scheme
The control scheme described below is applicable to any V2 based LDR preamp with earlier version 2.1.x firmware. Owners are encouraged to update their firmware to latest version of 2.2 after which you should refer to Apple Remote 2.2. section above.

Version 2.1 control functions of the Apple Remote are shown in the 2 tables below. The first table describes the control functions and modes. The second table summarizes how each control button relates to the control function.
Control functions list
| Function/Mode | Power | Button(s) | Description |
| Power On/Off | n/a | Power | Pressing button toggles the unit on and off |
| Volume Adjust | On | Raise/Lower | Raises and lowers the volume by 1 step for each press |
| Volume Mute | On | Mute | Toggles the mute status of the unit |
| Brightness Adjust | On | Enter, Raise, Lower | To place unit into Brightness Adjust mode:
Right display shows brightness level between 0 and 15. Use Raise/Lower buttons to adjust brightness. Press Enter button again to confirm/save new setting, exit Brightness Adjust mode and return unit to Volume Adjust mode. |
| Input Adjust | On | Right, Enter | Press Right button to switch to next input. Unit will immediately mute and right display will show selected input. Press the Enter button to lock in the selection, un-mute the unit, and return unit to Volume Adjust mode. |
| Balance Adjust | On | Mute, Left, Right, Enter | Press Mute button to first mute the unit. Then press Right button switch unit to Balance Adjust mode. Displays will blink. Right display will show double digit value. Balance towards right channel will show in right digit. Balance towards left channel will show in left digit. Use Left and Right buttons to adjust balance as you like. Press Center button to lock in balance adjustment, un-mute the unit, and return the unit to Volume Adjust mode. |
| Balance Reset | On | Mute, Left | Press Mute button to first mute the unit. Then press Left button to reset Balance Adjust to neutral. Unit will automatically un-mute and return the unit to Volume Adjust mode. |
| Auto-Cal | Off | Enter, Right | Press Enter button to enable auto-calibration. Unit will cycle through each of 4 LDRs showing LDR number in left display and step number in right display. There are 70 calibration steps for each LDR. Upon completion of 4th LDR, unit will shut disable auto-cal and shut off display. |
| Impedance Adjust | On | Left, Raise, Lower, Enter | Press the Left button to display the current Impedance Number (1-5). Press the Left button again to display the Impedance Level (1k-99k) associated with the current Impedance Number. Press the Left button repeatedly to toggle between displaying the Impedance Setting number and its associated Impedance Level.To switch to a different Impedance Number (1-5) use the Raise/Lower buttons while displaying the Impedance Number. This will immediately switch the preamp over to using the Impedance Level associated with the Impedance Number you selected. If you switch to an Impedance Number that has not been installed yet (has not been run through an Auto-Cal cycle), the audio output will likely shut off due to an absence of calibration settings for that Impedance Number/Level.If you wish to change the Impedance Level associated with the currently selected Impedance Number, switch display to Impedance Level (via Left button), then use Raise/Lower buttons to adjust impedance between 1k and 99k. The default setting is 20k. To lock in this new setting you must first press the Enter button and then run Auto-Cal for that new Impedance Level. If you do not run Auto-Cal immediately after changing the Impedance Level of the currently selected Impedance Number, the Impedance Level will not actually change. |
| Pre-Cal | Off | Raise, Right | Caution! Do not attempt the Pre-Cal process unless you have both the proper precision resistors and have carefully studied the pre-cal documentation. Pre-Cal requires the removal of all 4 LDRs and temporarily replacing them with a set of precision resistor modules with both 100 ohm and 100k ohm resistors. Use the 100 ohm resistors first. Also, Pre-Cal requires dual display modules. After the pre-cal resistors are installed, proceed to place the unit into Pre-Cal mode.First place unit in Auto-Cal mode. Then press the Raise button 3 times to switch unit to Pre-Cal mode. When the calibration factor on the display stabilizes, press the Right button to switch to the next LDR/resistor. Repeat for next 3 100 ohm LDR/resistors. Then switch all 4 precision resistors over to 100k. Repeat the process of stabilizing the display value and pressing the Right button four more times. At the conclusion of this process you will have pressed the Right button 8 times. The eight time will end the Pre-Cal process and blank the display. The results of the pre-calibration will be save in memory. |
Control buttons list
| Button | Power | Mode | Function |
| Enter | Off | Auto-Cal | turns auto-cal on/off |
| On | Volume Adjust | does nothing except blinks display | |
| On | Input Adjust | locks in selected input, blinks display, and returns unit to volume adjust | |
| On | Balance Adjust | locks in channel balance, blinks display, and returns unit to volume adjust | |
| On | Brightness Adjust | locks in brightness level, blinks display, and returns unit to volume adjust | |
| On | Impedance Adjust | locks in changes to Impedance Number/Level, blinks display, and returns unit to volume adjust | |
| Raise | Off | Info Display | move info display up 1 step |
| Off | Auto-Cal | press 3 times to enable Pre-Cal Adjust | |
| On | Volume Adjust | increase volume 1 step (0-70) | |
| On | Brightness Adjust | increase brightness 1 step (0-15) | |
| On | Impedance Adjust | increase impedance setting (1-5) or level (1k-99k) | |
| Lower | Off | Info Display | move info display down 1 step |
| On | Volume Adjust | decrease volume 1 step (0-70) | |
| On | Brightness Adjust | decrease brightness 1 step (0-15) | |
| On | Impedance Adjust | decrease impedance number (1-5) or level (1k-99k) | |
| Left | Off | n/a | does nothing |
| On | Balance Adjust | moves channel balance 1 step left | |
| On | Impedance Adjust | toggles between display of impedance number (1-5) and level (1k-99k) | |
| Right | Off | n/a | does nothing |
| Off | Auto-Cal | switches auto-cal to next LDR, shuts off auto-cal if already at 4th LDR (not recommended) | |
| Off | Pre-Cal | switches pre-cal to next LDR (required), 1st 4 steps are 100 ohm, 2nd 4 steps are 100k ohm | |
| On | Input Adjust | mutes the unit and switches unit to next input | |
| On | Balance Adjust | moves channel balance 1 step right | |
| Power | Off | n/a | turns unit on |
| On | n/a | turns unit off | |
| Mute | Off | n/a | does nothing |
| On | Volume Adjust | toggles muting – mute ramps volume down to zero, un-mute ramps volume up to prior setting |
No Auto-Repeat
The Apple Remote does not repeatedly send commands if you hold down the Raise or Lower buttons to adjust volume. Therefore each Raise/Lower button press increments/decrements the volume by 1 step count only.
Pre-Cal & Impedance Adjust Functions
- Pre-Cal and Impedance Adjust functions were added on 1.15.15 along with the release of version 2.1.0 of the LDR3x firmware.
- These functions are not present in earlier versions of the firmware.
- All LDR3x.V2.1 boards and LDR preamp products shipped on or after 1.15.15 include 2.1.0 or later versions of the firmware.
- All Tortuga Audio preamp products with USB connections can be updated with latest version of firmware to add these functions.
Apple Remote Bug:
- Units affected: All LDR units shipped on or after 10.1.13 but before 12.7.13
- The Bug: Pressing the Left or Right button again after having switched to a new input (but before having confirmed the change via pressing the Enter button), will either put the unit into Balance Adjust Mode (if you pressed the right button again) or will Reset the Balance (if you pressed the left button again). The reason this happens is switching inputs mutes the unit and when muted the Left/Right buttons control Balance Adjust Mode/Reset.
- The Work Around: When switching inputs you can only press the Left or Right buttons once and then must immediately confirm and lock-in the new input by pressing the Enter Key. Repeat this cylce until you’ve selected the desired input.
- The Fix: All LDRx units shipped on or after 12.7.13 have corrected software where pressing the Left or Right button will immediately switch over to the next input such that hitting the Enter key to confirm and lock-in the input change is no longer required.
