About this document
This document applies to V4 firmware only as used in the ePot.V4 Max and Mini series of electronic stepped attenuator & preamp controller and any V4 type preamps.
The purpose of this document is to provide information that will allow the owner/user to update the software (firmware) that runs the V4 hardware.
Click here for more information on the ePot.V4 hardware.
Click here for more information on the control and operation of the ePot.V4 attenuator and preamp controller.
What is firmware?
All of Tortuga Audio’s preamp’s are controlled by an embedded microcontroller commonly used today in commercial, industrial and consumer equipment. The software running on such microcontrollers is often referred to as “firmware”. We use the terms software and firmware in this document interchangeably.
Firmware is a class of computer software that controls a specific hardware device and is typically stored in that devices’s read only memory. By its nature firmware is neither easy to erase nor is it easy to replace or update especially as compared to software applications that run on a personal computer. Firmware usually runs directly on a microcontroller’s “bare metal” without any intervening operating system.
Why update your firmware?
The simple reality is that all software has bugs and over time software undergoes improvement and new features get added. In either case, the only way to get the bug fixes or improvement into your machine is to do a firmware update.
Firmware versions & changelog
The firmware changelog lists bug fixes, changes, improvements and new features that get added over time. Unless you’re having a specific problem with your current firmware, updating to the latest version is not generally warranted. However, significant firmware revisions it will be marked ** Important **. Many of the changes listed in the changelog are technical “under the hood” details that won’t mean anything to the average user/customer but are included for reference.
Which firmware version do you have?
The firmware version is shown on the OLED display by scrolling down the menu tree and selecting the “Version” menu. The firmware version is displayed as a 3 digit number as per the example below “FW: 100”

Firmware updating overview
Before wading into the detailed firmware updating procedure described below, we suggest you read the following overview of the process.
First, you’ll need a PC, MAC, or Linux computer together with a micro USB cable with one end attached to your computer and another plugged into the V4 board’s USB port.
Next, you’ll need to download and install the STM32CubeProgrammer application on to your computer. This only needs to be once.
Then, you’ll need to download the latest firmware file and store is somewhere on your computer where you can retrieve it later.
Turn on your V4 board and scroll down the OLED menu tree to “Firmware” and press the center button on your remote 5 times to enable firmware updating.
STM32 Cube Programmer application
The STM32 Cube Programmer, a.k.a. the “programmer”, is a powerful multipurpose microcontroller programming application that will run under Microsoft Windows (separate versions for 64 and 32 bit machines), the Apple MAC, and Linux machines. The programmer is maintained and made available for free by the manufacturer of the microcontroller used in the V4 board. You have to download this application and install it on your computer before proceeding with any firmware update. You only have to do this download and install once.
The programmer can communicate with the V4 through a USB connection but only when the V4 has been put into a firmware update mode. During the firmware update process the programmer erases the existing firmware and then uploads a new version.
You can download the programmer via the link below. The download is a zip file that you’ll have to unzip. Once unzipped you’ll be able to install the programmer by clicking on the installer program.
You only need to download and install the programmer application one time and not each time you update firmware.
The firmware file
The final piece of the puzzle is the updated firmware file that you’re going to upload into the V4. You retrieve this file directly from our website by clicking on the download link below. Store this data file somewhere on you computer since you will need to find it later while using the programmer application.
Detailed instructions
Step 1 | install the programmer application
Download the programmer files from the download link above. Install the programmer application on your Windows, MAC or Linux machine as you would any other application. We suggest you use the default installation settings.
Step 2 | download the firmware file to your computer
As described above, make sure you’ve downloaded the latest firmware file and make sure you’ve remembered where you stored it on your computer.
Step 3 | connect your computer to the V4 board
Use a common micro USB type cable to connect your computer to the V4 board’s J3.USB micro-USB socket.
Step 4 | place the V4 into firmware updating mode
Scroll down the V4 OLED display menu list and select “Firmware”. Then press the Enter (center) button on the remote 5 times in a row. On the 5th press, the V4 will enter into firmware updating mode. From that point forward, the V4 will no longer respond to any control input. This is normal.


Step 5 | run the programmer application
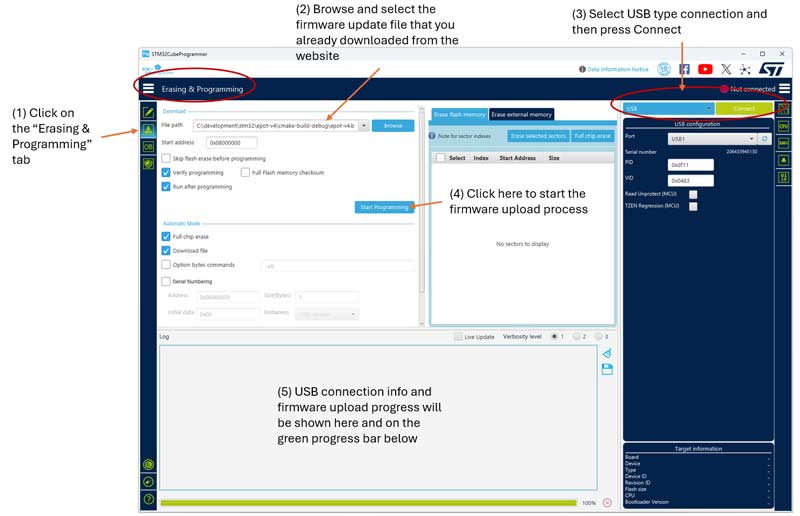
When you start the programmer application it may not look exactly like the image below. Each of the numbered sub-steps in the image below are explained in more detail as follows.
Step 5.1 – The programmer application has numerous tabbed views. Click on the 2nd tab icon in the upper left area as shown in (1). This will reveal the Erasing & Programming tab view.
Step 5.2 – Using the File Path dropdown or browse button(2), browse your computer for the firmware file that you had downloaded earlier and select it.
Step 5.3 – In the upper right hand corner of the programmer (3), select a USB type connection from the dropdown menu and then click on the Connect button next to it. The application will attempt to establish a connection to the V4 microcontroller. The results will be displayed in the Log window of the programmer application.
If the connection fails, the most likely explanation is that the V4 board is not actually in firmware update mode. Go back and repeat step 4 but first cycle power to your V4 board off and on before doing so. It’s also possible that there’s more than one USB configuration so repeat the process trying all USB configurations.
Step 5.4 – Click on the Start Programming button (4). If all goes well, the process will proceed smoothly and with a few seconds, the firmware will have been uploaded into the V4. The V4 board should reset when the programming is done but if it does not, simply cycle power off and on again to the V4 board and turn it on as you would normally. Double check that the updating work by scrolling down the OLED menu list to “Version” and select this menu item. The display will show the current firmware version (example: FW: 106). At this point you’re done so disconnect the USB cable from the V4 board and close the programmer application on your computer.