LDR3000x.V3 High Performance Passive or Active Preamp

$1,495.00$3,295.00

The LDR3000x.V3 line has been discontinued as of July 2022 due to changes in the company business plan going forward. Tortuga Audio continues to develop, manufacturer and supply its core LDR stepped attenuation and preamp controller technology to other OEMs and the DIY community.  

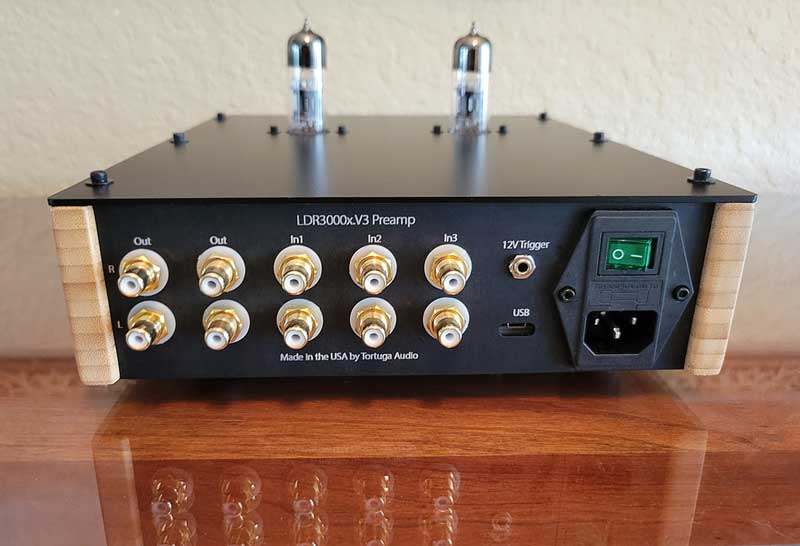
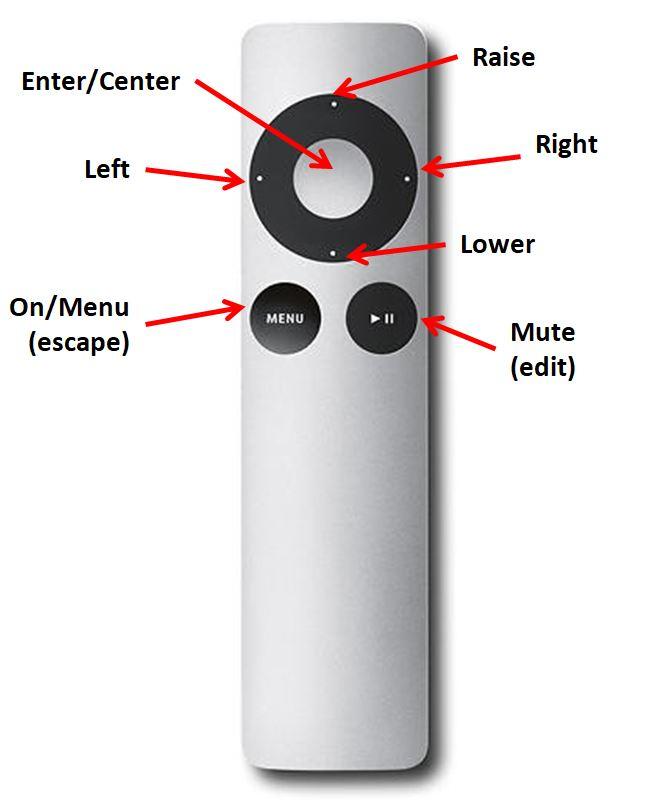
The LDR3000x.V3 is a flexible high performance, remote controlled, LDR (light dependent resistor) preamp available in 9 different configurations including as a passive, as an active solid state or as an active tube type preamp.  Each type can be ordered as single-ended only (3 in | 2 out | RCA), balanced only (3 in | 2 out | XLR) or mixed RCA/XLR (6 in | 4 out).  Each configuration can be remote controlled (Apple remote) or controlled from the front panel (rotary encoder) with a high contrast, white-on-black, interactive menu driven OLED display.

The sound quality of the LDR3000x.V3 is exceptional whether you opt for the passive or one of the active configurations. With 9 different configurations to choose from and the clear, natural proven sound of LDR attenuation, you will not be disappointed.

  • Output Coupling Capacitor Upgrade (Single Ended) *

    All tube preamps require output coupling capacitors and come standard with good metalized polypropylene caps included in the base price. You can opt to upgrade to the excellent VCap ODAM (Oil Dampened Advanced Metalized) capacitor.

  • Output Coupling Capacitor Upgrade (Balanced) *

    All tube preamps require output coupling capacitors and come standard with good metalized polypropylene caps included in the base price. You can opt to upgrade to the excellent VCap ODAM (Oil Dampened Advanced Metalized) capacitor.

Product total

Options total

Grand total

SKU: LDR3000x.V3 Category:
Print Friendly, PDF & Email

Flexible preamp platform
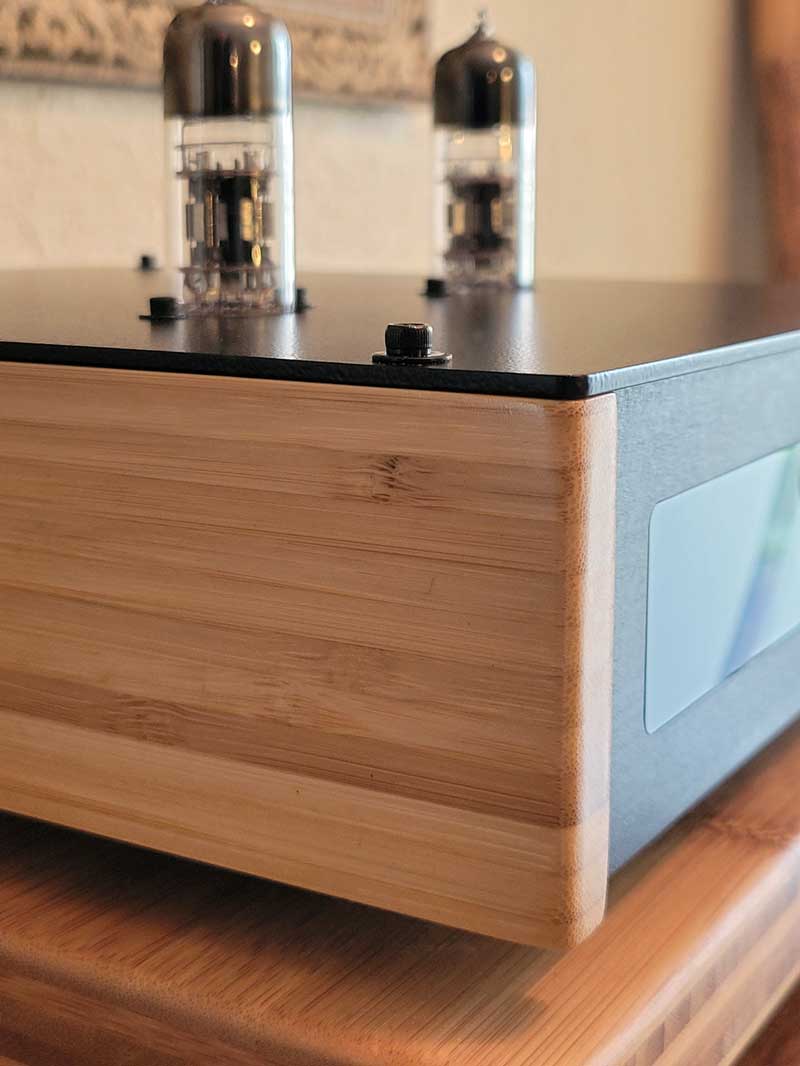
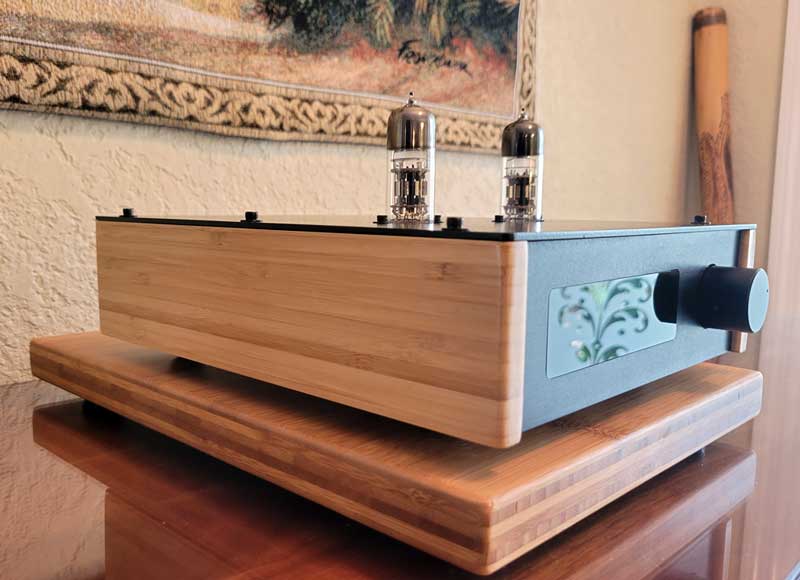
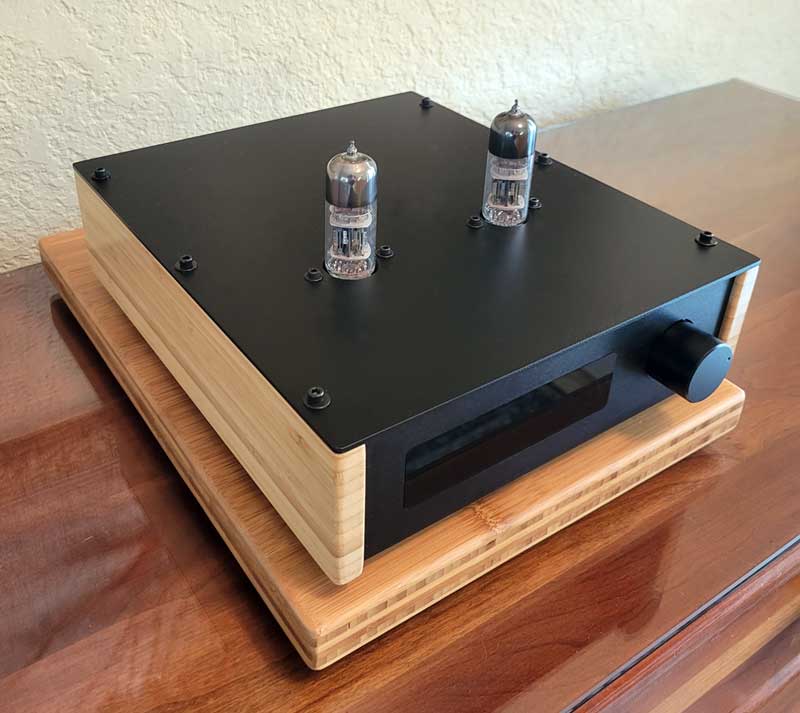
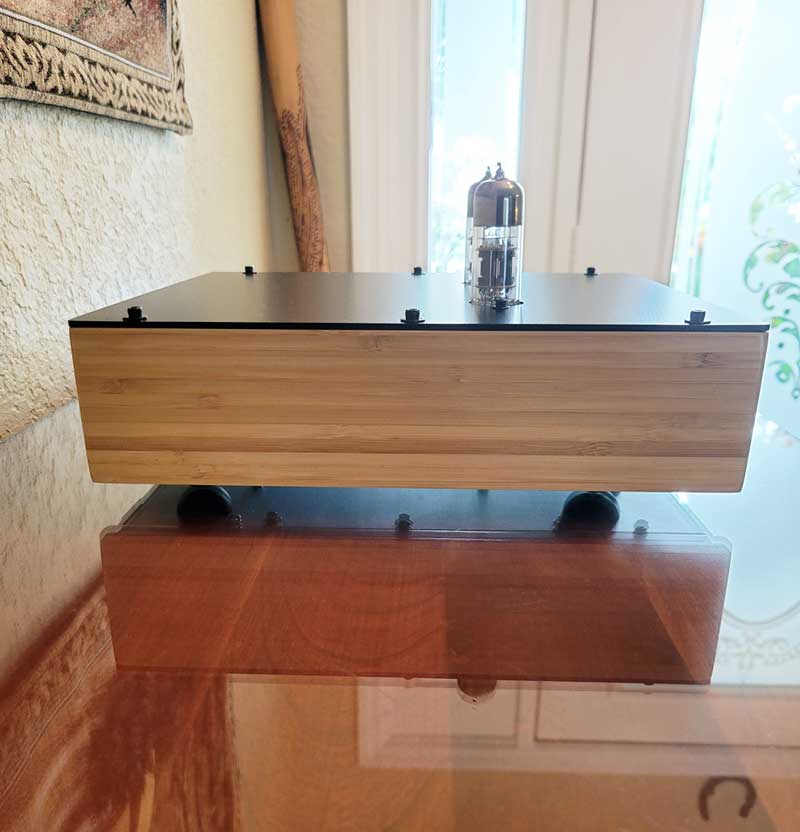
The LDR3000x.V3 is designed around our high performance V3 Max electronic LDR stepped attenuator & preamp controller in combination with an attractive enclosure composed of anodized and powder coated aluminum and sustainable bamboo.

LDR3000x.V3 preamp front view#2 (3D CAD)
LDR3000x.V3 Tube Preamp with mixed XLR and RCA inputs/output – wide enclosure

The LDR3000x preamp platform can be configured as either a passive or active preamp. The active version can be configured as either a solid state or tube based preamp. Regardless of preamp type, you can opt for single-ended RCA signals only, balanced XLR signals only, or a combination of both. Combined signal types requires a wider version of the enclosure but has the same height/depth as the narrower build and is otherwise identical.

All outputs are dual/parallel for convenience when bi-amping or driving both a main amp and a separate subwoofer amp.

LDR3000x.V3 configuration options diagram

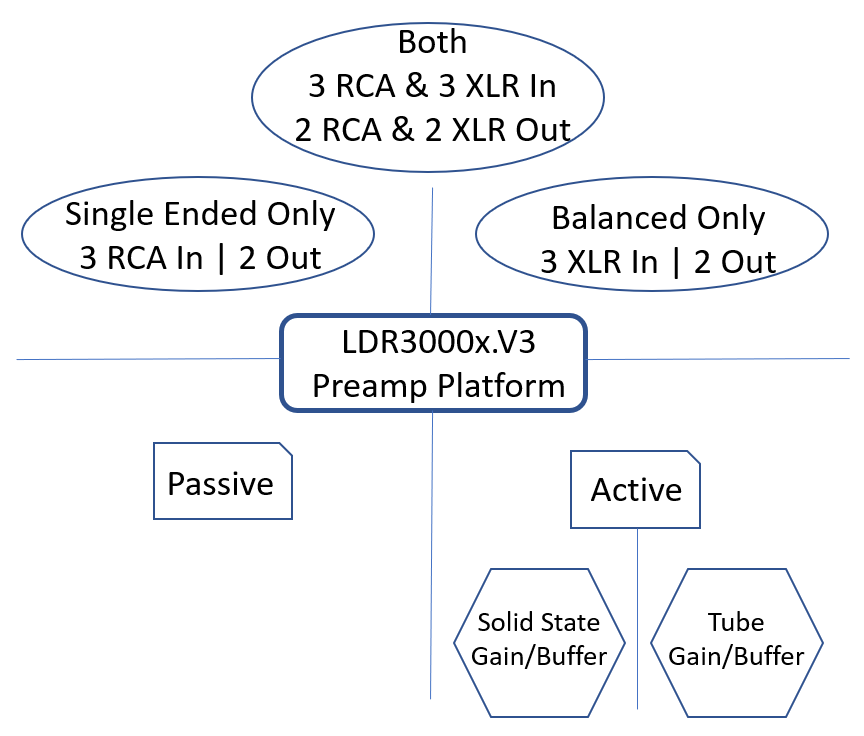
Nine (9) preamp configurations

The flexible LDR3000x.V3 preamp platform is available in nine (9) different preamp configurations. Each configuration is listed below along with its base pricing.

All configurations start with the V3 Max attenuator/controller in the LDR3000x enclosure. Different internal modules and rear panel assemblies are used in each configuration. Since these configurations are mostly modular, it’s not too difficult to change to a different configuration later on.

Configuration #Preamp TypeSignal TypeBase Price
1PassiveSingle-ended | 3 RCA inputs & 2 outputs$1495
2Passive Balanced | 3 XLR inputs & 2 outputs$1795
3Passive Mixed RCA & XLR
3 RCA inputs & 2 outputs
3 XLR inputs & 2 output
$2295
4Active | Solid StateSingle-ended | 3 RCA inputs & 2 outputs$1795
5Active | Solid StateBalanced | 3 XLR inputs & 2 outputs$2295
6Active | Solid StateMixed RCA & XLR
3 RCA inputs & 2 outputs
3 XLR inputs & 2 output
$2795
7Active | TubeSingle-ended | 3 RCA inputs & 2 outputs$2295
8Active | TubeBalanced | 3 XLR inputs & 2 outputs$2795
9Active | TubeMixed RCA & XLR
3 RCA inputs & 2 outputs
3 XLR inputs & 2 output
$3295

A great sounding preamp

Built around our latest ePot.V3 Max stepped attenuator & preamp controller, the LDR3000x is arguably our best sounding preamp to date whose subjective performance will please even the most discriminating listener.

V3 Max electronic stepped attenuator & controller

The heart of the LDR3000x is our latest preamp attenuator/controller, the ePot.V3 Max (the “V3” or “Max”  ). The V3 is the culmination of over a year of development and refinement of our evolving 10+ year LDR attenuation technology. The V3 combines exceptional sonic performance in an integrated, software driven, preamp controller that includes input switching, remote control and a menu driven interactive high contrast OLED display interface.

Features of the ePot.V3 Max include:

  • 100 step attenuator over 60 dB range
  • Smooth volume stepping with no sonic artifacts
  • No mechanical switches in the signal path
  • Menu driven visual control with high contrast 256 x 64 OLED display
  • LDR (light dependent resistor) attenuation
    • precision closed loop LDR current control
    • integrated offline self calibration of the LDRs
    • replaceable plug-in LDR module
  • Integrated input switching (3 single-ended stereo sources) via LDR switches
  • Remote controlled (Apple infrared remote)
  • Manual control via rotary encoder with integral push button
  • Smooth muting/unmuting
  • Left/right channel balance  (+/- 10 db)
  • Updateable firmware

Operating instructions

The operation of the LDR3000x.V3 is indistinguishable from the underlying ePot.V3 Max Controller/Stepped Attenuator at the heart of the LDR3000x. The operating instructions for the V3 Max are available in our online product documentation and can be found here.

Common specifications

The following specifications are common to all LDR3000x.V3 configurations. You can find specifications for the active solid state and active tube versions in their own tabbed sections.

CriteriaDescription
Preamp OverviewA remote controlled, 2 channel stereo linestage preamp that can be configured as a passive or active preamp with up to 3 single-ended inputs and/or 3 balanced inputs. The active version can be solid state or tube based.
AttenuationAn analog, 2 channel stereo, electronic stepped attenuator with 100 smooth steps over -60 to 0 dB range with using two light dependent resistors (LDRs) per channel in a series/shunt L-Pad voltage divider configuration.
Attenuation ModuleSingle plug-in replaceable LDR attenuation module with 4 embedded LDRs plus EEPROM memory chip for storing attenuation tables derived from in-situ calibration of the LDRs
ControllerThe controller uses an embedded 32 bit ARM M3 Cortex 100 MHz microcontroller to drive a 16 bit command DAC tied to 4 precision LDR current control loops each of which controls the resistance level of 1 LDR. The controller also handles the remote control decoding, manual encoder inputs, input switching, menu driven graphical OLED display and LDR calibration process.
LDR Calibration Embedded closed-loop offline calibration circuit which normalizes the behavior of each of the 4 attenuation LDRs over 100 steps of attenuation each corresponding to a specific targeted resistance value that varies with the input impedance setting which can be altered by the user if desired. Calibration can be run to compensate for performance drift, aging, or in the event of LDR Module replacement. Calibration is user initiated. Pre-matched LDRs are not required.
Direct input | no coupling capThe incoming audio signal is direct coupled with no AC coupling capacitors in the signal path.
Input ImpedanceDefault input impedance is 20k ohms with ability of user to configure other impedance settings each between 1k and 99k that user can switch between to determine potential optimal input impedance for user's system.
Channel Balance Adjustment+/- 20 step channel balance adjustment at ~0.6 dB per step for a nominal max channel balance range of +/- 12 dB
Remote ControlInteraction with the Display/Control Menu is done with a simple 7-button Apple infrared remote (or equivalent remote using 38 kHz NEC protocol and conforming with the Apple command/ID structure)
Encoder Control A subset of the controls are available through a front panel control knob attached to a rotary stepped encoder with integral push button switch
Display/Control MenuHigh contrast 3.12 inch white-on-black 256x64 pixel graphical OLED display mounted behind a tinted acrylic lens. Display is essentially invisible when preamp is turned off. The display provides an intuitive interactive menu driven control. Control Menu details are available online as art of the product documentation for the ePot.V3 Max controller at the following link: http://51.81.208.15/docs/epot-v3-operation-controls/
12V Trigger OutA 12 VDC trigger out is provided via a mono phone jack. The On/Off state of the trigger out corresponds to the On/Off state of the preamp. The trigger out On state has a using adjustable 10 seconds delay with the default delay being 0 seconds (no delay) .
Power Entry 100-240 VAC mains via IEC power entry module with integral fuse drawer and mains power switch. IEC style 3 prong plug-in power cable.
Internal Power Regulation * V3 Max Controller Power Supply - 10 W, 100-240 VAC to 12 VDC converter followed by linear filter
* V3 Max DC-DC power board - Dedicated 2 stage switch mode plus linear DC-DC regulation producing primary 3.3V plus +4.8V and -4.8V split voltage
Enclosure* Black brushed anodized aluminum front panel with dark acrylic lens inlay and large anodized aluminum volume/control knob in a machined recess
* Black brushed anodized aluminum read panel with laser etched annotation
* Top panel - black power coated aluminum
* Bottom panel - aluminum with natural finish
* Side panels - solid bamboo with durable satin polyurethane finish
* Feet - platinum silicone hemispherical vibration dampening feet
Circuit Boards/Solder High quality lead-free printed circuit boards with 3% or higher silver content in the soldered parts
ROHSCompliant or exempted
FusesOne external fuse located in the IEC fuse drawer
Ambient RequirementsPreamp must be operated in a stable, dry indoor environment only with stable ambient temperature within 60-90 degree F
DimensionsNarrow - 10 inches wide | 10.5 inches deep | 3 inches tall (including feet)
Wide - 13 inches wide | 10.5 inches deep | 3 inches tall (include feet)
Weight** TBD **
Other SpecificationsSpecifications that are specific to either the solid state or tube configurations of the LDR3000x.V3 are provided separately under those information sections
Print Friendly, PDF & Email

SSPB.V3 solid state buffer

The active solid state version of the LDR3000x.V3 adds our SSPB.V3 solid state preamp buffer module to our core V3 Max stepped attenuator to deliver clean, robust current drive. A highly neutral yet dynamic solid state buffer, the SSPB.V3 enhances performance when a passive attenuator alone may not satisfy.

The SSPB.V3 is our 3rd generation solid state buffer that is designed as both a stand-alone buffer board and also as a plug-in module. When used as a plug-in, it mounts directly on to the V3 Max attenuator/controller board turning the V3 Max into a compact, high performance solid state preamp engine that transforms the LDR3000x from a passive into an active preamp.

SSPB.V3 solid state preamp buffer diagram

Dynamic authority without editorializing

Our goal in offering an active solid state preamp is to augment the performance of our core V3 Max LDR attenuator/controller while retaining all its positive characteristics and not adding any coloration of its own. For this we chose the proven low-noise dynamic current drive of the LSK170 JFET together with a neutral high impedance unity gain stable JFET op amp as an input buffer.  The result is a neutral buffer with robust dynamic authority with minimal editorializing. Just the way we like. it.

Buffered input stage with optional gain

The SSPB.V3 employs a high impedance audio op amp input buffer stage that is set by default to unity gain (no signal amplification).  The simple fact is most audio systems require no actual gain (voltage boost) from their preamp in order to deliver adequate volume headroom.  But just in case your system does needs it, you can increase the gain by swapping out a a simple pair of plug-in gain resistor modules that provide either +6 dB or +12 dB gain. Other gain levels can be achieved by using a custom set of plug-in gain modules which can be ordered by request.

Also, since the 8-pin dual channel input stage op amp is socketed, those wishing to explore alternative input stage op amps can do so.

No coupling capacitors

The input and output of the solid state drive are both direct coupled. This means there are no input or output coupling capacitors in the signal path of the solid state LDR3000x.V3. This is made possible by using a dedicated 2 stage split voltage power supply for powering both the op amp input stage and the JFET output stage. This power supply is separate from the power supply for the V3 Max attenuator/controller.

The DC offset of the preamp output can be trimmed to near zero levels through easily adjustable trimmer pots that require only a small screwdriver and a volt meter to measure each output signal. Doing so does require removing the top cover of the preamp to access the solid state buffer board.

Specifications

(coming soon)
Print Friendly, PDF & Email

TPB.V3 tube preamp buffer

The TPB.V3 tube preamp buffer deliver robust dynamics with just the right touch of that airy and sparkling sound that only tubes can deliver. If the rest of your system has that dry solid state sound, adding in the TPB.V3 tube preamp buffer rarely fails to satisfy.

TPB.V3 tube preamp buffer diagram

The TPB.V3 is our 3rd generation tube buffer that is designed as both a stand-alone tube buffer board and also as a plug-in module. to the V3 Max.  When used as a plug-in, it mounts directly on to the V3 Max attenuator/controller board turning the V3 Max into a compact, high performance tube preamp.

Direct coupled tube input stage

6h30 tubes for Tortuga Audio's TPB.V1 Tube Preamp BufferThe incoming audio signal connects directly to the triode’s grid with no input coupling capacitor. A 100k ohm Vishay Dale resistor sets the tube buffer’s input impedance making the tube buffer extremely easy to drive.

We chose the 9 pin 6H30Pi Gold triode tube from Electro-Harmonix because of its growing reputation for sonic excellence, robust long-life, and the fact that it’s a contemporary tube that isn’t likely to go out of production for a long time to come.

We run the 6H30’s at a much lower plate voltage than most other tube preamps. This lowered voltage reduces tube stress and together with its already robust design all but guarantee that the 6H30’s will last indefinitely.

Most importantly, the 6H30 is a delightfully smooth, neutral and muscular sounding tube with just the right amount of tube euphonics.

Tube rolling possibilities

The TBP.V3 tube preamp buffer allows you to substitute the stock 6H30 tube with any tube from the 6DJ8 / ECC88 / 6922 / 7308 family of tubes which opens up a big wide world of tube rolling possibilities.  More info on tube rolling the buffer can be found here. 

Optional gain if you need it

The LDR3000x.V3 is designed by default as a unity gain (no signal amplification) preamp. The reason for this is quite simple. Most home audio stereo systems do not require signal amplification by a preamp in order to achieve sufficient volume levels. And since all amplification increases signal noise, why amplify any more than is necessary?

For those systems that need a little more volume headroom,  the gain of TPB.V3 tube buffer can be increased by the user by swapping out the unity gain plug-in gain modules with higher gain plug-in modules of +3 dB (1.414 x gain) or +6 dB (2.0 x gain).

Powerful solid state output stage

The output stage of the TPB.V3 is the buffer proper. And the heart of any buffer is its current amplifier (a.k.a. “current drive”). Unlike a voltage amplifier (voltage gain stage) which makes music louder, a current amplifier delivers the music with more authority, power and dynamics. To use the garden hose analogy, if  music volume is water pressure, then current drive is the capacity to deliver the water flow. That’s the job of the audio buffer; to deliver the content (current) of the audio signal represented by the voltage.

To this end, we employ the highly effective, low noise LSK170 JFET transistor in an elegantly simple class A constant current circuit with commensurate low output impedance. The result does not disappoint.

In fact, this is essentially the same proven buffer design used in our SSPB.V3 solid state preamp buffer. However, unlike the solid state buffer, the tube buffer requires that we use a DC blocking capacitor at the output to deliver a zero DC offset.

Robust hybrid power supply

The TPB.V3 is powered by an oversized 45 VA multi-stage power supply that starts with a highly efficient switching stage that converts either 120 or 240 VAC mains power into 12 VDC. The raw DC power is goes through a filter into pair of dedicated linear DC-DC regulators to deliver separate dead quiet DC current to each tube heater element. A separate circuit boosts the raw DC voltage which is then run through yet another DC-DC regulator to deliver low-noise plate voltage to the tube.

Given its high current capacity, the TPB.V3 is able to handle the current requirements of almost any 9 pin tube available today. Power supply will not be a limiting factor for those who consider tube rolling to be an official audio sport.

Output Coupling Capacitor upgrades

Since the TPB.V3 relies on an output coupling capacitor to pass through the audio signal, the performance of that capacitor becomes the ultimate limiting factor in performance. We employ a good yet modest stock polypropylene output coupling capacitor that can be upgraded to either an excellent high performance V-Cap ODAM (oil damped advanced metallized) capacitor or the quite pricey V-Cap CuTF (copper foil fluoropolymer film) capacitor for those seeking the ultimate in performance.

Specifications

These specifications reasonably reflect the current model and are subject to updating and modification without notification.

(coming soon)

Print Friendly, PDF & Email

LDR3000x.V3 operations & control

The information provided below can also be found in our online product documentation for the V3 series controller.

The following covers ePot.V3 operation & control as it applies to both the Mini & Max versions of the ePot.V3 preamp controller and stepped attenuator, both with and without the OLED display.

ePot.V3 operation & control
ePot.V3 preamp controller & stepped attenuator | Rev A

If you own a V3 series Tortuga Audio preamp, you can skip down to the section titled "V3 controls | with OLED display" and focus on information specific to the V3 Max controller.

The Apple Remote

The Apple remote has only the 7 controls buttons as shown below. These are adequate for common control actions like turning on, muting, adjusting volume etc. More complex control actions require menu driven interaction between the remote and the visual OLED display.

Apple Remote - OLED Display

The OLED display

The OLED display is a 256x64 bit high contrast white-on-black graphical display. It works interactively with the Apple remote to allow the user to navigate a menu tree to makek control changes or select or change options. Being a graphic display, the OLED can display a wide range of text, numbers, lines, and images. These capabilities are used to good effect to enable the user to easily configure and control our preamps.

OLED display - channel balance

Click on the image above to jump to more detailed documentation on the OLED Display.

ePot.V3 operation & control | Status LED only

The ePot.V3 Mini and Max are designed to work best with the OLED display. However, both V3 models can also be operated without the OLED display albeit with a reduced set of control features and no ability to change controller settings/options.  When operating without an OLED display is strongly recommended that a status LED light be attached to provide the most basic visual feedback.

The controls available without an OLED display include:

  • turn power on/off
  • raise/lower volume
  • muting/unmute output
  • left/right channel balance adjustment
  • input switching (V3 MAX only)

A detailed description of the V3 controls without the OLED display are provided below. Where there are differences between the Mini and Max, these are noted. The control information described below assumes the following:

  • No OLED display
  • Status LED attached
  • Remote control active (IR receiver attached | using Apple remote)
  • Encoder is attached (by default in all Mini's)

The details of each control function is contained within the expandable accordion sections below.

When no OLED display is used, we highly recommend the use of status LED as a simple alternative. The Status LED provides a minimal level of operational feedback and status information as follows:

Powering up: Blinks briefly while the unit boots up and then turns off indicating unit is in standby and ready to be turned on.

Turning on: Blinks briefly as unit turns on and then stops blinking once the volume un-mutes and ramps up to setpoint. Stays on indicating the unit is on and operational.

Turning off: Starts blinking as volume ramps down and mutes. Continues to blink while a brief turnoff process completes. When turnoff is complete, it turns off indicating the unit is off and in standby ready to be turned on.

Control response flash: Will quickly flash off/on once in response to most control inputs from either the remote or the encoder. Will flash repeatedly while generating a repeat command such as when a button is held down on the remote or when turning the encoder quickly.

Blinking while muted: Will blink slowly while the volume remains muted. Stops blinking and stays on once volume is subsequently un-muted.

Balance control neutral blink:  Blinks quickly several times each time the volume balance control is adjusted back to neutral (no left or right bias). Pressing the Enter(Center) button on the remote also resets the balance to neutral with similar blinking.

When power is applied the V3 will goes through a brief boot-up process as follows.

  • The LED will blink during boot-up
  • When the boot-up is completed the LED will stop blinking and turn off
  • The V3 is now turned off and in standby mode ready to be turned on and operated normally.

The V3 can be turned on by the remote or the encoder as described below.

When the V3 turns on the LED will blink briefly until the V3 unmutes after which the LED will remain on and the volume will ramp to its previous level when it was last on.

Remote Turn On:

  • Briefly press/release the Menu button on the Apple remote to toggle the V3 on or off.

Encoder Turn On:

  • Briefly press/release the encoder control knob/push-button on the front panel.

The preamp can be turned off by both remote and by the encoder.

During the turn-off process the volume will ramp down to zero while the the LED blinks. Upon reaching zero volume the controller/LED will turn off.

Remote Control:

  • Briefly press/release the Menu button on the Apple remote to toggle the V3 on or off.

Encoder Control:

  • Press/hold-in the encoder control knob/push-button on the front panel
  • Hold in for between 3 and 5 seconds and then release

Volume is adjustable 2 ways:

Remote Control:  

  • Press Raise/Lower buttons on the remote to increase/decrease volume by 1 step per press
  • Hold down the these buttons to cause the volume setpoint change command to keep repeating until released
  • The LED will flash each time a new remote command is issued but not when a repeat is happening

Encoder Control: 

  • Turning the encoder clockwise/counter-clockwise will raise/lower the volume
  • The encoder generates 20 steps per full rotation so for a 100 step volume controller the encoder will require 5 full turns to go from 0 to 100% volume
  • It’s possible to turn the encoder faster than the program can respond
  • There are no “stops” to the encoder. It will turn endlessly in either direction

You can mute/unmute the V3 with either the remote  control or the encoder.

Remote Control:  

  • Press the Mute button (lower right hand corner button to toggle the mute state
  • When muted the preamp’s volume will ramp down to zero and remain there until the Mute button is pressed again
  • The LED will blink while the V3 is muted

Encoder Control: 

  • Briefly press-in/release the encoder push button to toggle the mute state
  • The LED will blink while the V3 is muted

Max vs Mini Muting: 

Please be aware that whereas the Max uses various switches when muted to minimize volume, the Mini does not have any ability to disconnect the audio signal or shunt the signal to ground while muted and so the “muted” volume level for the Mini, especially with the discrete attenuator module, may simply be the same as as the minimum Step 1 volume. Said differently, when Muted, the Mini will likely still be passing through audio you can hear.

Balance control is available with the Remote (both Mini and Max) and the Encoder (Mini only)

Remote Control:

  • Use Left/Right buttons to adjust channel balance left/right
    • The LED will flash briefly acknowledging each  balance adjustment step
    • Each time the channel balance returns to zero (no left/right bias) the LED will flash briefly 3-4 times
  • Press the Center button to reset the channel balance to neutral
    • The LED will either:
      • blink off for 1 second acknowledging return to neutral (earlier firmware)
      • flash briefly 3-4 times (later firmware)

Encoder  (Mini only):

  • Press/hold-in encoder pushbutton while simultaneously turning the encoder right or left
  • There is currently no way to automatically reset channel balance to neutral using just the encoder, however by slowly adjusting balance you will eventually hit the neurtral point as evidenced by the status LED blinking slowly twice.
  • This feature is only available on the V3.Mini. On the V3.Max this control action is used instead to change inputs with the encoder.

Input switching is only available with the Max where input switching is possible via both the remote and the encoder. The Mini is a single input attenuator/controller thus it has no input switching.

Remote control:

  • Input switching via the remote is a 3 step control process
    • step 1 – mute the controller
    • step 2 – use the Right/Left button on the remote to switch to the next input
    • step 3 – unmute the controller

Encoder knob:

  • Press/hold in encoder push-button and while pushed in turn knob right or left to switch immediately to the next higher/lower input
  • Release encoder push-button when desired input has been selected

ePot.V3 operation & control | with OLED display

The ePot.V3 Mini and Max both designed to operate optimally with an OLED display.  The OLED display provides context and feedback wherein the user is presented with a full set of menu driven controls plus the ability to change controller settings/options to suit. We high recommend using the V3 preamp controller/attenuators together with the OLED display.

The controls described below relate to both the ePot.V3 Mini and Max operating under the following conditions only:

  • An OLED display is attached
  • The IR receiver & encoder are connected through the OLED display
  • An optional status LED is also attached (concurrent use of both OLED and status LED is possible with the Max only)

OLED control menu rules

The OLED control menu navigation "rules" are the same for both and are summarized as follows:

Menu Item Labels - The labels listed under the "Menu Items" column below are the actual labels shown in the OLED display

Navigating the List - The user navigates up/down the menu items list using the raise/lower buttons on the remote. You don't see the whole list, you only see the current menu item label that you're on.

Selecting a Menu Item - A menu item is selected/activated by pressing the center button on the remote. For example, if the "Off" menu item is currently being displayed, pressing the enter button will turn off the preamp. In this example, "Turns off preamp" is the resulting control action. As another example, if the "Volume" menu item is currently being displayed, pressing the enter button will switch the preamp into the default volume control action/view.

Control Action/Views - When you select/activate a menu item, you leave the menu items list and switch to the selected control action/view. Within each control action/view you use the buttons on the remote control (raise, lower, left, right, menu, mute and center) to manipulate the available controls which are different and specific to each control action. This is difficult to explain in text form and relatively easy and intuitive to understand with a little hands-on experience.

Volume Control | the default Control Action/View - The volume menu item and associated control action/view are highlighted in red. Volume control is the the default control action/view. This is where you'll spend 99% of your time. No matter what other control action/view you might be in, in most instances you can return to the default volume control action/view by simply pressing the center button on the remote - kind of a universal "escape to home".

Escape out via Menu button - When in any of the control action/views, pressing the Menu button on the remote will exit that control action/view and revert back to the associated menu item. Pressing the Menu button again will revert you back to the default volume control action view.

Escape back to volume control via Center button - When in any of the control action/views, pressing the center button on the remote will usually exit that control action/view and revert back to volume control action/view.

V3 Mini Control Menu | OLED

The control menus for the Mini is essentially a subset of control menu for the Max. Both control menus are shown below.

ePot.V3 Mini control menu structure

V3 Max control menu | OLED

The control menus for the Max has all the same elements as the Mini plus additional elements that are mostly related to input switching and the ability of the Max to adjust its input impedance and to calibrate the LDR module.

The control menu structure is outlined below. Each V3 control feature/function is explained in detail. Some of the control topics listed do not correspond to a specific OLED menu item. The controls that do correspond to a specific OLED control menu item are marked (menu). Controls that apply to only to the Max or Mini are marked accordingly.

epot.V3.Max control menu - rev 2.2.0

Description of each control

  • When power is applied the V3 will goes through a brief boot-up process
  • A turtle (tortuga) will appear on the display and then fade to black
  • The V3 is now turned off and in standby mode ready to be turned on and operated normally.

The V3 can be turned on either via the remote or the encoder as follow:

Turning on the preamp

Remote: 

  • When the V3 is off, press the Menu button on the Apple remote to turn the V3 on

Encoder: 

  • When the V3 is off, briefly press/release the encoder control knob/push-button on the front panel to turn the V3 on

After Turn On:

  • The large text “Tortuga Audio” will appear on the display and then fade to black
  • The display will then switch to the default volume control action/view on the display
  • The volume will then unmute and ramp up on the display to the same setpoint it was at prior to being turned off last time

The controller can be turned off with either the remote or the encoder as described below. Off is the topmost menu item in the menu tree.

Turn off the preamp:

Remote: 

  • Navigate to  the topmost Off menu item
  • Press Center button on remote to execute the turn off process.
    • The volume will then ramp down to zero
    • Once volume hits zero the unit will mute and the input will disconnect
    • The Tortuga Audio turtle will then appear and fade to black
    • At this point the preamp is turned off and remains in standby

Encoder: 

  • Press/hold in encoder push button for more than 3 (but not longer than 20) seconds and release

The volume control view is the default control view. Wherever you are in the menu tree, pressing the Menu button will eventually return you to the default volume control view where you will spend 99+% of your time when using the V3.

From the volume control action/view it’s possible to:

  • Raise/lower the volume level
  • Adjust left/right channel balance,
  • Switch between inputs
  • Mute/unmute the volume

This display will show the volume numerically and also with a horizontal volume bar. Channel balance is shown by a number either to the right or left of the volume which indicates the number of  balance adjustment steps right/left of neutral. In the Max only, the upper left corner will indicate the current selected input # plus the input label (“1 Input1” indicates input 1 plus the default unedited label).

LDR3.V25 Passive Preamp with TPB.V1 Tube Preamp Buffer

Raise/lower volume level: 

Volume level can be adjusted up/down using both the Remote and the Encoder.

Remote:

  • Press/release the raise/lower buttons briefly on remote to increase/decrease volume by 1 step per press (buttons are quite responsive so make each press quickly)
  • Press/hold the raise/lower buttons down to cause commands to repeat and ramp the volume setting up/down quickly

Encoder:

  • Turn encoder right/left to adjust volume 1 step per encoder detent
  • The encoder generates 20 steps per full rotation so for a 100 step volume controller the encoder will require 5 full turns to go from 0 to 100% volume
  • It’s possible to turn the encoder faster than the program can respond
  • There are no “stops” to the encoder. It will turn endlessly in either direction

Volume mute/unmute: 

Remote:

  • Press/release the mute button (lower right hand corner/play button) on the remote to toggle the volume mute state.
  • Muting will cause the volume to ramp down smoothly as shown on the display. Once the level reaches zero the display will indicate it’s in the “Mute” state.
  • Unmuting will cause the volume to ramp back up smoothly to its prior setpoint level.

Encoder:

  • Press/release the encoder push button to toggle the volume mute state.

Max vs Mini Muting: 

Please be aware that whereas the Max uses various switches when muted to minimize volume, the Mini does not have any ability to disconnect the audio signal or shunt the signal to ground while muted and so the “muted” volume level for the Mini, especially with the discrete attenuator module, may simply be the same as as the minimum Step 1 volume.

Input switching:

Input switching is now the default control action when using the left/right button as of firmware version 2.2.0. Previously, the default control action was channel balance. You enable this option by going to the "Vol Control" menu item and selecting "Input".

Remote:

  • Use the left/right buttons on the remote to switch to next input.
  • Muting behavior during input switching is determined by the volume ramping options selected in menu item Vol Ramp.

Encoder (Mini): 

  • Control not available

Encoder (Max): 

  • Press/hold in the encoder pushbutton and then turn the knob 1 step to switch to next input, then release the pushbutton.

Channel balance:

When channel balanced is enabled, you can use the left/right buttons on the remote to adjust channel balance from the volume control action/view. You enable this option by going to the "Vol Control" menu item and selecting "Balance".

Remote:

  • Channel balance adjustment was the default control action when using the left/right button. The default was changed to input switching starting with Rev 2.2.0 firmware. This control action can be changed to input switching instead of balance adjustment by going to the “Vol Control” control action/view and selecting Input instead of Balance.
  • Press/release the left/right  buttons briefly on remote to shift channel balance left/right by 1 step per press
  • Press/hold the left/right buttons down to cause commands to repeat  the balance adjustment steps quickly

Encoder (Mini): 

  • Press/hold in the encoder push button while turning to adjust the adjust balance 1 step per encoder detent. Release push button when done adjusting.

Encoder (Max): 

  • Control not available

This menu item is for switching from one input to another. Only the ePot.V3 Max switches inputs. The Mini has no input switching. You can also edit the input label of each input.

There’s quite a bit going on here with input switching so we encourage you to review this info carefully.

  • Inputs can be switched by both remote control and with the encoder.
  • Switching inputs by remote has a fast and slow mode
    • Fast mode – input is switched immediately
    • Slow mode – volume ramps volume down & mutes, then the input is switched, then the volume unmutes and ramps back up
  • Each time you switch an input the volume changes to match the volume last associated with that input when it was selected before
  • In no event will the initial volume during input switching ever start higher than the Vol Max setting.
  • If you select the “Input” option under the submenu “Vol Control”, then you can switch inputs simply by using the Left/Right buttons on the remote while in the default volume control action/view. With that option enabled you don’t have to visit the “Input” menu item discussed here.

Remote control – fast switching mode:

  • Navigate to  the Input menu item
  • Press Center button to enter Input control action/view
  • Use Right/Left buttons to  immediately switch to next higher/lower input number

Remote control – slow switching mode:

  • Navigate to  the Input menu item
  • Press Center button to enter Input control action/view
  • Use the Raise/Lower buttons to tentatively select next higher/lower input – the input will not have switched yet
  • Press Center button to execute switch to new input selection
    • Volume will ramp down to zero
    • At zero volume point the input gets switched
    • Then the volume ramps up again

Encoder – fast switching only: 

  • Press/hold in encoder push-button while simultaneously turning the control knob right or left to switch immediately to the next higher/lower input number.
  • Release encoder push-button when desired input has been selected

Edit input label:

  • While within the Input control, pressing the Mute button on the remote will switch the control to label edit mode for the current input.
  • The default input labeling will be "Input1" and "Input2" etc.
  • While the label edit mode is active....
    • The currently selected label character will be highlighted while the rest of the label characters will be dimmed
    • Use the left/right remote buttons to navigate between the label characters.
    • If you are already at the rightmost character, pressing the right button again on the remote will add a character to the label
    • Press the Mute button to erase the currently selected character
    • Use the raise/lower remote buttons to change the currently highlighted character
    • All edits made are made effective and saved immediately
    • Press the Enter or Menu button on the remote to escape out of label edit mode at any time

Selecting the Balance menu item takes you to the balance adjustment control action/view which allow you to adjust the left/right channel balance.

By default, adjusting channel balance is possible through the default volume control view without having to jump out and navigate to  this menu item. In which case the Balance menu item is redundant and can be ignored.

The Balance menu item is for users who have elected to change the default volume control/view behavior to input switching instead of channel balance adjusting. In which case this where you have to go to adjust channel balance.

  • Balance control is available with the Remote for both the Mini and Max
  • Balance control is also possible with the Encoder but only for the Mini
  • You can adjust the balance up to 20 steps in either direction.
  • Each step represents approximately 0.5-0.6 dB of volume adjustment

The internal balance adjustment logic attempts to maintain a constant volume while balance is adjusted. The way this works is every other balance adjustment step increase actually decreases a step in the opposite channel. For example, a +1 to the right increases the right channel volume +1 step. A +2 to the right increases the right channel +1 step and decreases the left channel -1 step. This mechanism is hidden. All you see is the 2 on the right side of the display (if one is present).

Remote:

  • Navigate to the Balance menu item
  • Press the Center button to select the Balance control action/view
  • Use the Left/Right buttons to adjust channel balance left or right
  • The number of balance  adjustment steps will be shown either to the right or left of the volume level on the display.
  • When the channel balance is neutral, no channel balance values will be shown (i.e. zero “0” values are not shown).

Encoder (Mini only):

  • At any time, press/hold-in the encoder pushbutton while simultaneously turning the encoder left or right
  • The OLED display will show the changes on the display
  • The status LED will blink  quickly 3 times when the channel balance hits neutral (zero).

Display (menu)

Display

The Display control provides for both display brightness adjustment and display timeout adjustment from a single control action/view.

The brightness control allows the user to adjust the display brightness between 1 and 14.

The timeout setting allows the user to set a timeout period in seconds after which the display will turn off. Pressing an key on the remote or turning the encoder will “wake up” the display again. The minimum setting is 5 seconds and the maximum is 120 seconds (2 minutes).

Brightness adjustment:

Remote: 

  • Navigate to  the Display menu item
  • Press Center button to enter Display control action/view
  • Use Raise/Lower buttons to increase/decrease display brightness
  • As you change brightness level the level number itself will actually change brightness while the rest of the info on the display retains the original brightness
  • Press Center button to lock in the new brightness level

Encoder: 

  • Control not available

Timeout adjustment: 

Remote:

  • By default the display timeout feature is disabled (set to off).
  • When enabled, the display will turn itself off when the timeout timer times out.
  • You can adjust the timeout period from 5 to 120 seconds.
  • Navigate to the Display menu item
  • Press Center button to enter Display control action/view
  • Use the Right/Left buttons to increase/decrease the display timeout period
  • When you decrease the period to less than 5 seconds the timeout feature turns off
  • The display shows the timeout period as you adjust it.
  • When the timeout feature is disabled the display shows “Off”

Encoder: 

  • Control not available

The Imped/Cal (impedance/calibration) control allows for adjusting input impedance and initiating calibration of the LDRs; two very interrelated aspects of the V3 design and LDR attenuation.

The topics of adjustable impedance and LDR calibration are outside the scope of this section but you are strongly encouraged to read up on these topics as they are unique to Tortuga Audio and are an essential part of how the V3 functions with LDR attenuation.

Impedance adjustment:

Remote: 

  • Navigate to  the  Imp/Cal menu item
  • Press Center button to enter Imp/Cal control action/view
  • Impedance setting #1 is fixed by default and cannot by changed
  • If the current impedance setting is labeled “Locked” that means it requires calibration
  • Used the Raise/Lower buttons to navigate through the impedance settings. If 2 or more settings have already been established, moving between them will literally switch the impedance of the preamp to the setting/level number shown on the display.
  • An unused impedance setting is labeled “Off”.
  • Use the Right/Left buttons to increase/decrease the impedance level of the current impedance setting
  • Press the Play button on the remote to initiate calibration of the currently selected impedance setting/level.

Encoder:

  • Control not available

About “Locked” Impedance:

  • When an impedance setting/level is marked “LOCKED” it means that setting/level combination has not been through calibration or even if it had been previously it now requires calibration be performed.
  • When the current setting/level is marked “LOCKED” you will not be able to switch to another setting including even the default setting #1. A “LOCKED” setting demands resolution before moving on.
  • There only 2 ways to resolve a “LOCKED” setting.
    • #1 Run calibration
    • #2 Reduce the impedance level to zero which effectively disables that specific impedance setting and allows you to switch to another setting.

Running calibration after a Reset:

  • The reset process  destroys all attenuation tables for all impedance settings including the attenuation table for the default #1 impedance setting.
  • After the reset process is completed, the user MUST put the preamp through 2 cycles of calibration at the default setting #1/20k.
  • Some versions of the firmware may do this automatically but the user should ALWAYS check if the impedance/cal status says ** LOCKED ** which indicates it needs to be run through calibration.

Initiating calibration: 

Remote: 

  • Navigate to the Imp/Cal menu item
  • Press Center button to enter Imp/Cal control action/view
  • Press the Play button on the remote to initiate calibration of the currently selected impedance setting/level.
  • When calibration is initiated the display will change to the calibration status display.
  • When calibration is complete the preamp will return to the volume control action/view.
  • Press the Enter button to interrupt and quit calibration at any time if you don’t wish to wait for the cycle to complete.

Encoder:

  • Control not available

Cal Auto is a feature that allows LDR calibration to be run automatically based on a timer set up by the user.

Automatic calibration will only run when the unit is turned off and never when the unit is turned on and operating. If calibration is running and the user wishes to turn on the preamp, the calibration process will immediately terminate and allow the preamp to be turned on.

The user can adjust the timer based on either the number of hours, days or months between between each calibration run.

Cal Auto is enabled by default and set to auto calibrate once a month.

The #Inputs  (number of inputs) feature allows the user to adjust the total number of inputs that the preamp can switch between. Every V3 Max has input switching installed for 6 inputs even if fewer than 6 are actually connected to the board. Inputs are numbered sequentially 1-6 so if say 3 inputs are allowed via this control then the preamp will only be able to switch between inputs 1, 2 and 3 regardless of how many inputs may actually be connected to the board.

# input adjustment:

Remote: 

  • Navigate to  the #Inputs menu item
  • Press Center button to enter #Inputs control action/view
  • Use  the Raise/Lower buttons to adjust the number of inputs available or desired.
  • If “1 input” is selected then all the input related menus and controls will become disabled and in the case of a menu item will no longer appear in the menu list.

Encoder: 

  • Control is not available

The Vol Ramp feature allows the user to choose between 4 different volume change behaviors when muting the preamp and/or switching inputs. These 4 options are explained below:

Option #1 – No ramp down | Ramps back up (default):

  • Volume will mute immediately. When unmuting, the volume will gently ramp back up to its previous setpoint.

Option #2 – Ramps down | No ramping back up:

  • Volume ramps down smoothly when muting or changing input. Then volume goes immediately back up to previous setpoint.

Option #3 - Ramps both down and up:

  • Volume ramps smoothly both down and up when muting, unmuting or changing input

Option #4 - Ramping disabled:

  • Volume ramping is disabled. Volume goes immediately to zero and back up to previous setpoint when muting, unmuting or changing input.

Remote:

  • Navigate to the Vol Ramp menu item
  • Press the Center button to enter the Vol Ramp control action/view
  • Use the Raise/Lower buttons to select the desired option
  • Press the Center button to lock in the selection and revert back to the default volume control action/view

Encoder:

  • Control not available

The Vol Control feature allows the user to choose between balance adjustment, input switching or a combination input/phase reversal as a secondary control within the default volume control action/view. These 3 options are explained below:

Option #1 – Balance (default):

  • Selecting Balance means that the Right/Left buttons within the volume control action/view will be used to adjust channel balance

Option #2 – Input:

  • Selecting Input means that the Right/Left buttons within the volume control action/view will be used to switch inputs

Option #3 – Input & Phase Reversal:

  • Selecting Input & Phase Reversal means that the Right button within the volume control action/view will be used to switch to the next input
  • The Left button within the volume control action/view will be used to toggle Phase Reversal on the balanced inputs of certain preamps that are especially equipped with the Phase Reversal feature. Unless you know for certain that your preamp has balanced inputs with phase reversal, selecting this option will have no effect.

Changing the Vol Control option:

Remote:

  • Navigate to the Vol Control menu item
  • Press the Center button to enter the Vol Control control action/view
  • Use the Raise/Lower buttons to select the desired option
  • Press the Center button to lock in the selection and revert back to the default volume control action/view

Encoder:

  • Control not available

The Vol Units control allows the user to view the volume level shown in the default volume control action/view as either a step number (default) or in units of dB (decibels) of attenuation.

Changing the volume units:

Remote: 

  • Navigate to  the Vol Units control  menu item
  • Press Center button to enter Vol Units  control action/view
  • Use  the Raise/Lower buttons to toggle between Steps and dB
  • Press Center to lock in volume display units and return to the default volume control action/view.

Encoder:

  • Control not available

The Vol Max control is an equipment protection feature that allows the user to adjust the maximum allowable initial volume associated with any of the following events:

  • When the preamp gets turned on
  • When another input is selected

For example, let’s say the preamp had been set on input #2 when last turned on and the volume had been on step 80 when the preamp was turned off. Let’s also assume that the Vol Max setting is set at 60 (default). When the preamp is next turned on, the preamp will first recover the saved volume setting of 80 associated with input #2 but will reset it to 60 before the actual preamp volume level command is transmitted to the attenuation circuit.

Changing the max allowable initial volume:

Remote:

  • Navigate to  the Vol Max control  menu item
  • Press Center button to enter Vol Max  control action/view
  • Use  the Raise/Lower buttons to adjust the value between 1 and  the maximum step available in your preamp.
  • Setting Vol Max to the maximum volume of your preamp effectively defeats any protection provided by this feature.

Encoder:

  • Control not available

The Vol Mute control in available only in the Max and is only relevant when the Max is also connected to a buffer that has its own muting relay. When enabled, the Max will transmit a mute command to a connected buffer. Muting relays typically connect the output signal to ground effectively killing the output. Some amplifiers do not tolerate this and may hum during grounded muting. This control allows the user to disable the mute command coming from the Max. This is a fairly rare scenario and most users can simply ignore this control.

Remote:

  • Navigate to  the Vol Mute control  menu item
  • Press Center button to enter Vol Mute control action/view
  • Use  the Raise/Lower buttons to select between Enable and Disable
  • Press Enter/Center button to lock in the change

Encoder:

  • Control not available

Version provides information only. There is no control action per se associated with this menu item, only information to view.

To view version info: 

Remote: 

  • Navigate to the Version info menu item
  • Press Center button to access the version info view showing the following information:
    • Model: The model number of the V3 based product
    • Hardware: The hardware version of the V3 controller board
    • Firmware: The version number of the current firmware
    • Imp: For Mini boards this is the fixed impedance of the LDR module currently installed
    • Atten: Indicates whether the installed attenuation module is an “LDR” or a “DIS1” (discrete) type module.
    • SN: Serial number of the board

Encoder:

  • Control not available

Reset allows the user to erase all impedance and calibration data of the currently installed LDR attenuation module in an ePot.V3 Max. Cal Reset is a convenience feature in the event the user wishes to clear out and start over with setting up calibration for an LDR module. Cal Reset is not a panacea or “go to” remedy for resolving problems with your preamp.

After running Cal Reset, you MUST run calibration (twice) to rebuild the attenuation tables for the default #1 impedance setting. 

To run Cal Reset:

Remote: 

  • Navigate to the Reset control menu item
  • Press Center button to access the reset control action/view
  • To initiate Reset press the Right button on the remote 5 times. Note the press count on the display.
  • Once reset is initiated it can’t be stopped.
  • If the unit is turned off or powered down before reset is completed it will resume or start over when next powered up.
  • When reset is completed the controller will revert to the default volume control action/view

Encoder: 

  • Control not available

Remote pairing is a procedure to pair your V3 preamp with a a specific Apple remote. Each Apple remote has an internal ID number between 0 and 255 (256 possible IDs) that it transmits with every command it sends. The ePot.V3 will only respond to commands from the one remote/ID number it is paired with. The pairing process teaches your preamp the ID number of your remote. It will then ignore all other Apple remotes with any of the 255 other ID numbers.

The Apple remote ID numbering scheme allows you to own multiple Apple products each responding to a different Apple remote in order to avoid conflicts. For this to work each product must be deliberately paired with a remote with a unique ID number.

Remote pairing procedure:

  1. First, turn on the preamp
  2. Press/hold in the encoder knob/push-button for 20+ seconds
  3. When the display changes and indicates the unit is in pairing mode, release the encoder. For units without an OLED display, the status LED will begin to blink quickly.
  4. Then press the Center button on the remote. This should complete the pairing process and the preamp should revert to the default volume control action/view. For units with only a status LED, the status LED will stop blinking and remain on.
  5. Repeat the above procedure if the controller still does not respond to the remote
Scroll to Top